Did any of your Windows 10 applications fail to start correctly returning error code 0xc000007b? If yes, then read this article in detail as we have brought seven working ways running which can easily solve this bug on your computer. This problem typically arises due to missing DLL files, compatibility issues, outdated Visual C++ runtime packages, or systems lacking DirectX.
The 0xc000007b error may also start occurring if you have recently upgraded your operating system to its next available build version. Whatever is the exact cause in your case, you may fix this by following these workarounds –
What causes Error Code 0xc000007b
In most cases, Error Code 0xc000007b shows that something has gone wrong with either your Windows files or a DLL file from one of your applications. When you download something from an unauthorized source, you will probably see this error. A similar error message can also occur if the proper redistributables are not installed on your computer.
Error Code 0xc000007b Solutions
To solve the application was unable to start correctly error 0xc000007b, try out the following suggestions –
- Download and Run DirectX
- Correct Application’s compatibility Issues
- Update DLL files
- Modify the registry
- Update .NET Framework
- Reinstall Microsoft Visual C++ runtime packages
- Run CHKDSK
1] Download and Run DirectX
If your system lacks the latest version of DirectX, this may prevent the applications from starting correctly. Here’s how to download and run the DirectX Runtime Web Installer on your computer –
- Go to Microsoft’s official website for DirectX.
- Scroll down to “
DirectX End-User Runtime Web Installer” section and select the language. - After choosing the appropriate language, hit the Download button painted in red color.

- When the download completes, open the folder containing the setup file, and double-click the same.
- Check all the boxes to accept their terms and conditions, and hit the Next button.
- If the web installer prompts to install any search engine (most likely Bing), uncheck the box.
- Click Next > Finish. Lastly, Restart your PC to implement the recent changes.
If the problem persists even after following this method, proceed to the next solution.
2] Correct Application’s compatibility Issues
Many a time, such errors occur just because of compatibility issues of the application. In order to get rid of this, you need to make the software compatible using the below steps –
- Make a right-click on the application that is not starting correctly and hit Properties.
- On the succeeding pop-up window, go to the Compatibility tab.
- Under the compatibility mode, mark the box left of “Run this program in compatibility mode for” and select Windows 8 using the drop-down menu.

- Next, hit Run compatibility troubleshooter.
- The troubleshooter starts looking for any compatibility issues.
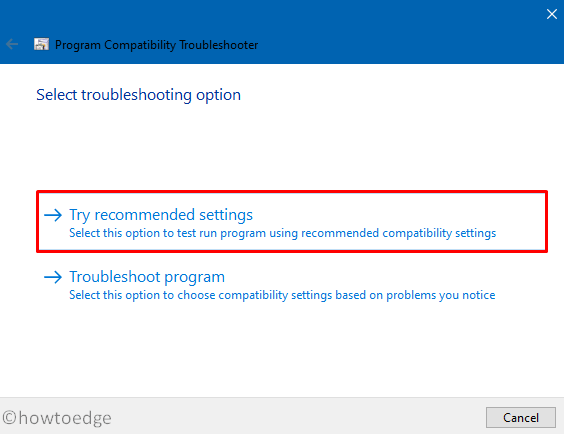
- When prompted, select the Try recommended settings.

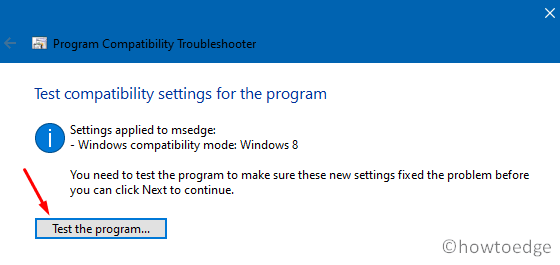
- Subsequently, you may click
Test the programbutton.

- The troubleshooter will try launching the application in the chosen compatibility mode. If the program starts correctly, there may appear the registry console tool asking to make necessary changes.
You may now close the troubleshooting window and reboot your device. From the next logon, the application should work fine. If not, follow the next workaround.
3] Update DLL files to Fix Error 0xc000007b
Several users reported that they simply solve this error simply by downloading a xinput1_3.dll file and placing it in the required folder. To confirm if this indeed is the case or not, go to the path – C:\Windows\SysWOW64, and look for this DLL file. In case you didn’t find such a file, you may get this file from an official site.
- Look for the latest DLL version and your existing system architecture.
- Once you are confirmed about these two things, hit the download button.

- Normally you will get a zip folder containing the xinput1_3.dll file.
- Open the folder containing the setup file, right-click over it and choose the option – Extract here.
- Now, go to the newly created folder, copy/paste the xinput1_3.dll file inside C:\Windows\SysWOW64.
Lastly, Restart your PC to implement the above changes.
4] Modify the registry
In certain scenarios, modifying the registry may also fix the 0xc000007b trouble on your computer. Here’s how to perform this task –
- Press WinKey +R.
- When the Run command opens up, type
regeditand press Enter. - Subsequently, navigate to the path –
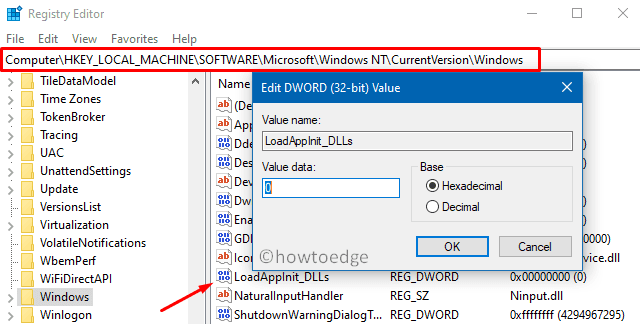
HKEY_LOCAL_MACHINE\SOFTWARE\Microsoft\Windows NT\CurrentVersion\Windows
- Jump to the right pane and double-click over the file –
LoadAppInit_Dll.

- Put “0” instead of its by-default value i.e. “1” and hit OK.
- At last, close the registry and restart Windows.
5] Fix 0xc000007b by updating .NET Frameworks
If you haven’t updated .NET Frameworks for a long time, make sure to upgrade this to its latest build version. To do so, use these steps –
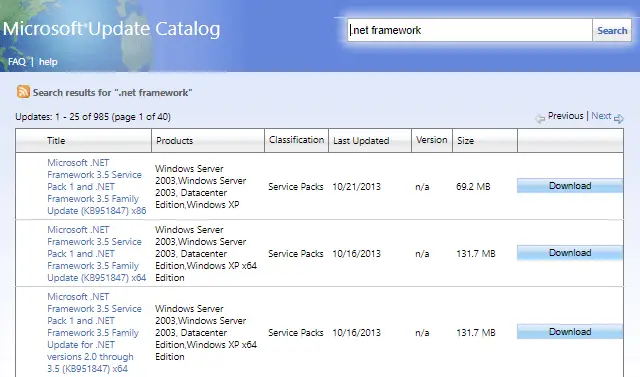
- Visit the Update Catalog Site.
- Type .NET Framework in the search field and press Enter.
- Select the latest cumulative updates for the .NET frameworks based on your system architecture.
- Hit the Download button available at the rightest corner.

- Click the top link to start downloading the chosen .NET Framework.
- When the download completes, open the folder containing this file, and double-click over the setup.
- Now, follow the on-screen instructions to complete the remaining process.
6] Reinstall Microsoft Visual C++ runtime packages
If none of the above fixes work to solve the 0xc000007b error, reinstalling Microsoft Visual C++ runtime packages may fix this issue. The presence of Visual C++ runtime packages ensures that the installed programs run normally. As usual, you will find these packages available for both system architectures i.e. 32-bit, 64-bit, or ARM64 PCs.
Just go to the supported site and download/install the runtime packages. When the download finishes, open the folder containing this file and double-click over this.
7] Run CHKDSK
You may want to try running the CHKDSK command if none of the solutions you’ve tried above work. When you run this program, it will scan your computer’s hard drive and repair problems if they are found. To run CHKDSK, follow these steps:
- Run the Command Prompt as an administrator
- Then type the following and press Enter:
chkdsk /f /r
- After the next restart of the computer, you will be asked if you would like the scan to be scheduled.
- If you would like to confirm, simply enter Y and press the Enter key.
- Now restart the computer.
- CHKDSK will run automatically when the computer starts up and scan your computer’s Hard Drive. All you have to do is wait patiently while the process runs.
The 0xc000007b error seems to have been resolved with this article, and applications should now start without any errors.


