Whenever you try to launch an internal program, the UAC prompt appears on a Dimmed Secure Desktop asking for consent. Guest users may have to enter credentials like usernames and passwords to start programs with administrative privileges. The prompt appears only to stop malicious software from entering your computer system.
The default setting for this setting is enabled, but these settings can be altered with a few simple workarounds. On this page, we will discuss three different methods by which you can activate or deactivate Dimmed secure desktop on Windows 10 devices using UAC settings, Local Security Policies, and Registry tweaks.

What is Dimmed Security Desktop UAC Prompt?
Dimmed Security Desktop UAC Prompt serves as an additional layer of security to keep users from installing infected software or accessing internal apps. A user in the Administrators group can perform almost all functions on his or her computer. The only thing you need to do is tap Yes or No when the UAC prompt appears. Generally speaking, this prompt is referred to as an elevation prompt for the UAC consent prompt.
In order to change internal apps or install new programs, every other user (if any) will need to enter a valid username and password. These users have to fill out the UAC credential prompt instead of the one described above.
Note: To change user account control settings, you must sign in as an administrator. By turning off UAC, other apps (especially viruses) may interfere with the dialog box’s visual appearance. There is a security risk here, so proceed only if you have a good antivirus installed.
Turn On or Off Dimmed Secure Desktop for UAC prompt
Here, we are going to explain three different ways to enable or disable Dimmed Secure Desktop for the UAC prompt:
1. Using UAC Settings
You can adjust UAC settings inside Control Panel to turn on or off a dimmed secure Desktop. Here are the steps –
- Open the Control Panel first. To do this, click Start Menu and type control panel. Select the top result.
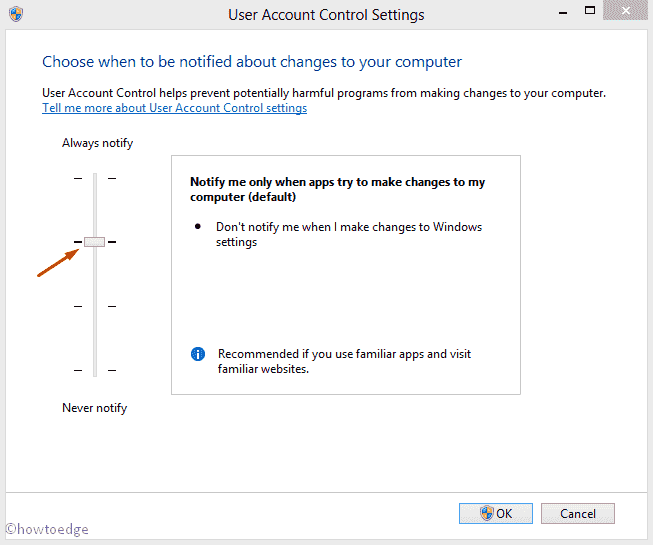
- Next, navigate to User Accounts > Change User Account Control Settings option.

In the next window, there are four options available. They are –
- Always Notify
- Notify me only when apps try to make changes to my computer
- Notify me only when apps try to make changes to my computer (don’t dim my desktop)
- Never Notify

Note: The first two options are there to turn on Secure Desktop whereas the rest two are to turn off this feature.
- Select as per your choice (enable or disable) then click OK to save the changes.
2. Through Local Security Policy
In case, the previous method doesn’t work on your PC (rare cases), you may use the Local Security Policy to do the same. Here is the procedure-
- First of all, press the Windows & R hotkey together to open the run dialog.
- Here, type secpol.msc and press the Enter key to open Local Security Policy.

- In case of UAC prompt appears up, tap Yes to allow access.
- On the next window, expand Local Policies followed by Security options on the left column.
- Switch to the right pane and double-click on “Account Control: Switch to the secure desktop with prompting for elevation”.

- This will open up a new window (See snapshot), here select Enabled or Disabled as per your choice.

At last, tap OK then restart your system so that changes come into effect.
Note: This method will work only on Windows 10 Pro, Education, and Enterprise versions. The below section applies to all Windows users.
3. Using Registry Tweaks
Windows 10 Home users can turn on or off dimmed Secure desktop for UAC using registry tweaks. Here are the steps to follow-
- Right-click on the Start Menu and choose the Run option.
- In the Run dialog, type regedit then hit Enter to open Registry Editor.
- If a UAC prompt pops up, tap Yes to permit access.
- Navigate to the following path-
HKEY_LOCAL_MACHINE\SOFTWARE\Microsoft\Windows\CurrentVersion\Policies\System

- On the right pane, locate the entry with the name PromptOnSecureDesktop.
In the absence of such a record, you can create it yourself. You just need to right-click the blank area and then select Create a 32-bit DWORD.
To disable the Secure Desktop feature, put the above name in the value name field and ‘0’ in the value data. When you want to enable UAC, double click on this entry, and in the Value data field, enter ‘1’ instead of ‘0’.
Closing words
Here, we explain three different ways to enable or disable the dimmed Secure Desktop feature for the UAC prompt on Windows 10 PC. They are UAC settings, Local Security Policy adjustment, and applying registry tweaks. We hope you are now able to apply this to your System as well.