“Wife connected but No Internet Access” is quite a confusing and annoying error as the WiFi displays the full bars yet no surfing over the internet. Well, this is not a new bug as this occurs every now and then. Moreover, there is not a single solution that you can apply and get over this issue.
You may experience no internet access issue even though connected to WiFi on account of mainly two issues – Router/Modem Problems or the Windows 10 itself. There are some easy troubleshooting methods like Restarting your device, resetting Router and Modem, Forgetting WiFi then re-connect. Mostly, the issue gets resolved following these three workarounds. In case this bug still exists, you may follow the advanced tweaks –

Read Also: Fix Wi-Fi connectivity issues while on Windows 10
WiFi connected but No Internet Access Solutions
Go through the below list of solutions to fix No Internet issues while connected to a Wi-Fi network in Windows 11 or 10 PC –
1] Reboot your Device
The first step to troubleshoot network issues on a computer is to restart your computer. There may lie some minor bugs preventing your PC to attain good network connectivity. So, just reboot your device and check if this helps to address “No internet issues while being connected to a WiFi”.
Sometimes, you may experience network issues simply because you’re connected to an external WiFi displaying a similar name to that of your router. Hence, before proceeding to the solutions below, do check the network name with which you’re trying to connect to.
2] Reset your Modem and Router
From the next logon, check if only your computer is not able to connect to the Internet or all the devices connected to the same source. If you find network issues on all of the connected devices, the problem lies within the Modem or Router itself.
To resolve this problem, you must reboot both i.e. Modem and Router. Doing so will clear any stored cache. When these devices restart, all of the available lights must turn on. Even if a single light doesn’t blink, this signifies a hardware failure. You may reset the not-working device simply by following the instructions provided in the manual.
3] Forget WiFi then Re-connect to Fix No Internet Access
Many a time, this simple trick works like a charm. All you require is to right-click on the Wi-Fi name that you are currently connected to and click Forget. Restart your PC and when this turns back on, try connecting to the network using proper credentials.
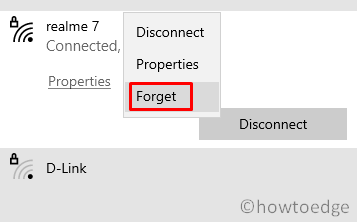
In the case of using a public hotspot, this becomes a necessity as the WiFi credentials get updated quite often. There are chances that you are using an old password resulting in the “Connected to WiFi but No Internet Access” error.
This method becomes a necessity when you are on a public hotspot and your device still uses the old password.
4] Reset IP addresses
An incorrect IP address configuration may also cause such network connectivity issues. If that’s the case, reset IP addresses using the below steps –
You may face network connectivity issues mostly if the IP address is not configured properly. In that case, resetting IP addresses in the command prompt should help. Here is how to do it.
- Hit the Start Menu and type “command prompt” on the text bar.
- Right-click on the top result and select “Run as Administrator“.
- When the UAC window prompts, tap Yes.
- Next, run the following codes one after another. Make sure to press the Enter key at the end of each code.
ipconfig/flushdns
nbtstat -R
nbtstat -RR
Netsh int ip reset c:\resetlog.txt
Netsh winsock reset
- Type exit on the console and press Enter to close the Command Prompt.
- Restart your PC and when it reloads, open Control Panel and reach out to the following path –
Control Panel > Network & Internet > Network and Sharing Center
- Select “Change adapter settings on the left pane“.
- On the upcoming window, select the WiFi adapter and choose to “disable this network device“.

- Wait for a few minutes then re-activate this by clicking “enable this network device”.
5] Reset or Modify DNS
A corrupted DNS server will also cause the No network Issues no matter how strong your WiFi signal is. So, it is essential to reset DNS from time to time. Sometimes, simply clearing the DNS cache may also solve such problems on your device.
How to reset DNS
- Open the Run dialog by pressing the Windows key and R.
- Type “cmd“, and press “Ctrl+Shift+Enter” altogether to enter the prompt area.
- If there appears a UAC window, tap Yes to go forward.
- Next, run these codes one after another followed by the Enter key –
ipconfig/release
ipconfig/renew
- Lastly, come out of the command prompt and Reboot your PC.
How to clear DNS cache
The DNS creates a log of all the websites that you ever visited on your computer. This log contains all information in the form of caches. The stored cache boosts the page load time whenever you visit a previously opened website again. However, when huge data are stored inside, this may start causing minor network glitches on your device.
- Open the Command Prompt having administrative privileges.
- Run the below two codes to know your IP address and flush the existing DNS –
ipconfig/flushdns
Obtain DNS Automatically
There are chances that you remain connected to a router with full bars and still have no internet access. Such a situation arises merely due to your router not recognizing the public IP address set by you. If that’s the case, try setting your device to obtain an IP address automatically. Here are the essential steps to work upon –
- First of all, reach out to the address –
Win + I > Network & Internet > Status > Change Adapter options

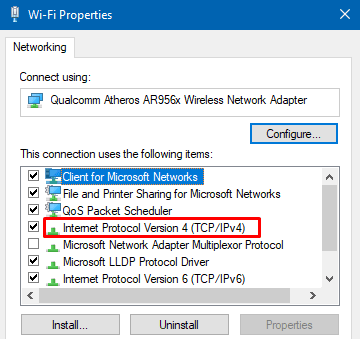
- Right-click on the WiFi (currently in use) and select Properties.
- Double-click the Internet Protocol Version 4((TCP/IPv4) on the upcoming screen.
- Enable the “Obtain an IP address automatically” instead of the “Use the following address” option.
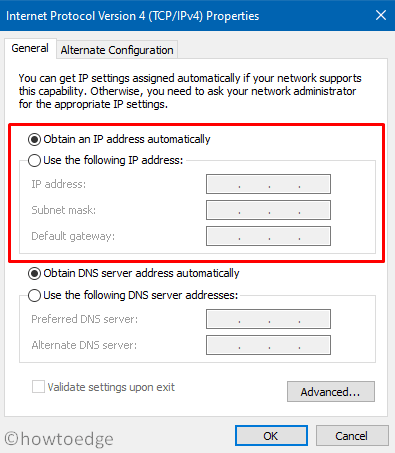
- Lastly, hit OK to confirm the above changes and Restart Windows.
Try the Google Public DNS instead
At times, your specific DNS server may fail to function properly. If that’s the case, try using the Public DNS by Google instead of using the normal ones. All you require is to make the following changes –
- Open the Power Menu by right-clicking on the Windows icon.
- Select
Network Connections > Change Adapter Settings.

- The system will then redirect you to the connected network on the Control Panel.
- Right-click on your WiFi connection and select Properties on the drop-down menu.
- On the WiFi Properties window, double-click the Internet Protocol Version 4((TCP/IPv4).
- Check the radio button left of “Use the following DNS server addresses” and fill in the following data –
Preferred DNS server option: Use 8.8.8.8.
Alternate DNS server: Use 8.8.4.4.
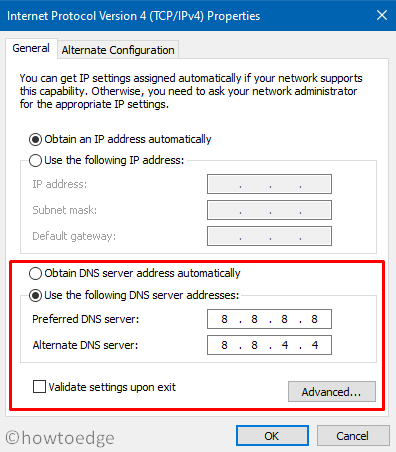
- Finally, click OK and Reboot your PC to implement the above settings.
6] Reset Winsock to Fix WiFi Connected But No Internet
Resetting Winsock is another interesting solution following which one can solve network connectivity issues. If you don’t know how to proceed, follow these steps –
- Launch the Command Prompt having Admin rights.
- On the elevated console, run these codes one after another –
netsh winsock reset
netsh int ip reset
- Executing the above two command lines will reset Winsock as well as IP.
- Come out of the prompt area and Restart your computer.
Sign back into your device and check if you still experience network issues on your computer or have been solved.
7] Update Network Adapters
The presence of an outdated network adapter may also cause no internet issues on the computer. To fix this, you must update the existing network drivers to their latest version using the below steps –
- Make a right-click on the Windows icon and select Run.
- Type
devmgmt.mscin the text field and press Enter to launch the Device Manager. - Click the “>” sign to expand drivers under the Network Adapters.
- Now, right-click on each one of the available drivers and select Update driver.

- When the system prompts to select between manual and automatic options, select the latter option.
- That’s it, your PC will automatically search for any available updates online. And if available, this will download and install the same.
- Once this is over, Restart Windows to incorporate the above changes.
8] Reset Network
If none of the above solutions work to provide a resolution to the network issues, you may use the Network reset option. Basically, this option is readily available inside Windows 10 OS and is able to resolve any WiFi-related issues on the computer.
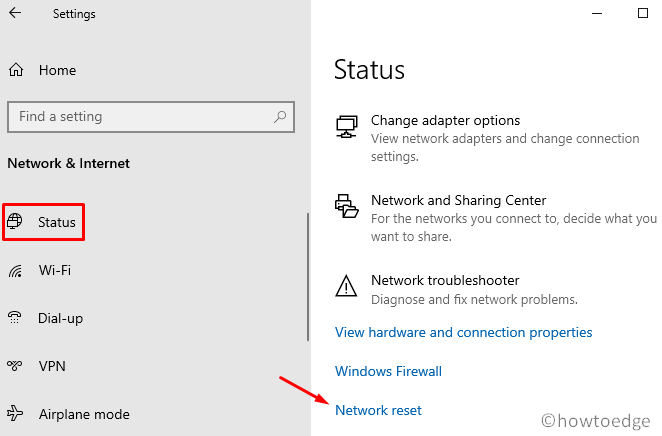
- Navigate to the address below –
Settings > Network & Internet > Status
- Scroll down and click Network reset on the right pane.
- Subsequently, hit Reset now button.
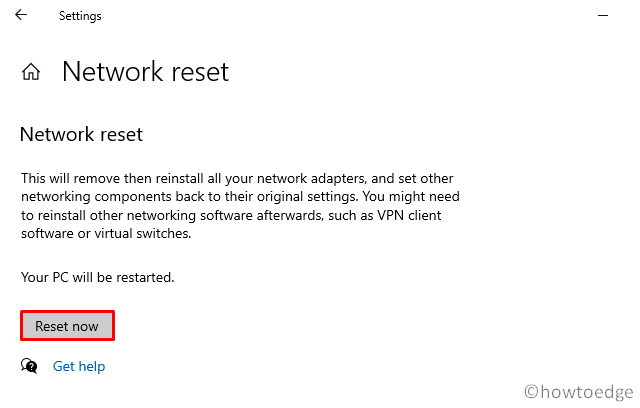
- Your computer will remove and then reinstall all of the network adapters. Meanwhile, this will also reset other networking components to their default settings.
| Tip: Since your device will restart a few times, make sure to save all ongoing processes on the computer. |
How to add a new Wi-Fi network in Windows 11?
To add a new Wi-Fi network in Windows 11, go to Settings > Network & internet > Wi-Fi > Manage known devices. Click Add network, provide the network name, the security type, the network security passkey, and hit Save.
That’s it, you are connected to the chosen network in Windows 11.
Read Next:


