Did you face Connect to Network Share issue recently on your System? If yes, then we have brought an effective solution for this trouble. A system connected to Network on HDD or NAS enhances the overall efficiency of the computer.
This allows several PCs to work under the same Network which is quite good if you are a part of a big organization. Once connected to the Network, you can easily transfer files and folders from one system to another. Let’s learn how to connect your System to a Network Share-
Connect to a network share in Windows 10
Here’s the complete step walk-through on how to connect to a network share in Windows 10 PC.
Step-1: Go to the System tray and click on the File Explorer icon. Alternatively, you can press Win + E hotkey together to launch the same.
Step-2: Navigate to This PC option on the left column.
Step-3: Switch to the ribbon control strip (top of the screen) and tap on the Computer tab.
Step-4: Click on the drop-down button in Map Network drive and choose the same option (See snapshot).

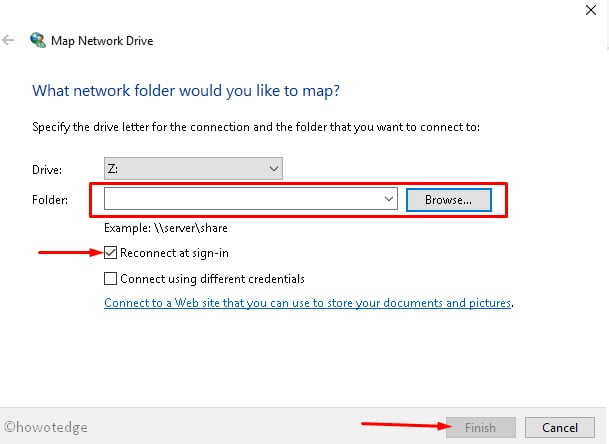
Step-5: On the pop-up window, select the Drive followed by the Browse link to specify the folder which will be used for Network Share.

Note: Do remember the Network address as well as Folder’s name which you used to connect to a Share Network.
Step-6: After that type valid User Name and Password under Windows Security dialog then tap OK to go back.
Step-7: Again under the “Map Network Drive” window, you will see two checkboxes to select. If you are confused at this point, you can follow the little description written below-
- Select Reconnect at the Sign-in checkbox to ensure you don’t want to sign in every time to manually reconnect to the Network share.
- In case the Network Drive is password-protected, disable the “Connect using Different credential” checkbox. This will ensure that you can set other usernames and passwords as well to log in on Network Drive.
Step-8: At last, mark the Reconnect at Sign-in checkbox and click Finish to save the changes.
Step-9: Henceforth if you hit This PC option in File Explorer, you can find the created drive under Network Location. This is now ready to access the file using the share path or connected drive.
A new drive letter under This PC will be available that can be accessed like any other folder. Moreover, if you want to disconnect the network drive, right-click on it and select the Disconnect option.
If you have any concerns related to this article, do ask us in the comment box.


