In this guide, we will discuss how one can create Windows 11 Bootable USB Drive using Rufus provided s/he already has its ISO image. Even in cases where you don’t own such a file, Rufus (third-party) provides an option to download this by connecting to Microsoft’s servers.
Rufus is a very lightweight app that does the job right. This tool works similar to that of the Media Creation providing users, even more, better options. The best thing about using Rufus is that you can even download older versions of Windows using it. This even supports installing Windows 11 OS on unsupported hardware (unique of its kind).

Create Windows 11 Bootable USB Drive using Rufus
To create a bootable USB drive of Windows 11 using Rufus, follow these easy steps –
1] Download Windows 11 ISO Image
If you already have Windows 11 ISO image, you may skip this section, and follow the next one. Before you may proceed ahead, make sure that you have a USB flash drive having at least 8 GB of free space. Assuming you already have one, apply the steps as guided below –
- Visit Rufus’ official webpage and download its current version.
- We suggest downloading the portable file as this doesn’t require any installation.
- Now that you have Rufus, double-click on it to launch its interface.
- The user account control window will appear next, hit Yes.
- When the Rufus update policy window comes up, click “Yes”. In case you click No, Rufus won’t provide any option to download the Windows ISO image online.

- At the bottom, you may find Rufus’ settings option. Well, click on it (second icon from the right). See the Snapshot below. Inside its settings window, use the dropdown menu next to “check for updates,” and then choose “Daily (Default)” from the selection.

- Close the policy settings window, and hit Close again.
After making the above changes to its settings window, reopen Rufus.
- This time, select the device that you want to make bootable. Go with a USB flash drive option as this way is pretty fast.
- Using the drop-down menu next to Boot Selection, select Download.
- Click over this Download button again.
- Select “Windows 11” from the drop-down menu and hit Continue.
- Choose the Windows 11 Release version as shown below. The release number may vary depending upon the latest Windows 11 build updates.
- Click Continue and select Edition, Language, and Architecture proceeding in a similar way.

- Finally, click Download to begin downloading the chosen Windows 11 release number.
- You may check the box “Download using a browser” if you want to download the ISO file using your default web browser.
Wait for the time the download completes and henceforth follow the below section.
How to download and clean install Windows 10 21H2
2] Create a bootable media using Windows 11 ISO file
If you had followed the above steps or you already have a Windows ISO image, use these steps to make it bootable using Rufus –
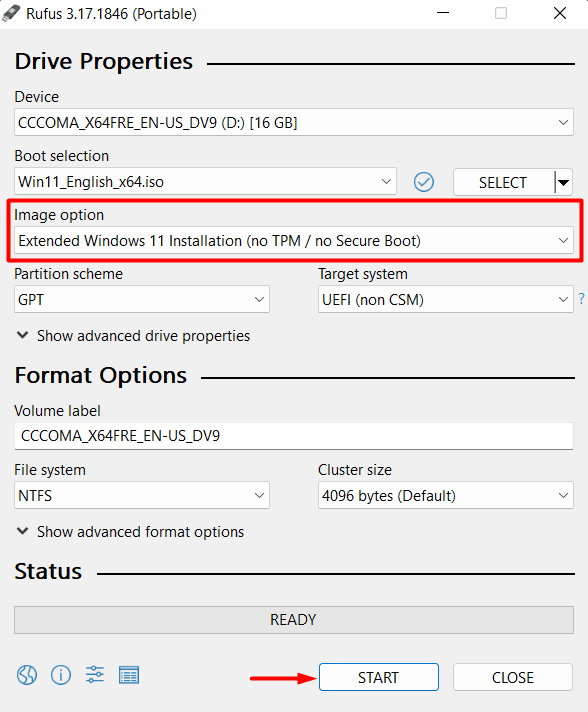
- Launch Rufus and this time click the Select button and browse to the location where you have the ISO image.
- Select “Standard Windows 11 Installation (TPM 2.0, Secure Boot)” using the drop-down menu next to the “Image option”.
Note: If you don’t have TPM 2.0 or Secure boot features on your PC, go for the below option instead.
Extended Windows 11 Installation (no TPM 2.0, no Secure Boot)
Proceeding this way facilitates the creation of a USB flash drive that meets the system’s requirements.
- Under the Partition scheme, select GPT and UEFI (non-CSM) besides the “Target System”.
- Click Start next to begin creating Windows 11 bootable media.

How can I install Windows 11 on unsupported hardware?
As we all know, Microsoft is not allowing installing Windows 11 on unsupported hardware. Yet, there is a way by which you can tweak the compatibility settings so that you can install the new OS on even unsupported hardware.
To do so, all you require is to perform exactly as stated in the previous section with a minor change. When opting for the “Image option”, go for “Extended Windows 11 Installation (no TPM 2.0, no Secure Boot)” in place of the default option. The pre-selected option is “Standard Windows 11 Installation (TPM 2.0, Secure Boot)”.

Doing so will create a bootable media of Windows 11 that you may use to install the new OS on your unsupported PC.


