Snap Layouts is the most exciting feature included on the upcoming Windows 11 OS. Using this, you no longer need to adjust the window size while doing multitasks. Rather, hover the mouse pointer to the maximize button and choose a pre-defined layout. The chosen window will adjust to the confined area.
Though its a great feature, there will be some users who simply want to avoid unnecessary confusion. If you are one such user, this post will help you to disable Snap Layouts in Windows 11.
- Turn Off Snap Layouts in Windows 11
- Re-enable Snap Flyout for Maximize button
- Turn On or Off Snap Layouts via the registry
- Disable Whole Snap windows using the registry
Configure Snap Layouts in Windows 11
Here’s how to modify Snap Layouts for Maximize button in Windows 11 –
1] Disable Snap Layouts in Windows 11
By default, this feature is enabled on new Windows Operating System. This helps you to confine a running window to a pre-allotted space. However, if you didn’t like the Snap concept and want to turn off this, do the following –
- Open Settings app by pressing Win logo & I.
- Expand System then Multitasking on the left column.
- Under the Work with multiple windows section, uncheck the box left of – “Show snap layouts when I hover over a window’s maximize button“.

- That’s it, the Snap Layout gets disabled immediately afterward. You can check this by pointing your Mouse to the Maximize button.
2] Re-enable Snap Flyout for Maximize button
In case you want to re-activate this feature on your PC, use these steps –
- Press Win and X and select Settings from Power Menu.
- Go to System then Multitasking.
- Mark the checkbox that you had disabled previously i.e. – “Show snap layouts when I hover over window’s maximize button“.
- Hover your mouse to the maximize button and you will find the Snap Layouts re-enabled.
3] Turn On or Off Snap Layouts via the registry
Though you can enable or disable Snap flyout direct on the Settings page, you may do the same by modifying the registry as well. In case you are interested in doing so using the registry, follow the below guideline –
- First of all, open Registry Editor. To do so, press Win + R, type regedit, and press Enter.
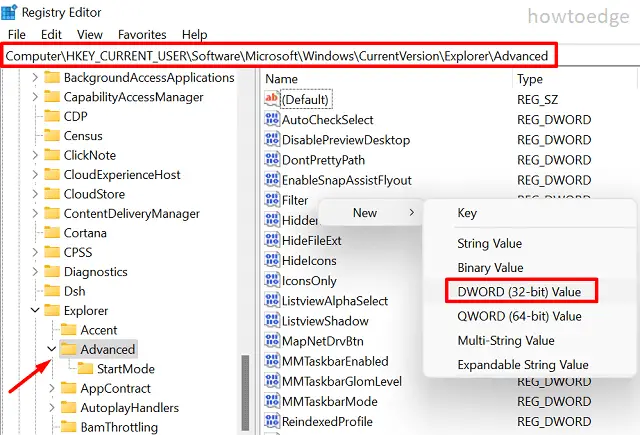
- On the registry, navigate to the following –
HKEY_CURRENT_USER\Software\Microsoft\Windows\CurrentVersion\Explorer\Advanced
- On the right pane, locate a key entry named “EnableSnapAssistFlyout“.
- If you didn’t find such an entry, right-click anywhere and select New > DWORD (32-bit).

- Rename this newly created key to “EnableSnapAssistFlyout“.
- Double-click over this key and put “0” or “1” inside the Value Data Field. The digits implies the following –
0 – Disable
1 – Enable
- Restart your PC and the Snap Flyout gets modified as per your chosen configuration.
4] Disable Whole Snap windows using the Registry
In case you want to disable the whole Snap windows, modify the “WindowArrangementActive” string. This is basically a REG_SZ entry and responsible for following operations on Windows OS.

Here’s how to proceed –
- At first, browse to the below location on the registry editor.
HKEY_CURRENT_USER\Control Panel\Desktop
- After locating this file, right-click on it, and hit Properties. Type “0” to disable Snap Flyout for Maximize button in Windows 11. To re-enable this feature on your device, type “1” instead and hit OK.

That’s it, I hope you find this article useful and easy to follow upon. In case you have any queries or suggestions, let us know in the comment section.
Read next:


