Microsoft releases Windows 11 23H2 Multi edition ISO on 31st October 2023. In this article, we have discussed how to download its ISO file and later clean install Windows 11 23H2 on your PC.
There are three official and one third-party way to get your hands on the new operating system. They include using Windows Update (local settings), Windows Assistant, and Media Creation Tool. I personally prefer downloading its official ISO image, making it bootable using Rufus and then proceeding ahead with its clean installation on my laptop or desktop.
Why Clean Install Windows is a preferred choice?
Do note that Windows 11 23h2 is merely a cumulative update (the enablement package), and you may upgrade to this version directly from Windows Update.
The real problem with this is that your system might run into some compatibility issues because of the existing and new applications. That’s the reason why I prefer installing the new operating system afresh on my computer.
How to Get Windows 11 23H2 ISO Image
The official ISO image of Windows 11 23H2 is available on Microsoft’s Software Download Page. You may visit this page, and then download Windows 11 Disk Image from there. You must choose your preferred language and system architecture.
Alternatively, you may get the US-English-based ISO image from here.
Note: How to Create Windows 11 Bootable USB Drive using Rufus
How to make Windows 11 23h2 ISO file bootable
Assuming you did download the ISO image of Windows 11 23H2 from Microsoft’s official site, visit Rufus, and download its portable tool. The downloaded tool will help you make the ISO file bootable and then clean install Windows into your PC.
Warning: As you are performing a clean installation of Windows on your computer, all your personal files and data will be lost from your device. We suggest you keep a backup of all your important files and folders so that you may add them later to your computer again.
Important: The steps discussed below are to clean install Windows 11 version 23h2 as soon as the official ISO becomes available for the general public. If you don’t have the same, we suggest waiting till then.
- Double-click on Rufus’s icon to start the application.
- When this opens up, plug in a USB Flash drive, and the same will appear under Device.
- Click the Select button next to Boot Selection, and choose the downloaded ISO image.
- Make sure to keep the Image option selected to “Standard Windows 11 Installation (TPM 2.0 + Secure Boot).”

- Since Windows 11 is compatible with the UEFI system, select GPT as your partition scheme, and UEFI (non-CSM) under “Target system.”
- Use the drop-down menu next to the File system and select NTFS.
- You may now click on Start to start converting the ISO image into a bootable file.
- Wait for this process to complete and when this is over, you have the Windows 11 23h2 bootable image on your inserted USB Flash Drive.
Clean Install Windows 11 23H2
Now that you have created the bootable image of Windows 11 23h2, follow the below steps on how to fresh install this new operating system on your PC.
- Insert the bootable USB flash drive in one of your device’s ports and restart your computer.
- When your device is rebooting, hold and press the boot key. This way, you will get the boot options.
- Use the arrow keys to come down and select your flash drive.
- Windows Setup will appear next on the display screen. Well, click Next.
- Click Install now next and you will see an option to activate Windows.

- Select I don’t have a product key as you may activate Windows after installing as well.
- Select the Windows Edition of which you have the license to install.
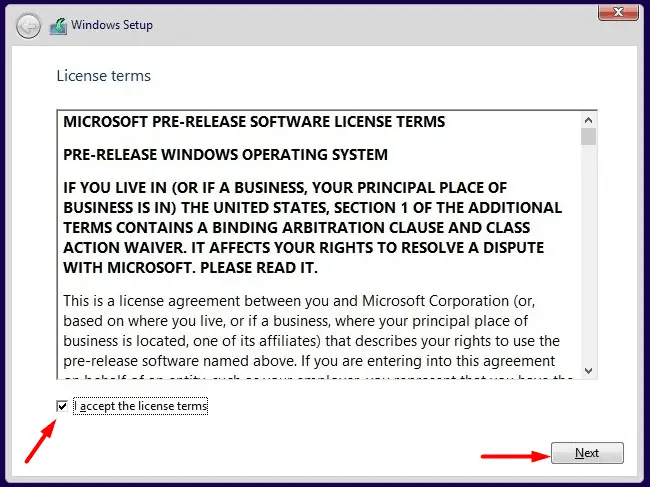
- Succeeding after, select the “I accept the license terms” option, and hit Next again.
- On the “Which type of installation do you want?” screen, select Custom. You may choose the Upgrade option also, however, this will not install Windows 11 23h2 afresh on your computer.
- Select the partition on which you would like to install Windows 11 23h2, and hit Format. Do note that this will delete all the available data on the selected drive.
Note: Though you may install Windows on any one of the existing drives, we recommend installing the new version on the previous root drive. Or, else you will end up with two operating systems on the same PC.
- After the partition is formatted successfully, click Next.
- Wait for a few minutes, and your device will boot into the Out-of-the-box experience (OOBE) screen.
What to do on the OOBE Screen?
The Out-of-the-box experience is self-explanatory, and all you require is to adjust the settings that you would like to see on your computer. I have explained the required steps briefly, however, you may change them as you like.
- On the OOBE screen, select your Country/Region first and then hit Yes.

- This will next prompt you to select your default Keyboard Layout. Select the default keyboard layout, and click Yes again to proceed ahead.
Tip: There’s an option to change the Keyboard Layout as well when the OS is successfully installed.

- If you want to add a second layout, do so. Or, simply click Skip to let go of adding a secondary keyboard layout to your PC.
- In case you are using an ethernet connection, your device will fetch the required details and automatically connect to that. However, if you have a WiFi network, you should connect to the same using the right credentials.
- Next, provide the name of the installed OS that you would like to see when opening the Settings app.
- Click Next, and select the “Set up for personal use” option on the succeeding screen. If you have installed a Home edition, you will not find this option on your computer.
- Click Next and then sign in with a Microsoft account. For this, you may use either your official Microsoft account, a phone number, or your Skype identification.
- Wait for a few seconds while Microsoft fetches your account or creates a new one.
- Click Next and then sign in to your Microsoft account using the correct password. In case you are signing up for a Microsoft account, you must set up a password to use your computer.
Setting up your Windows 11 23h2 device
- These days, Microsoft supports restoring settings from your older device. However, as you are trying to clean install Windows, you better skip it and select the “Set up a new device” option instead.
- Click Next and set up a four-digit PIN to open Windows 11 version 23h2 on your computer.
- The privacy settings will appear next. If you are willing to turn On your location, you may do so by enabling the toggle switch next to Location. Additionally, you may also enable “Find my device” underneath the Location option.
- Click Next and Next again, and then Accept to confirm using Windows 11 23h2 as the manufacturer wants you to.
- If you want, you may restrict Microsoft from sending diagnostic data under the Tailored Experiences and even consent to apps using your Advertising ID.
- Microsoft will next prompt customizing your PC. Well, select all the ways you plan to use your device, and click on the Accept button. If you don’t want to select any option, you may skip this section as well by clicking on the Skip button.
- In the end, you will be offered to back up all your files with OneDrive. Click Next to proceed ahead, or click “Save files to this PC” to let go of this feature on Windows 11.
- Click Next again and decline to use Microsoft 365 apps.
- If you see the Game Pass Subscription module, click Skip for now.
That’s it, wait for a few seconds and you will see a message stating “We are setting up your PC for the first time use”, and a Welcome note.
Now that you have successfully installed Windows 11 23h2 on your computer; browse through its Settings, and other sections, and check if this appears great as per your expectations.