Windows 11, nowadays, provides numerous options to sign into its operating system. These are using Windows Hello PIN, Facial recognition, Fingerprint recognition, and several others. However, many of us still like using the 4-digit PIN to access the contents inside our devices. If you are facing trouble accessing your PIN on some error code 0x80090027, go through the below list of suggestions and check if they resolve this issue in real time.

What causes hello PIN to fail on an error 0x80090027?
Just like any other error code on Windows 11/10, hello PIN is also one of its kind and it primarily occurs when you are either editing or changing the first-time PIN. Most of the time, this is not even an error and resolves immediately afterward you restart your computer. So, make sure to reboot your device once and check if the problem resolves this way.
Using outdated PINs, installing buggy updates, and disabling TPM, are a few other reasons that might cause Windows Hello PIN to fail on some error code. Let’s see what these issues hold and how can you resolve them on Windows 11.
Windows 11 PIN Isn’t Available Error 0x80090027, Fixed
If you are struggling to either get past the lock screen, modify your 4-digit PIN on Windows, or remove it from your computer, attempt the below fixes one after another. Just make sure to follow these solutions in the same order as they were put in –
- Reset your PIN
- Boot into Safe Mode first
- Enable Trusted Module Platform (TPM)
- Manually Remove Your PIN and then Set it up
- Use System Restore Point
- Reset Windows PC
1. Reset your PIN
Resetting your PIN is the most effective way to resolve the “PIN isn’t available” issue on your computer. Windows 11 lets you perform this task directly on the lock screen. However, for this to happen, your device must remain connected to an active internet. Follow the below instructions
- While remaining on the lock screen, click I forgot my PIN.
- Provide your Microsoft account id on the succeeding overlay window.
- You will receive a 6-digit code on your registered email id for verifying your account.
- Well, use that to verify your account and hit the Continue button.
- Moving forward, set up a new PIN on your computer and hit OK.
You may now use this newly created hello PIN to sign into your Windows PC.
2. Boot into Safe Mode first
If you are still not able to use your PIN, and you can’t get past the lock screen as well, you must boot into Safe Mode. This is a fail-safe mode on Windows that lets you introspect third-party apps and their interactions with your device. After entering this mode, you may check for different apps, and analyze if the error 0x80090027 is indeed appearing due to a faulty application or some buggy updates. Here’s how you boot into Safe Mode on Windows 11 –
- Power On and Off your device 2-3 times using the power button.
- Doing so will let you enter the Advanced Startup options.

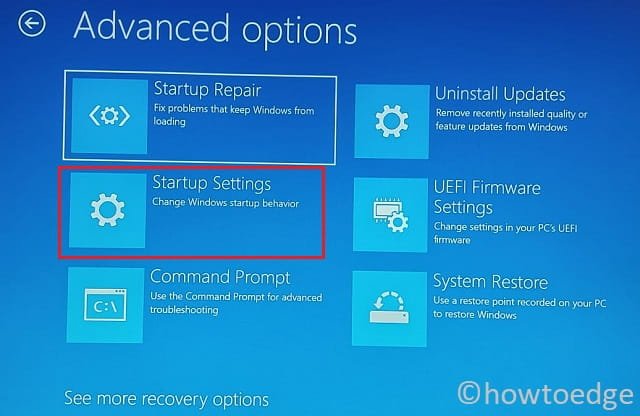
- Select Troubleshoot > Advanced options > Startup Settings.

- Choose to restart your computer and while it is reloading, press the F5 or 5 key.
- Your device will now boot into Safe Mode with networking.
Check if you can use, change, or remove the Windows Hello PIN from your computer. If this works while being in this mode, the problem must lie within the recently installed programs.
You may remove the recently installed programs from your computer while remaining inside Safe Boot. Restart your computer and check if the error code 0x80090027 resolves this way.
What if you can boot into your device?
If you can boot into your device normally, use these steps instead –
- Launch Run (Win + R), and type
msconfigon it. - Click OK to confirm entering the System Configuration window.
- Go to the General tab, and check the Selective startup radio button.
- Keep the “Load system services” checked and uncheck the other available options.

- Head over to the Services tab next, and tick the “Hide all Microsoft services” checkbox.
- Click Disable All. Moving forward, click Apply and then OK to confirm the recent changes.

Restart your computer and you will notice all third-party apps and services not starting automatically from the next login. Check if you can use, remove, or change your PIN without encountering an error 0x80090027. In case, following this way resolves this hello PIN error, you must uninstall all applications that you have installed recently on your PC.
3. Enable Trusted Module Platform (TPM)
To provide additional hardware-level security to your password and passkey, Windows 11 runs only on devices that support TPM 2.0 and Secure Boot. If you have somehow bypassed these minimum system requirements and installed Windows 11, you must correct this mistake.
First of all, check if your system supports Trusted Module Platform (TPM)and if yes, learn how to enable this TPM on your computer. Here’s how to check and enable this tool while remaining inside the Safe boot –
- Use Windows + I to launch the Settings app.
- Go to the System tab and then Recovery on the right pane.
- Click Restart now and wait for the system to reboot automatically.
- In case of a confirmation window prompts, hit Restart now again.
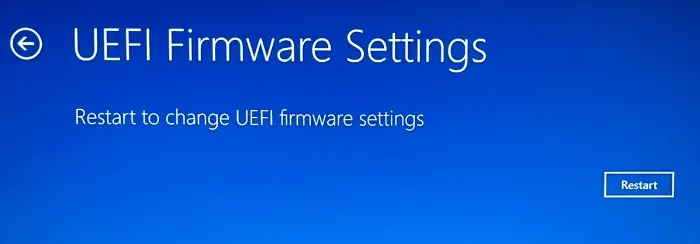
- Wait for Windows 11 to enter the Recovery environment and when it does, hit Troubleshoot > Advanced options > UEFI Firmware settings.

- Click the Restart button and your device will reboot again. Boot into your BIOS Setup page, and search for Security. When found, locate “Trusted Platform Module (TPM)” and turn On its toggle switch. If there is a drop-down menu, you may use that to select the “Enabled” option.
- After you enable the Trusted Platform Module, come out of the BIOS setup page. A pop-up window must appear asking if you want to Save Changes and Exit. Well, click on this option and hit the Yes button.
Now that you have enabled TPM, check if you can use, change, or remove PIN from your Windows PC.
4. Manually Remove Your PIN and then Set it up
Windows 11 requires using a TPM chip to encrypt the hello PIN. If your device doesn’t have the option to either enable or disable the passkey, you must remove using a PIN on your Windows 11 PC. It’s officially allowed by Microsoft and here’s how to perform this task –
- First of all, press Win + E to launch File Explorer.
- Select This PC from the left navigation, and reach out to the below path on it –
C:\Windows\ServiceProfiles\LocalService\AppData\Local\Microsoft
- There’s a possibility that you don’t even see the AppData folder under the LocalService folder. This is because the AppData is a hidden folder and you must configure the hidden items setting to view this folder.
- Go to View > Show > Hidden items, and you can now view all your hidden items.
- Reach out to the path provided above, and double-click on the Ngc folder. The Ngc is the default folder to save all your passwords and passkeys.
- A warning message might appear on the screen, click Continue to proceed ahead.

- If you see “You have been denied permission to access this folder”, click the Security tab link.

- You will be redirected to the Ngc properties window. Well, click on the Advanced button.
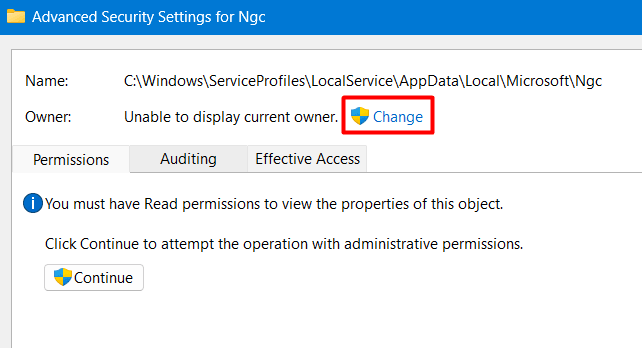
- On the Advanced Security Settings for Ngc window, locate the Owner and click the Change button next to it.

- The Select User and Group window will appear next. Click Advanced again on this prompt.

- Next to Common Queries, you can see the Find Now button. Well, click on this button.

- Scroll down and locate your username from the list. After you select your account, hit the OK button.
You have successfully authorized one of your user profiles to have all the deletion rights.
Go back and confirm all the recent changes
- Coming back to Select User or Group, hit OK.
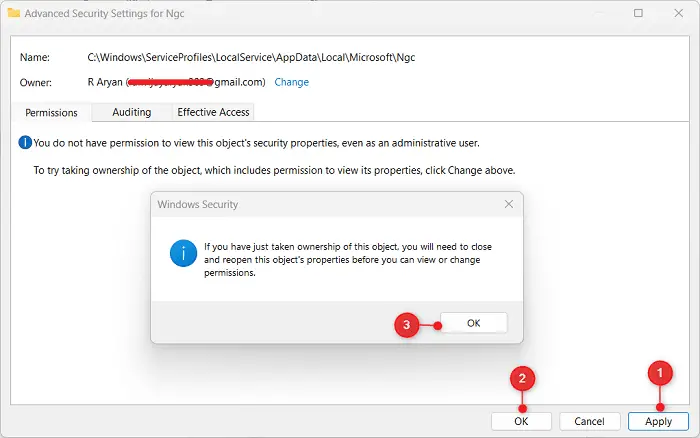
- You must be now on the Advanced Security Settings for Ngc page, click Apply, and then OK.

- Click OK on the Windows Security pop-up. Locate and click Enable inheritance on the “Advanced Security Settings for Ngc” window.

- Click Apply and then OK to confirm the recent changes as well. Windows Security pop-up will appear again, hit the Yes button on it again.
- Close all previously opened windows related to Ngc, and double-click on the Ngc folder. This time, you must be able to open this folder.
- Select all the contents available inside this folder, right-click anywhere on the selected items, and hit Delete.

- After the chosen folder deletes successfully, reboot your computer.
Since there isn’t any profile available inside the Ngc folder, you must now be able to edit or delete your PIN. You may do this task by navigating to the below path –
Settings > System > Sign-in options
- Go to PIN (Windows Hello) and set up a new 4-digit passkey on your computer.
Assuming you did follow the above steps correctly, you may now use this new PIN to log into your computer. Hopefully, this method will surely work in your case.
5. Perform a System Restore
A restore point is the last system backup up till when your device is functioning pretty well. In case you have turned On system protection and created a restore point, you may use that to revert your PC to its well-functioning state. Here’s a complete guide on how to use the system restore point on Windows 11.
Read Also: How to Recover Windows 11 using System Restore in WinRe
6. Reset your PC
If none of the above solutions work to resolve the error code 0x80090027 on Windows 11, consider resetting your PC. However, before you do that, make sure to back up all your important data. Here’s how to reset Windows 11 –
- Go to Settings (Win + I), and select System > Recovery.
- Under the Recovery options, click the Reset PC button next to Reset this PC.

- When prompted, select “Keep my files”, and follow the on-screen instructions. The reset process will erase all files and programs from your computer. This is why we suggest transferring all your files and folders to an external hard disk.
This whole process will take some time, so you need to wait patiently. Once this process is over, check if you can sign into your device normally.


