Microsoft takes user feedback seriously and works to bring a resolution as soon as possible. They righteously roll new cumulative updates each patch Tuesday to fix existing bugs and errors. However, the right-click not working on Start Menu or Taskbar has survived quite a few updates and is still creating a nuisance among users.
No need to worry though as we have brought four working ways to address this issue on Windows 10. Let’s explore these workarounds in detail –
Right-click not working on Start or Taskbar, Fixed
If the right-click is not working on your computer while making a right-click on either Start or on the taskbar, consider applying the below fixes one after another.
1] Restart the Explorer
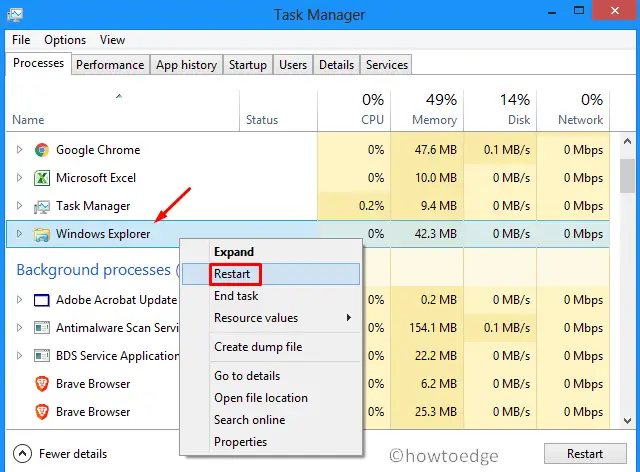
This may sound strange, however, restarting Windows Explorer instantly resolves this bug on Windows 10. Here’s how to restart the File Explorer –
- Use Ctrl + Shift + Esc keys altogether to start Task Manager.
- Scroll down and locate Windows Explorer.
- Once found, right-click on this application, and hit restart.

Restarting File Explorer should resolve the right-click not working issue either on Start Menu or Taskbar.
2] Using PowerShell
Alternatively, one may also use PowerShell to correct the right-click not working issue on the computer. All you need is to execute a few codes on the PowerShell interface. Just follow the below guideline –
- Start Windows PowerShell as an Administrator.
- Copy/paste the below code and press Enter –
PowerShell -ExecutionPolicy Unrestricted
- Next, execute the below command followed by the Enter key.
Get-AppXPackage -AllUsers | Foreach {Add-AppxPackage -DisableDevelopmentMode -Register "$($_.InstallLocation)\AppXManifest.xml"}
- In case there appears a warning message, tap Y to proceed further.

- When the two codes run successfully, you are good to use right-click either on the Start menu or Taskbar.
3] Registry Tweaks
In quite a few scenarios, the registry gets corrupted somehow and hence prevents right-click feature anywhere on the computer. To correct this, you need to modify a few key entries on the registry. Here’s how to perform this task –
- Use Win + R to invoke the Run command box.
- Type Regedit and click OK.
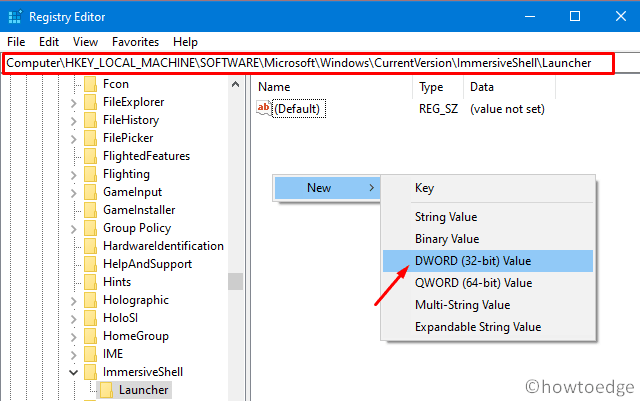
- On the registry wizard, browse to the following location –
HKEY_LOCAL_MACHINE\SOFTWARE\Microsoft\Windows\CurrentVersion\ ImmersiveShell\Launcher- Right-click anywhere on the right pane and select New > DWORD (32-bit) value.

- Rename this key to “
UseExperience“. - Double-click the newly created entry and put “0” instead of “1” under the value data field.
- Close all running tabs, apps, and Restart Windows.
The right-click functionality should now be working on either Start Menu or Taskbar.
4] Replace the WinX folder from another PC
If you are having another Windows 10 device, just copy/paste the WinX folder, and the problem gets resolved. To do so, use these steps –
- First of all, navigate to the below address –
%USERPROFILE%\AppData\Local\Microsoft\Windows\WinX
Note: Use Win + E to open File Explorer, write the above path at its address bar, and hit Enter.
- Use Ctrl + A to select all items, and copy & paste them to a USB flash drive.

- Attach the Pendrive to the computer on which the right-click is not working.
- Use copy/paste again to transfer copied items to the corrupted Windows.
- Restart Windows and check whether doing so fixes the issue or not.
| Tip: If you don’t have a separate Windows 10 device, create a new user account and use its information to correct the older user account. |
I hope by now, this bug surely gets fixed on the computer.


