The Update error 0x800711c7 is a new update-related issue that several users are experiencing these days. In case, you too receive this bug, you won’t be able to download and update the recent patches by Microsoft on your device. Sometimes, you may succeed to download a certain percentage of the latest cumulative update only to get stuck at a later stage. Today, in this blog post, we discuss some easy troubleshooting guides to resolve this update error.
The main culprits behind the Update error 0x800711c7 are corrupt system files, third party services running in the background, or an outdated Windows 10 OS. So if the automatic Windows upgradation doesn’t work, you should try it manually as well. The DISM utility, reset the Windows Components and performing clean boot will probably help to solve this bug. If these workarounds do not solve the issue, you should upgrade Windows 10 OS to its latest Build version.
Fix: Update Error 0x800711c7 in Windows 10
To fix the Update error code 0x800711c7 in Windows 10, use the following workarounds –
1] Install the pending updates manually
If the automatic updates don’t work due to the popping error 0x800711c7, you should try to update the OS manually. All you need is to download and install the standalone package that usually comes with the monthly cumulative update. To do so, use the steps –
- At first, note down the KB that you want to upgrade to on your Device.
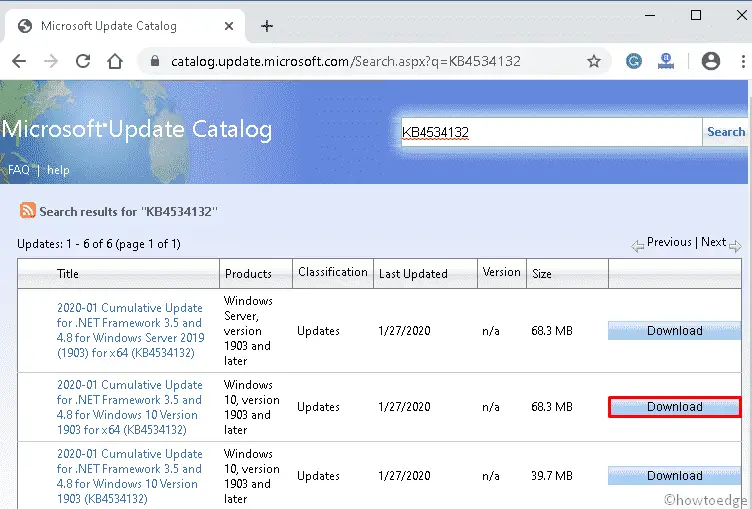
- Visit the Microsoft Update Catalog and type the exact KB number in the search box.
- A list of updates will appear here, scroll down and locate the patch file based on your system architecture.
- Click Download available next to the cumulative update. See the Snapshot below –
- Once downloaded, install this file. This should solve the 0x800711c7 error on your PC.
2] Run the DISM command
If there is system-level corruption on your PC, this may damage the core Windows file. Owing to this, there may occur issues while upgrading the existing version of Windows 10. DISM is an in-built tool of Windows that works to repair the damaged files using a single code. Here are the steps to work upon –
- Press Win and S hotkey to launch the Search box.
- In the text area, type Command Prompt.
- Right-click on the same result and select Run as administrator.
- If the User Account Control appears, press Yes to permit the access.
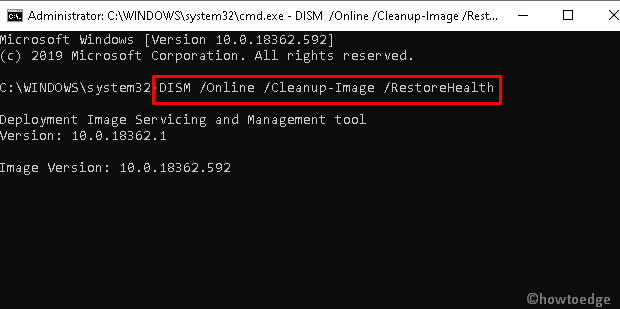
- Near the blinking area, type the following code and hit the Enter key at the end.
DISM /Online /Cleanup-Image /RestoreHealth
- When you complete the above steps, reboot your PC and try to update Windows 10 Build again.
3] Reset Windows Update Components
If you are still unable to upgrade your OS due to the Update error 0x800711C7, there may lie some bugs inside the Windows Components. Follow the below procedure to reset update components –
- Press Win and R Shortcut to launch the Run dialog.
- In the void area, type cmd and simultaneously hit Ctrl+ Shift+ Enter key.
- On the UAC prompt, tap Yes to permit the access.
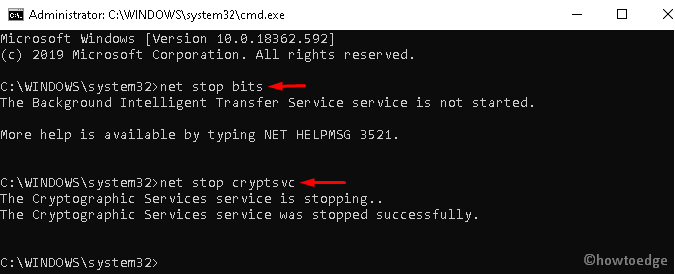
- Near the cursor run the following codes one by one. Make sure to press Enter after each command line.
net stop bits
net stop cryptsvc
net stop wuauserv
net stop msiserver
Ren C:\Windows\SoftwareDistribution SoftwareDistribution.old
Ren C:\Windows\System32\catroot2 Catroot2.old
net start bits
net start cryptsvc
net start wuauserv
net start msiserver
- After successfully executing the above commands, the Update error 0x800711C7 shouldn’t appear afterward.
4] Perform a Clean boot
Using Clean boot, one can disable the background services and this troubleshoots several interruptions during Windows 10 Update. All you need is to follow the below steps –
- Go to the Search and type msconfig in the text area.
- From the pop-up result, click on the System Configuration option.
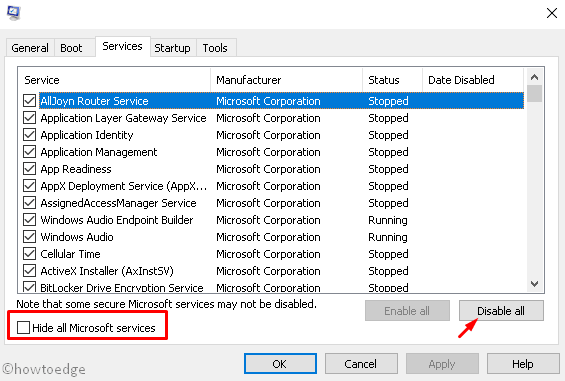
- Next, go to the Service tab and tick hide all Microsoft service checkbox.
- Henceforth, click Disable all button.
- Moving ahead, go to the Startup tab and select the open task manager link.
- Here, select each application one by one and disable them from running.
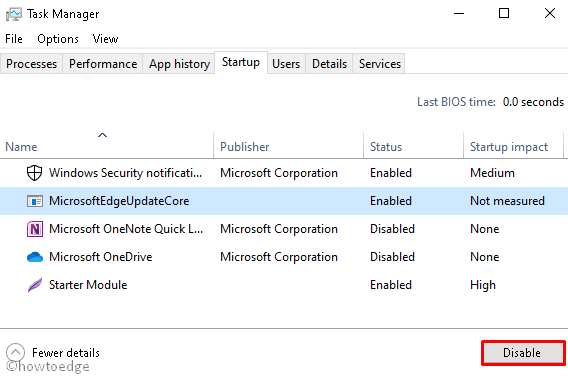
- Come out of the task manager and tap the Apply button to save the recent changes.
- Lastly, Restart your system.
After the next login, you must be able to update the existing OS without getting the error code 0x800711C7.
5] Upgrade the BIOS
In case, all the above fixes fail to resolve the 0x800711c7 error, you should update BIOS to its latest version. This will override the corrupt system files that get damaged somehow. Let’s see how to proceed –
- Download the Media Creation Tool visiting the official Website.
- Next, browse to the saved location, put right-click over the setup file and select Run as administrator.
- When UAC prompts, click Yes.
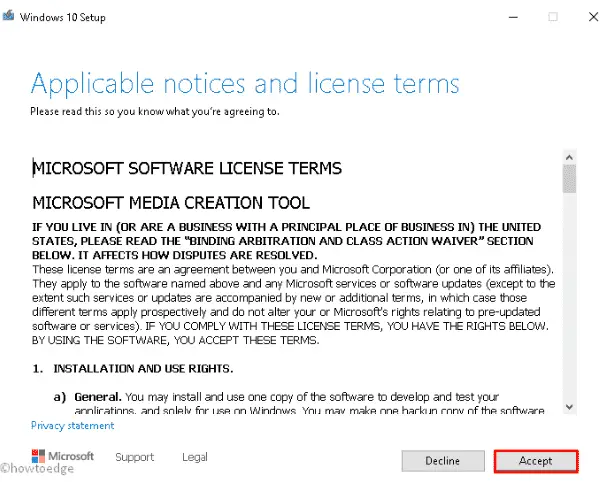
- On the License term page, click Accept to go ahead.
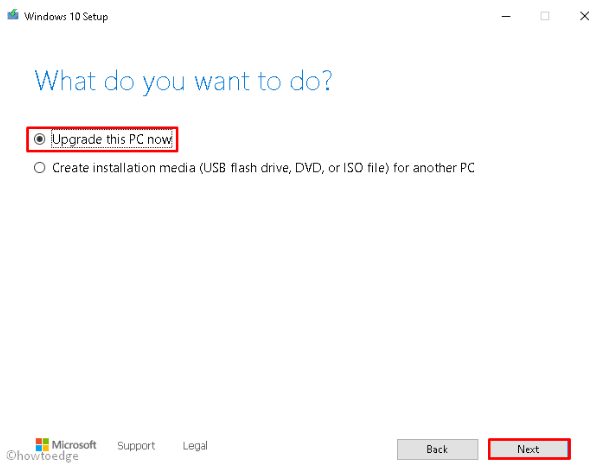
- Here, mark Upgrade this PC now checkbox thereafter hit Next.
- Wait for a while as the setup file is preparing to install.
- Next, hit Download and Install updates followed by Next.
- Select Keep your personal files and apps then Next again.
- Go through the On-screen instruction until this task completes.
- Once over, it might perform multiple system reboots.
- Lastly, check whether it does download the pending updates or not.
We hope, this article helps to troubleshoot the Update error 0x800711c7 on your PC.


