Microsoft, in general, rolls the new cumulative updates to make your system even more smooth and efficient. However, at times, there appear new bugs and errors. Today, in this article, we discuss one such bug – Update Error 0x8009001d that comes up after upgrading the existing OS to Nov 2019 (19H2) update. The company acknowledges this update issue and suggests a few ways to fix this.
The presence of corrupt system files, leftovers of uninstalled applications, and other junk files may cause this update error on your PC. To resolve the Update Error 0x8009001d, try running Update Troubleshooter, Repair corrupt files, Perform a clean boot, remove unnecessarily stored cache, etc.
If the above methods don’t address this problem, rename the SoftwareDistribution folder or use System Restore Point as the last resort. In case, you haven’t created any restore point in the past, you are left with only one option i.e. Clean Installation of Windows 10.
Fix – Update Error 0x8009001d on Windows 10
To fix the Windows 10 Update Error 0x8009001d, try these solutions –
1. Uninstall the Problematic Programs
The presence of malfunctioning programs may begin update-related issues on your PC, hence you must scan and remove such applications. Here are the steps to follow –
- Press Win and S hotkey together to launch the Search menu.
- In the text area, type Control Panel and hit Enter.
- Next, select the specific app that is causing problems inside Programs and features.
- Now go to the top bar and hit the Uninstall button.
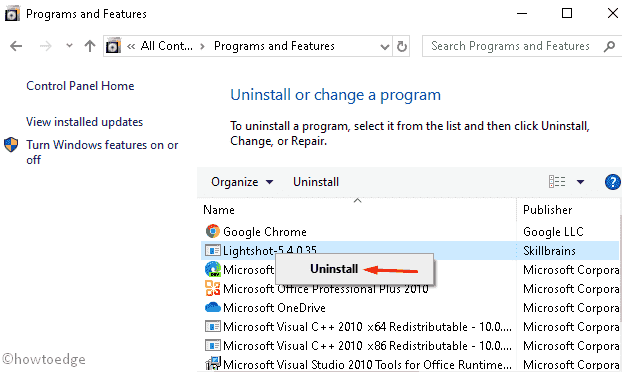
- Afterward, tap Yes on the confirmation message asking for consent.
- When the application is removed, Restart your PC and try installing the patches again.
2. Run the Update troubleshooter
Troubleshooter is the by-default tool to resolve common update-related bugs on Windows 10 PC. Here’s how to perform these steps –
- Open the Settings app using Win+I hotkey.
- Here, select Update & Security then Troubleshoot.
- Move to the right pane and tap the Windows Update category.
- Next, press Run the troubleshooter.
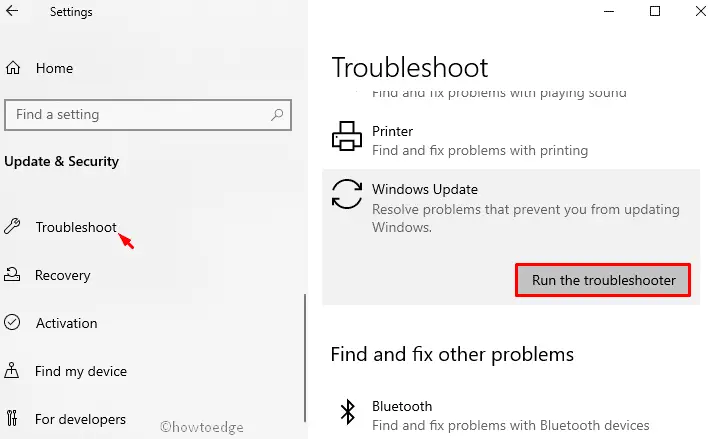
- This tool will start detecting and repairing the faults (if there exist any).
- Do Restart your PC to save the changes performed so far.
You may now navigate to Settings > Update and Security and hit Check for Updates. The system will search for any pending updates online. If it does find any, the same will be downloaded and installed automatically.
3. Cleanup-image using Command Prompt
The corrupt Windows image may also restrict the updates from being applied. If that’s the case, one should clean Windows images by executing a few codes on Command Prompt. Here are the essential steps –
- Go to Start and type Command Prompt in the search area.
- Right-click on the top result and select Run as administrator.
- The User Account Control window will appear immediately after, tap Yes to go ahead.
- Next, copy/paste the following command line followed by the Enter key.
dism /online /cleanup-image /startcomponentcleanup
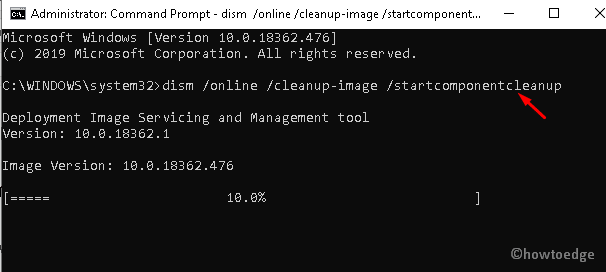
- Wait, until the above process is completed. Once over, Reboot your system.
4. Install the pending updates of an installed app
If you are still unable to apply the Windows updates, you should check whether there are any pending updates for installed apps. All you need is to update the system as well as third-party applications to their lately released versions. One might do this by visiting the Microsoft Store or official websites. Here, we explain the essential steps –
Step-1: Go to the system tray and hit the Microsoft Store icon.
Step-2: When the Store window appears, move to the top-right panel and hit the ellipse icon.
Step-3: Using the drop-down menu, select Downloads and Updates.

Step-4: There appears a list of all the applications that require an upgrade. Select one after another and tap over the Get Updates button.
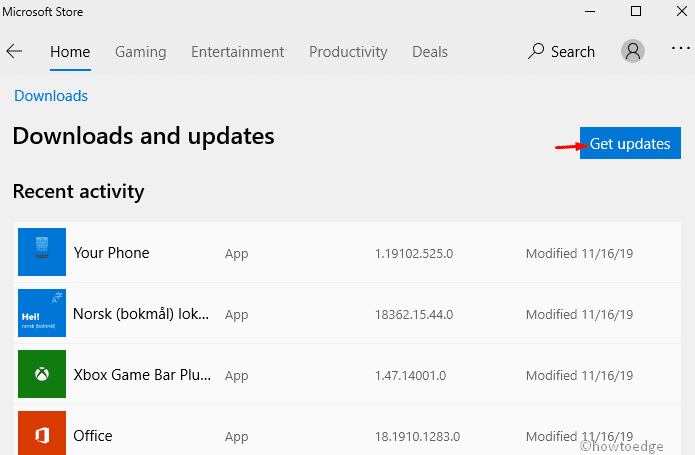
Step-5: This will automatically download and prompt you to apply the pending updates for different apps.
5. Rename SoftwareDistribution to softwaredistribution.old
Usually, when you update the existing OS with the latest release, the files from previous updates remain as they were. Such leftover files may create issues while backing up your Windows OS. To fix it, one may try renaming the file “SoftwareDistrubution” to “softwaredistribution.old” using the following steps –
- Press Windows and X hotkey together thereafter select the Run option.
- In the text area, type cmd and simultaneously hit Ctrl+Shift+Enter.
- If User Account Control appears, tap Yes.
Run the following commands one by one on the Console. Make sure to press the Enter key at the end of each command line –
net stop wuauserv
rename c:\windows\SoftwareDistribution softwaredistribution.old
net start wuauserv

After the above process completes successfully, Restart your PC and check whether the updates still carry the 0x8009001d bug. If yes, head over to the next workaround –
6. Clear junk and temporary files
Whenever you delete files or remove certain applications, their data remains as cache on the system. There is no need to keep these files as they will consume unnecessary space and memory. If your PC stores more cache then it might cause Update Error 0x8009001d. Well, in that case, you must delete all junk files using the Disk Cleanup tool. Here is the complete procedure –
- Hit the Windows icon and start typing Disk cleanup, and select the top result.
- A new window appears afterward, select the root drive (C:) using the drop-down menu and tap OK.
- Here, select the “Clean up system files” button.
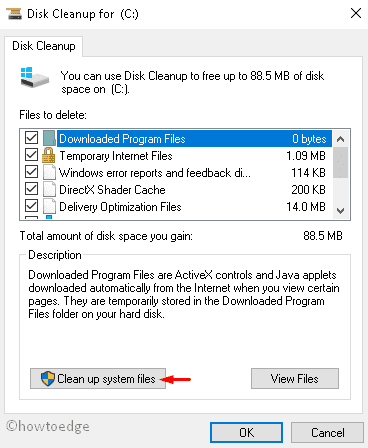
- Select the C: drive again.
- On the consecutive window, select all the checkboxes except the Download folder.
- This app will take some time to collect the entire information on the selected folders.
- After this completes the calculation part, click OK then Delete Files on the confirmation dialog.
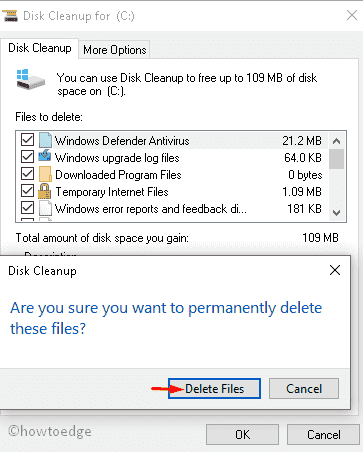
Disk Cleanup tool will remove all the cache stored on the PC. Make sure to Restart your PC after performing the above changes.
7. Perform Clean boot
The clean boot is another nice feature on Windows 10 that can resolve common issues like Windows Update bugs, BSOD errors, corrupt drivers, etc. Here, we explain the step-wise procedure to perform this task –
- Start the System and sign in as an Administrator.
- Press Win + S, type “
msconfig“, and hit System Configuration. - Head over to the Services tab and mark the checkbox – “Hide all Microsoft services“.
- Click Disable all.
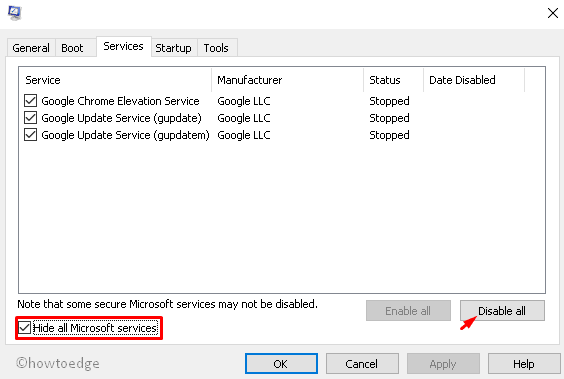
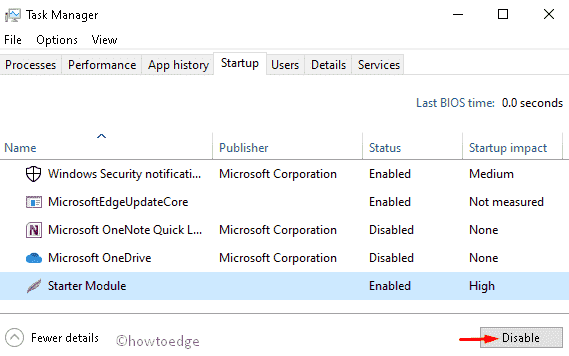
- Go to the Startup tab next and click Open Task Manager.
- On the succeeding wizard, look for unnecessary programs and disable them. See the snapshot below –
- Close all running windows and Restart your PC.
You may now download the pending updates (if available) without experiencing the Error code 0x8009001d.
8. Use System Restore Point
If none of the fixes described above fix the Update error 0x8009001d, try using the System Restore points (generated previously). In case you don’t have any backup, attempt to clean installing Windows OS on your PC.
Sometimes, when users install the latest cumulative update (containing bugs) might lead to this situation. Hence, one should restore the earlier operating system which was running completely fine.
Note: If you haven’t created any system restore point previously, you may skip this method and perform a clean installation of Windows 10 OS.
Here’s how to use this workaround –
- Press Win and R, type
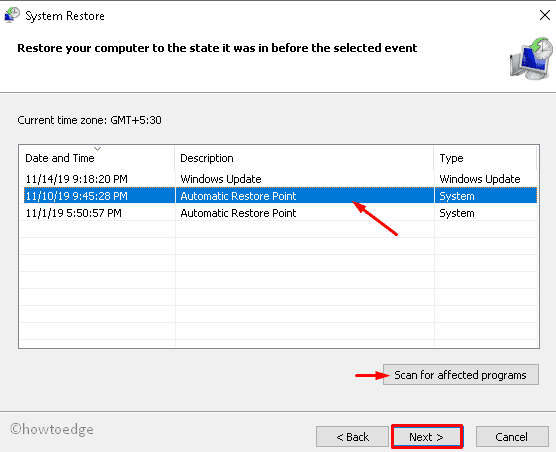
rstruiin the text area, and press the Enter key. - On the succeeding wizard, click Next and select the latest Restore Point.
- Scroll down and hit the Scan for affected programs button then Next again to proceed further.
- Click Finish and wait while the system is restoring the stable operating system. This whole process might take 30-45 minutes depending on the size of the backup.
That’s it, you may now update your Windows 10 OS to its latest Build version without getting into an update error 0x8009001d.

