In this tutorial, we outline the prime reasons that may cause the Webcam error 0xA00F4289 along with six working ways to fix it. Usually, this problem comes with an error message that reads “ActiveCameraUnplugged“.
The main reasons that cause this issue in the first place are – Corrupted Webcam driver, Disabled essential camera settings, etc. This error may also occur due to some corruption inside the applications downloaded from Microsoft Store. Whatever the reasons behind the 0xA00F4289 bug, you may resolve this by following these solutions –
List of Solutions
Fix ActiveCameraUnplugged Webcam Error 0xA00F4289
To solve the 0xA00F4289 error in Windows 10, try out the following suggestions –
1] Start windows Camera Frame Server Service
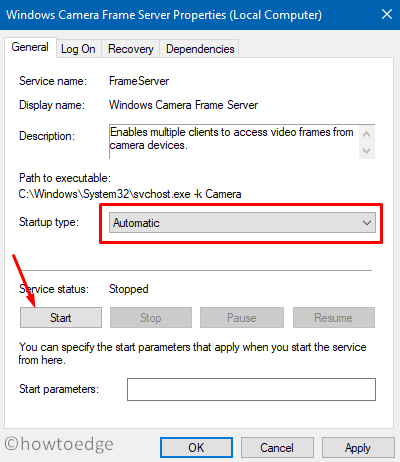
A disabled camera frame server service may also evoke the webcam error 0xA00F4289 on the computer. If that’s the case, try out the below instructions to solve this problem –
- Press Windows Key and R to invoke the Run dialog.
- Type
services.mscand then click on the Enter key. - When the Services window comes into the view, Search for the “Windows Camera Frame Server” option.
- Right-click on Windows Camera Frame Server and hit the Properties option.

- Choose “Automatic” using the drop-down menu next to “Startup type” and hit the Start button.

- Lastly, hit Apply then OK to confirm the above changes.
2] Enable Camera App
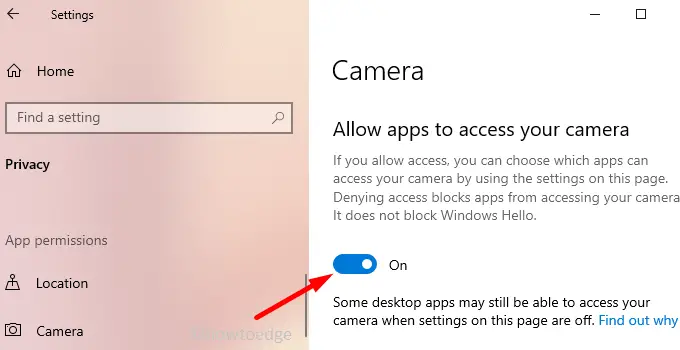
Many a time, users get into the 0xA00F4289 error simply because the Camera app remains disabled or being used by some other applications. Check if this indeed is the case or not by following the below guideline –
- Launch the Settings app by pressing the WinKey + I shortcut.
- Click on the Privacy option.

- Search for the Camera on the left pane and select it.
- Go to the right pane and hit on the Change option. Turn ON Camera access for this device and allow apps to access your Camera.

- Lastly, Restart your device and see whether doing so resolves the issue or not.
3] Reset Your Camera
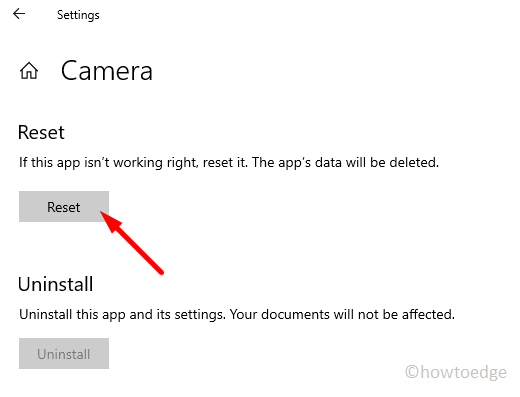
Resetting the Camera app often solves several Webcam-related bugs and errors. Do the same and check if doing so helps to fix the 0xA00F4289 error or not. Here are the essential steps to work upon –
- Press “Windows key + I“.
- Click on Apps > Apps and Features.
- Navigate to the Camera app and select it.
- Click on the Advanced Option.

- On the next screen, hit the Reset button to reset your Camera application.

- Make sure to reboot your PC so as to incorporate the above changes.
4] Update Your Driver
If your webcam stopped working and your computer fails to detect it, this might be because of any compatibility issues with the camera driver. One may fix this simply by updating the Camera driver to its latest version. Here’s how to update the Webcam driver –
- Jointly press “Windows key and X” on the keyboard.
- Select the Device Manager, a new window will start immediately afterward.
- Double-click on the Camera option.
- Right-click on the available driver i.e. HD Camera, and choose the Update driver option.

- Subsequently, select the option that reads “Search automatically for drivers”.
- The system will take care of the remaining steps. Just follow the on-screen instructions to complete the remaining process.
5] Reinstall Driver to Fix Error 0xA00F4289
Since the 0xA00F4289 error mostly occurs due to corrupt Webcam drivers, we suggest uninstalling then reinstalling the related camera driver. To do so, use the following steps –
- Press “Windows key + X” using your keyboard.
- Select the Device Manager option.
- Expand the Cameras section by clicking the “>” icon.
- Right-click on the available driver, and choose the “Uninstall device” option. In the screenshot below, we have uninstalled our USB2.0 HD UVC WebCam.

- When the Webcam driver uninstalls successfully, restart Windows 10 delete any leftover files as well.
- Sign-back into your computer and browse the Help Center of your specific manufacture. There, you may find an option to reinstall the latest version of the Webcam.
6] Uninstall Skype to solve Error 0xA00F4289
A few users reported that they solve the 0xA00F4289 error simply by uninstalling the Skype application. Since Skype is known to use the webcam, any bugs on this software may result in similar errors. This is why we suggest uninstalling the Skype application and check if doing so indeed fixes this problem or not. To do so, use these steps –
- Start Control Panel on your computer.
- Click Uninstall a program under the Programs and Features section.

- On the next screen, locate and right-click on the Skype program.
- Choose the “Uninstall” option from the context menu.
- If there appears any prompt asking to confirm this action of yours, hit Yes.
- When the uninstallation completes, restart Windows to remove any leftover files as well.
7] Update Windows 10
If none of the above workarounds solve the Webcam error 0xA00F4289, check if there lies any pending update for the system or not. If you do find any pending update, download and install using the below guideline –
- Click on the Start button.
- Select Setting (gear icon).
- Click on the Update and security option.
- A new window will appear on the screen, select Windows Update from the left column.
- Move to the right pane and hit the Check for Updates button.
- The system will immediately start searching for any pending updates. And if available, this will automatically download and install the latest cumulative update on your computer.
- Just follow the onscreen instructions to complete the remaining process.
- Your PC may restart a few times during Windows 10 update.
When your system gets updated, the ActiveCameraUnplugged Webcam Error 0xA00F4289 should disappear as well.


