The Update Error 0x80246010 first appeared while upgrading Windows 10 to the feature update 1709. Recently, a few users reported getting this issue after installing the latest cumulative patches. Well, this bug occurs because of missing system files, damaged Windows Image, and mainly due to a corrupt registry.
In this post, we have covered almost all potential workarounds that seem to be useful in solving the 0x80246010 issue. Run SFC, DISM works to address the bug due to damaged system files and Windows Image respectively. Resetting Windows Update Components is another effective tool to solve different update-related troubles. Let’s explore the solutions in detail –
Fix: Windows 10 Update Error Code 0x80246010
To solve the Update Error 0x80246010 on Windows 10 PC, try the following suggestions –
1] Manually install the latest Cumulative Updates
Manually installing the latest cumulative update is the best way to get rid of the 0x80246010 error. However, for that, you must know the recent patch number matching the system architecture. Here’s how to perform this task –
- First of all, go to the Windows 10 Update history webpage.
- Select Windows 10 Edition available on the left column.
- Next, scroll down to “In this Release” section and click the top link. Here, copy the “KB” number available on the right pane.
- Now that you have the recent CU number, visit Microsoft Update Catalog and type the copied “KB” number in the search field.

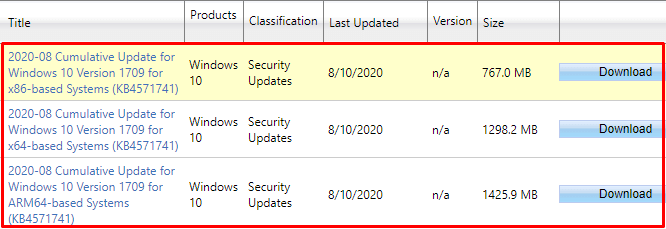
- Press Enter to view a list of matching results, choose one as per your PC architecture.
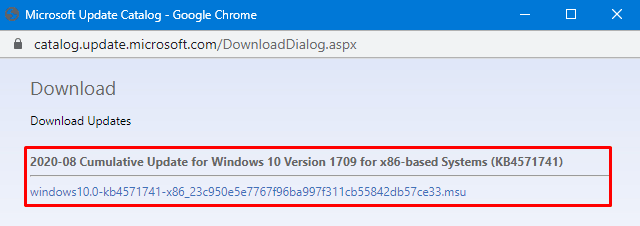
- Click the Download button thereafter the top link on the succeeding window.

- After the download completes, double-click the setup file to start upgrading Windows 10 OS.
2] Repair Registry
If you are still getting the error 0x80246010, this might be due to corruption inside the registry. To fix this, use the below steps –
- Use Win + I to start the Settings app.
- Click Recovery then “Restart Now” under the Advanced startup section.
- Your PC will next boot into the Advanced Start mode.
- Click Troubleshoot followed by Advanced options.
- Here, you will find “Startup Repair” at the top, click this link to start repairing the registry.

- If the system prompts to use an account, use the Administrator one.
When the PC boots into Windows normally, check whether the 0x80246010 bug still occurs or gets resolved.
3] Run System File Checker
The presence of corrupt or damaged system files often causes different update-related issues on the computer. To repair such files, you should use the System File Checker utility program. Here are the essential steps –
Step-1: Launch Command Prompt having administrative privileges.
Step-2: On the elevated console, type sfc/scannow and hit Enter.

Step-3: This tool immediately starts scanning for corrupt files and repair them as well.
Step-4: Wait for a while as this takes approx. 15-20 minutes to correct damaged files.
Lastly, Restart Windows to incorporate the above changes.
4] Run DISM
If the 0x80246010 error appears again while updating Windows 10, use the DISM tool to solve any corruption on the Windows Image. Here’s how to use this tool –
- Use Win & R to launch the Run dialog.
- In the text area, type cmd, and press Ctrl+Shift+Enter keys combination.
- When the UAC window comes into view, tap Yes. This will open Command Prompt having full Admin rights.
- On the elevated console, copy/paste the below code, and hit Enter.
DISM.exe /Online /Cleanup-image /Restorehealth

- The above process usually takes a few minutes to complete scanning/repairing, so wait accordingly.
- Once over, Restart PC to implement the recent changes.
5] Clear Windows Update temporary cache folder
At times, the 0x80246010 error comes into existence due to unnecessary stored cache inside the update folder. If that’s the case, you may follow the below steps to clear the update folder –
- Press Win+Q to launch the Search App.
- In the text field, type services and click the top result.
- When the Services window comes into view, locate Windows Update.
- Once found, do the right-click and hit the Stop button.
Now that you have stopped update services, it’s time to clean the unnecessary stored cache using below steps –
- Use the Win+R shortcut to start Run.
- Copy/paste the below code and press Enter.
%windir%\SoftwareDistribution\DataStore
- Running the above command-line will take you to the SoftwareDistribution folder.
- Use Ctrl+A to select all the items and hit Delete to remove them all.
- Re-visit the Services window and put right-click on the Windows Update.
- Next, choose to restart using the shortcut menu.
After completing the above steps successfully, Reboot PC so that changes made come into effect from the next logon.
6] Use Restore Points or Clean Install
If you had created system backup on the computer, it’s the perfect time to go back to the state where everything was working fine. Learn how to use system restore points in case you have created one previously. If not, do the clean installation of Windows 10.
That’s it, I hope this article useful addressing the 0x80246010 error on Windows 10.
Read Next: How to reset this PC using Cloud Download on Windows 10


