Windows 10 users get new security-updates every Patch Tuesday (second Tuesday of a month). While installing these cumulative updates, there’s a possibility of PC becoming stuck due to bugs like 0x8024a105. In case you are wondering why this error stops the update process or the essential tips, read and apply the workarounds discussed in this post.
What causes an error 0x8024a105 in Windows?
There are so many factors that may interrupt the smooth upgrade process like – poor net connectivity, hardware issues, faulty installation of apps/updates, or corrupt Windows Updates. Many a time, this is simply due to either malware infection or unused cache.
To address the 0x8024a105 error, try fixes – run Windows update troubleshooter, perform a malware scan, or block firewall. If the bug persists even after this, repair the corrupt system files, or clear the unnecessarily stored cache. Let’s explore these solutions in detail –
How to Fix Update Error 0x8024a105 in Windows 10
To solve the Update Error 0x8024a105 on Windows 10, try the following suggestions –
1. Run the Windows Update Troubleshooter
If you fail to upgrade Windows 10 Build OS due to Error 0x8024a105, the Update Troubleshooter might find the exact reasons behind it. To run this tool, follow the below steps –
- Jointly press WinKey & I to launch Settings.
- Click Update & Security thereafter “Troubleshoot” on the left pane.
- Go to the adjacent right, scroll down to “Additional troubleshooter”, and click the same.
- Subsequently, hit to expand “Windows Update” and tap “Run the Troubleshooter“.

- Follow the on-screen instructions to complete the remaining steps.
2. Purge Cache
The presence of unnecessary or unused files/folders often disturbs the smooth upgrading process. If there indeed lie any such files, learn how to Use Disk Cleanup Tool in Windows 10.
Apart from this, we also recommend uninstalling third-party Antivirus from the computer. In lieu, you may use the Windows Defender Security program.
3. Use System File Checker
Since you already removed unused files on the computer, it’s time to scan for possible corruption inside the system files. To do this, Microsoft provides a great built-in tool i.e. System File Checker. Here’s how to use this utility program –
Step-1: Jointly press Win + Q and type Command Prompt in the search field.
Step-2: Right-click on the well-matching top result and choose Run as Administrator.
Step-3: Near the blinking cursor, type sfc/ scannow, and press Enter.

Step-4: Since this is a time-consuming process, wait till the scanning/repairing complete as well.
Note: Do restart PC to implement the recent changes.
4. Run DISM
Running DISM command may also diagnose for the root cause behind Update Error 0x8024a105 on Windows 10. This tool works effectively to solve any corruption inside the Windows Image. Here’s how to use this tool –
- Press Win & R altogether to open the Run dialog.
- In-text area, type cmd and hit Ctrl+Shift+Enter keys.
- Doing this will start Command Prompt having full Admin rights.
- When the UAC window prompts, hit Yes.
- On the elevated console, copy/paste the below code, and hit Enter.
DISM.exe /Online /Cleanup-image /Restorehealth

- The above process usually takes a few minutes to complete scanning/repairing, so wait accordingly.
- Once over, Restart PC to incorporate the recent changes.
5. Reset Windows Update Components
The presence of corrupt Windows services and components often causes different update-related issues on the computer. This is why we suggest restoring the default settings of the core components. To do so, just follow these easy steps –
- Go to the Search icon and type cmd in the text field.
- Right-click on Command Prompt and choose “Run as administrator“ using the context menu.
- When the UAC window appears, hit Yes.
- Now, run the below codes one after another to stop some basic services like BITS, Windows Updates, and Cryptographic.
net stop bits
net stop wuauserv
net stop appidsvc
net stop cryptsvc
- Next, you need to delete all the qmgr*.dat files. To do so, use this code –
Del "%ALLUSERSPROFILE%\Application Data\Microsoft\Network\Downloader\*.*"
- Rename the Software Distribution and Catroot2 folders running these commands –
rmdir %systemroot%\SoftwareDistribution /S /Q

rmdir %systemroot%\system32\catroot2 /S /Q
- If there appears any confirmation message, tap Y to grant permission.
- Reset the BITS and Windows Updates services executing the below codes –
sc.exe sdset bits D:(A;;CCLCSWRPWPDTLOCRRC;;;SY)(A;;CCDCLCSWRPWPDTLOCRSDRCWDWO;;;BA)(A;;CCLCSWLOCRRC;;;AU)(A;;CCLCSWRPWPDTLOCRRC;;;PU)
sc.exe sdset wuauserv D:(A;;CCLCSWRPWPDTLOCRRC;;;SY (A;;CCDCLCSWRPWPDTLOCRSDRCWDWO;;;BA)(A;;CCLCSWLOCRRC;;;AU)(A;;CCLCSWRPWPDTLOCRRC;;;PU)
- Enter the System32 directory by running code –
cd /d %windir%\system32. - Go ahead and re-register all of the Windows DLL files. To do so, you need to run each one of the commands below separately. Don’t forget to press Enter at the end –
regsvr32.exe /s atl.dll
regsvr32.exe /s urlmon.dll
regsvr32.exe /s mshtml.dll
regsvr32.exe /s shdocvw.dll
regsvr32.exe /s browseui.dll
regsvr32.exe /s jscript.dll
regsvr32.exe /s vbscript.dll
regsvr32.exe /s scrrun.dll
regsvr32.exe /s msxml.dll
regsvr32.exe /s msxml3.dll
regsvr32.exe /s msxml6.dll
regsvr32.exe /s actxprxy.dll
regsvr32.exe /s softpub.dll
regsvr32.exe /s wintrust.dll
regsvr32.exe /s dssenh.dll
regsvr32.exe /s rsaenh.dll
regsvr32.exe /s gpkcsp.dll
regsvr32.exe /s sccbase.dll
regsvr32.exe /s slbcsp.dll
regsvr32.exe /s cryptdlg.dll
regsvr32.exe /s oleaut32.dll
regsvr32.exe /s ole32.dll
regsvr32.exe /s shell32.dll
regsvr32.exe /s initpki.dll
regsvr32.exe /s wuapi.dll
regsvr32.exe /s wuaueng.dll
regsvr32.exe /s wuaueng1.dll
regsvr32.exe /s wucltui.dll
regsvr32.exe /s wups.dll
regsvr32.exe /s wups2.dll
regsvr32.exe /s wuweb.dll
regsvr32.exe /s qmgr.dll
regsvr32.exe /s qmgrprxy.dll
regsvr32.exe /s wucltux.dll
regsvr32.exe /s muweb.dll
regsvr32.exe /s wuwebv.dll
- After registering all the DLL files, reset Network Configuration which might also be a reason behind.
netsh winsock reset
netsh winsock reset proxy
- Next, restart the services that you have previously stopped.
net start bits
net start wuauserv
net start appidsvc
net start cryptsvc
- Lastly, Reboot Windows to make the changes effective from the next logon. The 0x8024a105 error must have gone by now. However, if not, try the next set of solutions –
6. Perform a Clean Boot
Third-party apps running on the computer often interfere with core system files causing the 0x8024a105 error. To minimize their interference, you can always disable them all at one go and check whether doing this solves the issue or not. Here’s how to do this –
- Hit the Search icon and type “system” in the text area.
- Click the top result as shown below –

- When the System Configuration window comes into existence, go to the Services tab.
- Here, mark Hide all Microsoft services check box and tap Disable all.

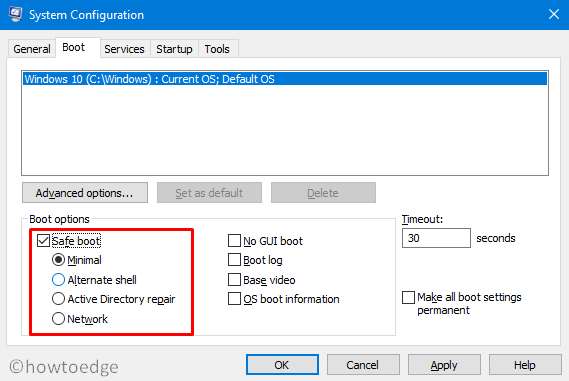
Alternatively, go to the Boot tab, tick Safe boot, and enable the Minimal radio button. Clicking Apply then OK will prompt to restart Windows, do the same. The system will boot into the Safe Mode from the next restart.

- Now, check whether the 0x8024a105 error appears here as well or not. If not, this bug is definitely due to third-party apps.
- In such cases, you need to follow the above steps again to remove the Safe boot tick on the Boot tab and Reboot the device.
- Log back into the system and remove all of the recently installed applications on the computer.
- Keep doing this until this error gets resolved. Make sure to Restart Windows after removing each program to remove residual files as well.
7. Manually download and apply the Updates
Since you are not able to get the latest updates via Windows Update, you may try downloading them manually. The company releases the related standalone package each patch Tuesday for such users. All you need is to follow the below steps sequentially –
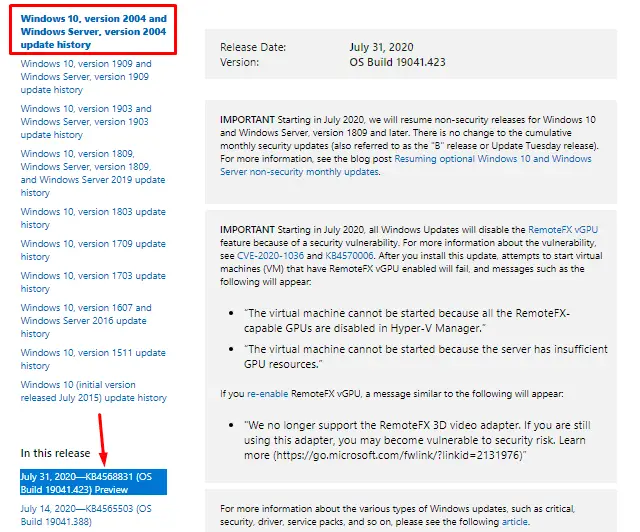
Step-1: First of all, Visit the Windows 10 Update history.
Step-2: On the left pane, select the Windows 10 version thereafter scroll down to “In this release“.

Step-3: Note down the KB number and reach out to the Microsoft Update Catalog webpage.
Step-4: Paste the KB number noted down above and hit Enter. A list of matching patches will pop-up.
Step-5: Here, hit the Download button next to architecture to which your computer currently belongs to.
Step-6: On the next screen, click the top link to download and install the .msu file.

After the file gets downloaded, browse to the Download folder and double-click the setup to upgrade OS.
8. Clean Install Windows 10
In case each one of the above solutions fails to resolve the 0x8024a105 bug, you are left with only one option i.e clean installation of Windows 10. Installing a fresh copy will get rid of all such bugs and errors.
Quick Note: If you have previously created a system backup, you may try using the same before proceeding ahead. Read how to use system restore point to revert OS back to its well-functioning state.
Here’s how to clean install Windows 10 –
- Go to the Microsoft official website and click Download the tool now.
- When the setup file gets downloaded, browse to the Download directory and click twice on the setup.
- Next, hit the Install now button.
- Make sure to accept all the checkboxes to agree with Microsoft’s terms and conditions.
- Choose to Keeps your files and apps followed by Next.
- Subsequently, hit the Install button and follow on-screen instructions to complete the remaining process.

- Once this is over, navigate to the below path and download any pending updates.
Settings-> Update & Security-> Windows Update-> check for updates
That’s it, I hope this guide helps to resolve the update error 0x8024a105 on Windows 10 PC. If you have any queries or suggestions, let us know via the comment section.


