Windows Defender Error 0X8007139F is a persisting issue in Windows 10 with several users complaining about this on different Windows forums. Microsoft has come very far by improving its native security app to One that we appreciate much these days. This app is quite proactive and saves huge bucks that might go in the vein while purchasing third-party anti-malware programs.

This security app is prone to different bugs (like any other program) that appear from time to time. Here, we explore different ways to fix this error message on your System. They are as follows –
- Disable third-party antivirus application
- Install Latest Updates
- Turn on Windows Firewall
- Set Windows Defender Services to Automatic
- Disable Real-time Protection Security
- Change the Power Options
- Run Windows Update Troubleshooter
- Run System File Checker
- Perform DISM
- Create a new User Account
- Reset Windows Update Components
- Perform a System Restore
- Check the exclusions list
RECOMMENDED: Windows Update error 0x8007139f on Windows 10.
Ways to Fix Windows Defender Error 0X8007139f
Here we describe different ways to resolve this error message on your System. They are as follows –
1] Disable third-party antivirus application
Third-party anti-malware application is known to block several services of system files, hence the best solution is to either disable or uninstall such programs. Here are the steps to follow-
- Press the Win logo & I to launch the Settings app.
- On a new page, tap the Apps category followed by Apps & Features on the left column.
- Now switch to the right pane, scroll down the cursor, and locate the installed antivirus program.
- Once found, click on it and hit the Uninstall button.

- A new dialog appears next, tap Uninstall to confirm the changes.
When this process is complete, Restart your system and check whether Windows Defender is working properly or not. If not, try other workarounds.
2] Install the latest updates
If your system has a pending update, this may also create such bugs in your system. Although, Windows download and install the latest update on a regular basis, in case it is skipped for any reason, do perform the same manually. Here is the complete manual procedure-
- Press the Win logo to open Start, and select the Gear icon (Settings) from the list.
- Now tap Update & Security thereafter Windows Update on the left column.
- Switch to the right pane then hit the Download button (if it displays any pending Updates available) and wait until it gets over.

Once it is completed, Reboot your System. This process will also update the Windows Defender application, I hope this time you solve this threat using Windows Defender without any interruption.
3] Turn On Windows Firewall
In case somehow the issue still persists on your system and hampers the functionality of Windows Defender, it might be due to Firewall being set as disabled. This might be the probable culprit that doesn’t register files thus disturbing the system performance. If that’s the case, enable Firewall to solve the Windows Defender error 0X8007139f on your Windows 10 PC. Here are the steps to follow-
- Go to Cortana and type the Control panel in the text box.
- On the next screen, click on the view by the drop-down menu then select Large icons.
- Subsequently, press Windows Defender Firewall on the same page.
- Again, on the next window hit Turn Windows Firewall on or off on the left pane.

Now mark the check-boxes of Windows Defender firewall in both i.e. public as well as private network settings then OK to save the changes.
This will block any malicious program that tries to enter your Windows 10 PC, thus addressing the Windows Defender Error 0X8007139f.
4] Set Windows Defender Services to Automatic
As per some users, setting the startup type as automatic and then starting such services may also solve this problem on your Windows PC. Adhere and follow these instructions as guided below –
- Press Win & X hotkey and select Run on the context menu.
- On the popup dialog, type
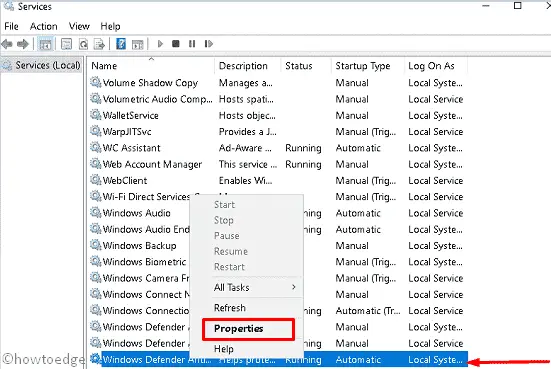
services.mscthen tap OK to launch the System Configuration window. - From the list of Services, locate Windows Defender Antivirus Services, and right-click on it.
- Select Properties from the context menu and set its running Status to Start.

Thereafter, change its startup type to Automatic then hit OK to save the changes.
At last, Restart your system and check if the trouble has gone out or not.
5] Disable Real-time protection Security
Sometimes when a Real-time protection option is set as Enabled, it may also arise this trouble. Therefore, disabling this option on your log-in screen might work like a charm to get rid of this bug. Performing this task is quite simple, just follow the below process-
- Go to the notification area on the system tray and select Windows Security.
- When the page comes into view, tap the Virus & threat protection category.
- Now select Manage settings inside Virus & threat protection settings section.
- Again on the next window, disable the Real-time protection toggle switch henceforth hit Apply then OK.

When this method completes, Restart your system and see if the Windows Defender Error 0X8007139f gets fixed or not. If not, attempt the next solution.
6] Change the power options
If you continue experiencing the Windows Defender error message, the problem might be inside your Power settings. Follow these steps to find and solve the potential culprit –
- Go to Cortana and type Power & Sleep Settings, once found click on it.
- On the Right pane window, move to the Related settings category and choose Additional power settings.
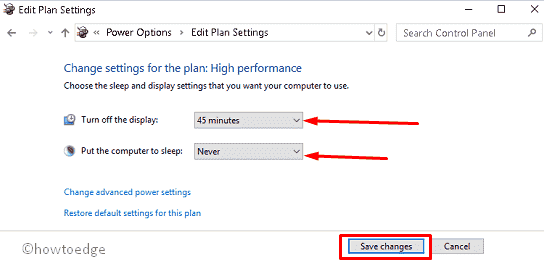
- Here hit Change plan settings under the “Hide additional plan” section and reset Turn off the display.

- Henceforth, click on Put the computer to sleep drop-down options and select Never.
At last, tap the Save Changes button to confirm the changes made so far.
Finally, try to quick scan using Windows Defender, hope this time you will be successful to remove this error.
7] Run Windows Update Troubleshooter
Windows Update troubleshooter is an in-built app of the Windows Operating system, which works as a diagnostic tool. It can solve numerous bugs that occur from time to time on your Windows machine. By default, this can fix any Windows-related bugs automatically that are associated with Windows Defender. To move ahead, apply these steps-
- Press Win & I altogether to launch Settings.
- When the Settings app pops up, tap Update & Security thereafter Troubleshoot on the left pane.
- Again switch to the right pane and click on Windows update next Run the troubleshooter button.

This wizard will start detecting and repairing any problems that lie inside your system. Once it gets finished, Restart your system and check whether this error has been eliminated or not.
8] Run System File Checker
System File Checker is the perfect tool to try in such scenarios. This tool helps to scan and repair missing as well as damaged system files on your computer. The system files and folders might corrupt due to the presence of some third-party software, especially Antivirus programs. Follow the below instructions to resolve any file corruption on your PC –
- Hit the Search box and type Command Prompt.
- Right-click on the best-matched result then select Run as Administrator.
- If UAC prompts, hit Yes to permit access.
- Again on the elevated command prompt, type the following code and hit Enter at the end.
sfc /scannow

This is a time-consuming process, so wait accordingly. When it completes the scanning, Restart your system and try to quickly scan using Windows Defender. Hope this time you may succeed to do the same.
9] Perform a DISM scan
Windows Defender Errors might also occur when there are issues within your system files. The DISM scans and looks for any corrupted file which may aid and resolve this issue.
- At first, jointly press the Windows key & R to launch the Run dialog.
- Here in the text box, type cmd and simultaneously press Ctrl+ Shift+ Enter to open Command Prompt as Administrator.
- Click Yes on the UAC prompt to authorize this access.
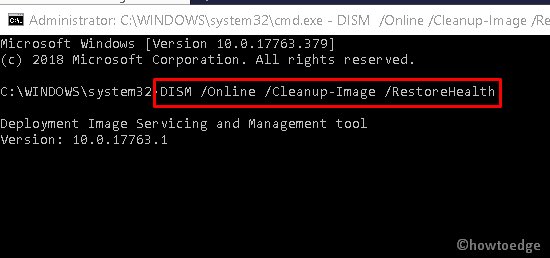
- On the elevated command prompt, copy-paste the below code then hit Enter to execute it.
DISM /Online /Cleanup-Image /RestoreHealth

Don’t interrupt your computer for approx 20 minutes, this is the max time it takes to complete this task. Once over, Restart your system and check if Windows Defender error code 0x8007139f still exists or has been resolved now.
10] Create a New User Account
Sometimes, when a logged-in user account gets damaged, Windows Defender error code 0x8007139f might also appear. In such cases, one should create and change the User account to overcome this problem. The procedure is quite easy, all you need is to follow the below instructions –
- Right-click on the Windows icon at the left corner of the desktop and select Settings from the list.
- On the new screen, tap Accounts followed by Family & Other people on the left pane.
- Switch to the corresponding right-hand side and select Add Someone Else To This PC.
- Now click on I Don’t Have This Person’s Sign-In Information followed by the Next option.

- Provide a valid email id or phone then hit Add A User Without A Microsoft Account option.
- Succeeding after, put the Username and Password in their respective fields then jump to the Next option.

At last, switch to the newly created user account and check if the issue has been resolved. If not, try the below fixes.
11] Reset the Windows Update Components
Many a time, when the update components get corrupted, this may also lead to errors like this. One might avoid this issue by resetting the OS components to their default states. Here’s how to perform this task –
- Firstly, hit on the search icon and type Command prompt.
- Right-click on the best-matched result and select Run as Administrator.
- Tap Yes on the UAC prompt to authorize opening CMD as Admin.
- Near the blinking cursor, copy/paste these codes one by one and hit Enter at the end of each command.
net stop wuauserv
net stop cryptSvc
net stop bits
net stop msiserver
Ren C:WindowsSoftwareDistribution SoftwareDistribution.old
Ren C:WindowsSystem32catroot2 Catroot2.old
net start wuauserv
net start cryptSvc
net start bits
net start msiserver
- At last, reboot your PC so that the changes made so far become effective.
12] Perform a System Restore
System Restore is a nice feature on Windows that helps to revert back your current OS to its earlier version when it was functioning pretty well. Assuming the Windows Security was functioning perfectly, you may try this feature to resolve Windows Update-related issues. Performing System Restore is quite easy, just follow the below steps –
- Jointly press the Win key & S to start the Search window.
- Type Create a Restore Point in the text box then hit Enter.
- Now on the pop-up window, hit the System Restore button followed by the Next button.

- Here select your past restore point then Next to proceed.
- Thereafter follow the on-screen instructions to complete this process.
As this is a point where your system was running smoothly, this might bring back your old Defender and thus solve the currently occurring error code on it.
13] Check the exclusions list
The presence of malware or viruses may also cause Windows Defender to fail on some error codes. Check the exclusions list on your PC and see if you find any anomaly there. Here’s what you need to do next –
- Press the Win logo & I to launch the Settings app.
- Tap Update & Security on the next window thereafter Windows Security from the left pane.
- Move to the right pane and hit Virus & threat protection option.
- Under the Virus & threat protection settings section, hit the Manage Settings link.
- Again on the next screen, scroll down the cursor and click Add or Remove exclusions under the Exclusions section.

In case, the system drive is listed here, delete the same. This procedure will completely remove Defender-related issues.
I hope that you are now able to fix the Windows Defender Error 0X8007139F issue on your PC. If you have any queries related to this article or its contents, do ask us in the comment section below.


