Are you experiencing issues with your Windows PC stuck on the Restarting Screen? Well, this mostly happens when you upgrade to a recent Build Update or after you encounter some Blue or Black Screen of Death Errors.
In this post, we have discussed the reasons behind its occurrence along with some probable fixes to this issue on your Windows 11/10 PC.

Why is my Windows not responding to restart?
When your system meets one or a combination of the following issues, your display screen might freeze or become unresponsive.
- You’re using some bad or corrupt USB devices
- A few system apps have become unresponsive during PC restart
- Issues with internal files, folders, or even BIOS
- Pending Windows Update or BIOS Update
- Accumulated Cookies or Caches on your computer
Enabled Fast Startup, Unresponsive Device Drivers, and Disabled Indexing Services are a few other reasons that may cause Windows Stuck on the restarting screen.
Ways to Fix Windows Stuck on Restarting screen
Now that you know what may trigger this issue, let’s learn the fixes which you may overcome this issue on a Windows 11/10 PC.
1. Wait for Some Time
At times, Windows takes some time to complete the restart process, especially after a recent Windows Update. If that indeed is the case, wait for some extra time and check if it eventually progresses.
2. Unplug External USB Devices
If you have plugged some USB devices into one of your device’s ports, and this issue starts appearing, you may unplug all those devices, and force restart your PC.
3. Force Restart your PC
If Windows is stuck on the restarting screen even after removing the external devices, you must force restart your PC. You may perform this task by holding down the power button until your computer turns off. Wait for the next 5-10 seconds, and then turn your device back on and check if the issue persists.
Alternatively, you may also use Command Prompt to force restart your computer. This method will work only in cases where you can access CMD at least. All you need is to execute this code on the elevated console and hit Enter.
shutdown -r
Note: If you can’t even load Command Prompt on a stuck Windows Screen, boot into Safe Mode, and then repeat the above step.
4. Boot into Safe Mode
Assuming you are not able to power off your device using CMD, you must boot into Safe Mode. This mode disables all third-party app interactions and interferences and thus it might resolve the Windows Stuck on the Restarting Screen issue. Here’s how to perform this task –
- Restart your Windows PC first.
- Press the F8 key repeatedly before the Windows logo appears.
- Enter Advanced Boot Options, and choose to enter Safe Mode.
Wait for your system to boot into Safe Mode and as soon as it happens, check if Windows starts working normally. If it does solve this issue, you have some faulty or unresponsive app or driver.
5. Check for Driver Updates
Outdated or corrupt device drivers may also result in the Windows Screen stuck on the restarting screen. If that’s the case, you may follow these steps –
- Go to Settings > Windows Update > Advanced options, and check what’s there inside the Additional updates.
- If you do see any pending driver updates under the Optional Updates section, click on it.
- Tick all the checkboxes, and hit Download and Install.

After you download and install all pending driver updates, restart your PC, and check if the issue is resolved thereafter.
6. Close Unresponsive Apps
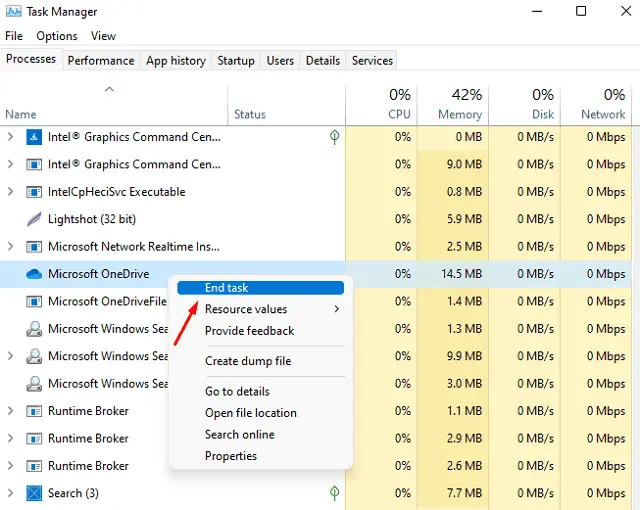
There’s a possibility of some unresponsive apps preventing Windows from functioning normally as well. You may confirm the same via opening Task Manager (Ctrl + Shift + Esc).
In the task manager window, locate and close all background apps by pressing the End Task button. Reboot Windows and check if this resolves the issue that you are struggling with.

7. Try SFC, DISM, and CHKDSK Tools
Corruption within the hard drive, or with the system files, folders, and System Image may also result in different issues on a Windows PC. Before you try out any advanced fix, we recommend attempting all these command-based tools and checking if the issue resolves hereafter.
- Force restart your PC by pressing the power button.
- Power on your computer again using the same power button.
Repeat the above two steps 2-3 times, and you will find your device entering the Windows Recovery Environment. Once you are there, navigate to Troubleshoot > Advanced options, and select Command Prompt.
- Command Prompt will launch having the admin rights.
- Well, run the System File Checker Utility first by executing this command –
sfc /scannow

- Wait for this scan to complete 100%, and as soon as it completes, run the DISM tool.
- All you require is to run these commands on the same prompt one after another –
Dism /Online /Cleanup-Image /ScanHealth
Dism /Online /Cleanup-Image /CheckHealth
Dism /Online /Cleanup-Image /RestoreHealth

- If it was due to file corruption, the issue must have been resolved by now.
- However, we suggest running the CHKDSK command next to inspect for bad sectors in your hard drive. For this, you need to execute this command –
chkdsk C: /f /r /x

- After you have run all these tools successfully, restart your computer, and see if the problem stands resolved now.
8. Check for Malware
Bad files including viruses or trojans may also result in Windows Stuck on the Restarting Screen issue. If that’s the case, you must boot into Safe Mode, and disable Windows Defender. You may perform this task via the Services window.
Note: If you use some third-party antivirus, make sure to uninstall that from the Control Panel while remaining in the Safe Mode.
9. Uninstall Recent Updates via Advanced Options
If you are encountering this issue after a recent Windows Update installation, you must uninstall that update via Advanced startup options.
This method is more important when you receive a Blue/Black Screen of death errors on your computer. Follow these steps to initiate the uninstallation process –
- Access the Advanced Startup options (as guided above).
- Choose the Troubleshoot option from the Windows Recovery environment.
- Click on Advanced options > Uninstall Updates.
- Select either the Uninstall latest quality update or Uninstall latest feature update, depending on your specific requirement.
- Follow the on-screen instructions to complete the uninstallation process and subsequently check if Windows restarts correctly.
If this method fails as well, you may perform a system restore within the Windows Recovery Environment (WinRE). This method works only if you have previously generated a restore point on your computer.
10. Use System Restore via Advanced Recovery
As stated before, you can use this method only when you have some restore point available on your computer. If you didn’t, skip this solution and proceed to the next one.
Assuming you did have a system backup, follow these steps –
- Go to the Advanced Startup options and then click on the Troubleshoot > Advanced options.
- Now, choose the System Restore option and select the user account to perform this action on.

- Then, enter the password of the account and click on Continue.
- Select the restore point followed by the Next button.
Follow the on-screen instructions to complete the remaining steps.
11. Try Startup Repair
Startup Repair is a Windows feature designed to fix problems that might be preventing your computer from starting correctly. Here’s how you can use Startup Repair –
- First of all, access Advanced Startup Options.
- Select Troubleshoot > Startup Repair.

- Windows will begin diagnosing and attempting to fix any issues preventing your computer from starting correctly. This process might take some time, so wait patiently.
- If Startup Repair identifies and fixes the problem, your computer may restart automatically. In case, there is some action required from your side, you’ll be prompted with instructions on how to proceed.
I hope the issue resolves after performing a startup repair on your Windows PC.
How to access Advanced Startup Options
When you are unable to boot into Windows, you can access the Advanced Startup options by holding the Shift key while clicking on the “Restart” option from the Start menu.
Alternatively, you may also use a Windows installation media to boot your computer. Insert the installation media and restart your computer. You may need to change the boot order in the BIOS/UEFI settings to boot from the installation media.
How to force restart a Windows PC
There are four different ways by which you may force restart your computer and they are as follows –
- Using Power Button: Hold and press the power button until your computer shuts down.
- Task Manager: Press the Ctrl + Alt + Del keys together. Doing so will open a window with some advanced options. Choose Sign out or use the Power button to restart/shut down your PC.
- Windows PowerShell: Launch PowerShell as an administrator and execute the following code on it – Restart-Computer.
- Command Prompt: Launch CMD as administrator first and then run the following code on it – shutdown -r.
I hope you are now able to resolve the Windows Stuck on the Restarting Screen issue. Let us know in the comment section which solution exactly works in your case.


