Some users encountered Error Code 0x80240031 while attempting to upgrade their Windows 10 OS to a newer build. This error code generally occurs due to the damaged system files or corrupted registry files.
Earlier this error was only associated with Windows 8 and Windows 8.1 but nowadays it has become a serious concern for Windows 10. If you’re looking for any resolution to avoid this problem then this article may help you.
In this article, we have included some effective workarounds that may likely help you to fix this issue. So let’s see how to fix this error.
Ways to fix update error code 0x80240031 in Windows 10
To fix update error code 0x80240031 in Windows 10, use the steps –
Solutions List
1. Perform a clean boot
- Press the Windows+S shortcut key to open the Windows Search bar.
- In the text bar, type System Configuration and press Enter.
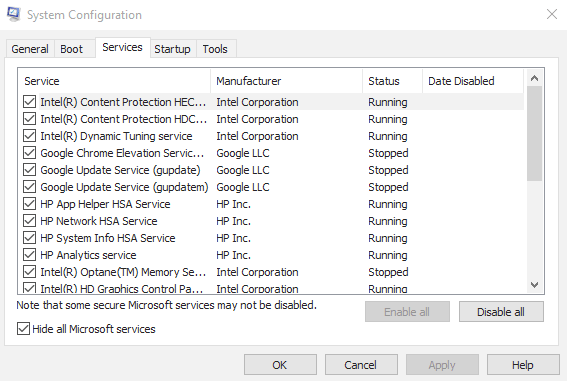
- Once the System Configuration window opens, switch to the Services tab.
- Now go to the left bottom corner and mark the checkbox next to Hide All Microsoft Services.
- Then click Disable all available at the right-bottom.
- Go to the Startup tab and hit Open the task Manager.
- In the Task Manager, select the services one by one and hit the Disable button.
- Repeat this process until you turn off all the running services.
- Now close the window and back to the System Configuration page again.
- Click Apply > OK button to save the changes.
- Restart your computer.
Once you complete the process, try to install the update again and check if it works.
Now open the System Configuration again as explained above. On the General tab, select Normal Startup. Then go to the Services tab and unmark the Hide all Microsoft services option.
After that, move to the Startup tab and select Open Task Manager link. In the Task Manager, select Enable All to activate all startup programs. Lastly, hit OK and restart your device.
2. Run System File Checker and DISM Tool
If performing the clean boot doesn’t fix it then run the System File Checker tool to fix the corrupted or damaged system files. To continue, follow the instructions below:
- First of all, open the command prompt with admin rights.
- In the elevated command prompt, type the below command and press Enter.
sfc /scannow
- This will take a couple of minutes to complete the searching/repairing process, so wait till then.
- Once it is over, restart your computer to apply the changes.
Now run Deployment Image Servicing and Management (DISM) scan to repair the corrupted system files. Here are the steps:
- Open the elevated command prompt again.
- Type the following commands and hit enter after each one –
Dism /Online /Cleanup-Image /ScanHealth
Dism /Online /Cleanup-Image /CheckHealth
Dism /Online /Cleanup-Image /RestoreHealth
-
It may take a couple of minutes to finish the work. So wait patiently without intervening it. Once it completed, restart your PC to apply the changes.
3. Disable the Graphics Card Driver
Sometimes these types of problems also occur due to the graphics card driver installed on your computer. So, we suggest you disable your graphics card driver temporarily and then try to upgrade your operating system. Here is how to do:
- Right-click on the Start button and select Device Manager from the menu list.
- Once the Device Manager opens, go to the Display Adapters and then expand it.
- Now right-click your graphics card and select Properties from the options.
- In the Properties window, go to the Driver tab and select Disable Device.
- Then click the OK button to save the changes.
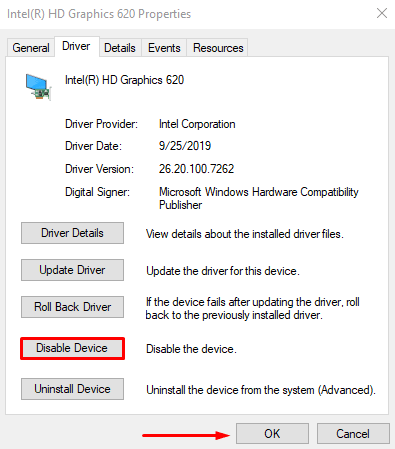
Now reboot your computer and check if it works. Once you’ve complete the process successfully, navigate to the manufacturer website, and install the latest version of your driver.
4. Perform an Automatic Repair
If you are still encountering Error 0x80240031 while upgrading Windows, we recommend you to perform an automatic repair. Here are the steps:
- Launch Windows Settings using Win+I shortcut key.
- Select Update & Security >Recovery.
- In the right pane, click Restart now under Advanced Startup.
- Once it starts up, navigate to Troubleshoot >Advanced Options >Automatic Repair.
