Microsoft respects user’s privacy and is always ready to provide a resolution following which users may take care of their ill-choices that they made some time back. Today, in this tutorial, we will cover one such topic i.e. how to prevent apps from taking screenshots on Windows 10 devices.
Programs in Windows 10 seek several capabilities that are of no use to them. One such capability is allowing your camera access to Windows 10 apps. After having access to your webcam, these apps may take screenshots with or without your permission, and send them to their servers (provided your PC is connected to the internet).
In case you no longer want apps taking screenshots of your display screen, there are two ways. The first one is selective disabling apps that access your camera app on the Windows Settings page. Using this, you may also turn off the webcam access to all programs. Secondly, navigate to the registry editor, and make the required changes.
How to Stop Apps taking screenshots in Windows 10
If you are using any application downloaded from Microsoft Store, you must check what permissions exactly you have allowed them. To view and prevent apps from taking screenshots in Windows 10, try any one of the following two methods –
1] Modify Camera Settings
The best way to stop Windows 10 apps from taking snapshots is by disallowing their camera access. To do so, use these steps –
- Press WinKey + I to launch the Settings app.
- Select Privacy > Camera (under App permissions on the left column).
- Scroll down to the “Allow apps to access your camera” section on the right pane.
- You should find a toggle switch just below this section, slide it to the left. See the snapshot below –

- Disabling this will turn off camera access to all programs that are installed on your device.
- Alternatively, you may also selectively turn off the toggle switches next to the installed apps.
2] Modify a key entry on the registry
In case you don’t want any apps accessing your camera, you may modify a key entry on the registry. Here’s how to perform this task –
- Press Win + R to invoke the Run dialog.
- Type “
regedit” and hit OK. - When the UAC window prompts, click Yes.
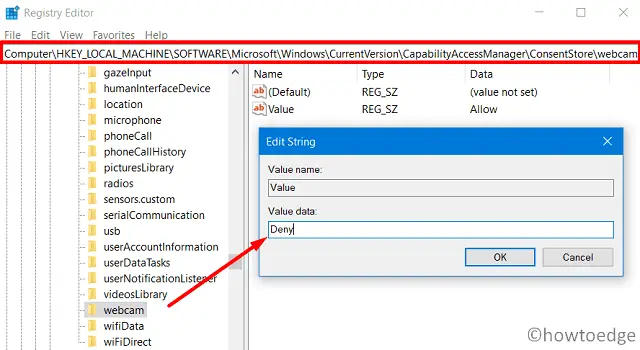
- On the registry editor, navigate to the below path –
HKEY_LOCAL_MACHINE\SOFTWARE\Microsoft\Windows\CurrentVersion\
CapabilityAccessManager\ConsentStore\webcam
- Jump to the right side and look for a key entry titled “Value“.
- Double-click over this string and type “Deny” under the value data field.

- After editing this file, close the registry, and restart Windows to make the changes effective.
From the next logon, the internal or external programs on Windows 10 won’t be able to take any screenshots. In case you want to undo the above changes, re-visit the above path, open the “Value” string, and type “Allow” under the value data field.
I hope this article helps with what you were looking for. If you have any queries or suggestions, let us know in the below comment section.
Read Next:


