These days, everything runs online whether it is children’s classes, software companies, or others. Since pretty much everyone is working from home, they can’t stay silent forever or perform activities without producing any noise. This is the reason why we receive unwanted background noise when we attend a class or join a meeting on Microsoft Teams.
Background noise in all aspects is distracting and prevents participants from listening clearly to what is being told. So, if you want to reduce it on your device, you have to modify related settings on the Devices page. You need not require to download and install the Microsoft Teams app, as you can modify the setting right on any web browser. Let’s explore how to reduce the background noise during meetings or online classes via the Teams app –
Reduce Background Noise in Microsoft Teams
Whether you are in a meeting or an online class, the background noise is one thing that you must bear. But what if you are the one who is annoying others by singing softly or mumbling a few words every now and then. Even activities like flipping pages or shuffling papers produce some sound and that comes pretty loud over a meeting. You can’t control such things as they do come naturally to people. What you can do at the max is to suppress the noise over an ongoing meeting. Here’s how to perform this task –
- First of all, open the Microsoft Teams app.
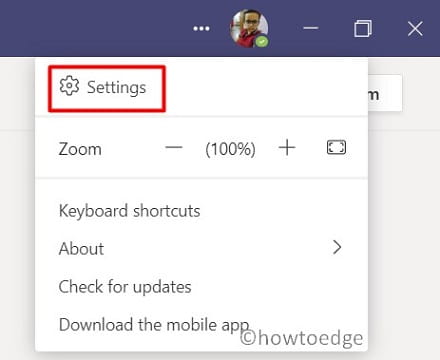
- Go to the top-right corner, click the three-dots, and select the gear icon i.e. Settings.

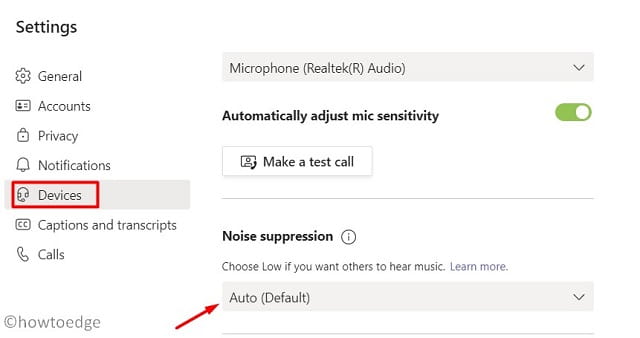
- Select Devices on the left pane.

- Use the drop-down menu next to Noise Suppression and select an appropriate setting.
By default, it is set to Auto. You may change it to high if you do want to suppress noises coming from the background. In case you want others to hear everything clearly, change its setting to Low.
Note: There’s an option to completely turn off the Noise suppression as well. Use this setting only when you want to hear everything that is being said or told in an online class or in a meeting.
- Press the Esc key to come back to the ongoing meeting.
How to decide which setting is beneficial for you
To decide which option to go for, you need to first understand what different terms mean inside Noise Suppression. The below guideline may help you a bit in deciding which option is best for you.
First of all, know the exact meaning of different terms inside this setting –
- Auto: This is the default setting on Microsoft Teams. As per the company, they use artificial intelligence to control the background noise and pick the appropriate noise-suppression level accordingly.
- High: When selected, this will cancel out all background noise while you’re speaking.
- Low: Going for this option will cancel persistent sound be it like coming from fans, AC, etc. In this, you may play soft music and no one will notice.
- Off: Opting this setting will turn off the Noise Suppression and thus every other participant will hear what you say or sing.

Tip: After you select a setting, the same gets applied across all your devices by default. So, choose it wisely.
That’s it, I hope you find this article useful and are now able to reduce background noise on Microsoft Teams.


