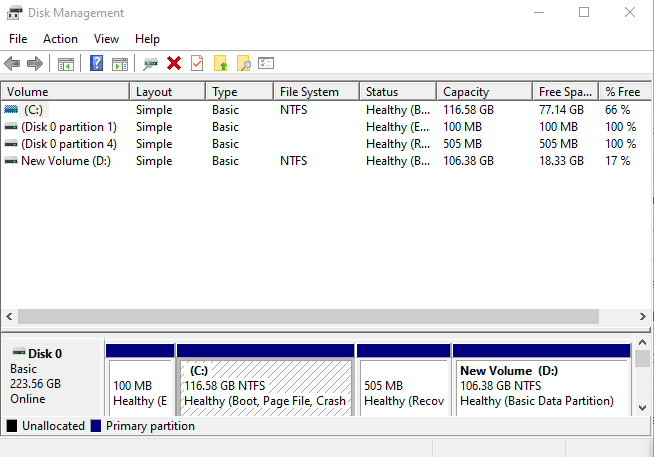
There might be several drive partition available in your single physical storage drive. However, if you want to organize your drive, you may need to delete a drive partition so that it could create separate partitions out of your Hard disk drive (HDD) or SSD based storage.
Windows 10 Operating System offers several tools that ease your process to organize drives. Using these tools, you can delete any partition and increase the size of another partition to allocate their storage to your partition. This will remove the unimportant data and you can start anew with the overflowing partition. There are also some tools available that can clean the storage and prepare that partition with a different file system.
In this article, you will know different ways to delete a drive partition on windows 10 using PowerShell, Disk Management, and Command Prompt.
Remove or Delete a drive partition on Windows 10
Here is how to delete the drive partition on Windows 10 computer:
Attention: Applying the following methods might delete all your files and data stored inside the partition. Therefore, please create a backup of your important files and folders if they are important.
1. Remove a Drive Partition using Disk Management
Disk management is an inbuilt tool to manage disk space. Following are the instructions to delete a drive partition on Windows 10 using Disk Management:

- Click Start, type Disk Management, and select the Create and format hard disk partitions from the menu.
- In the Disk Management window, select the partition you want to delete.
- Right-click on the partition you want to delete and choose the Delete Volume option.
- Confirm by clicking Yes.
Once all the step completes, the drive partition and their content will delete. This will increase the space availability in other partitions.
2. Delete a drive partition using PowerShell
You can delete drive partitions using two methods on PowerShell. Either you can use the drive letter or the partition number to delete the partition. Both these methods use different commands.
{1} Using drive letter on PowerShell
Here is the tutorial to delete drive partition using drive letter on PowerShell:
- Right-click on the Windows icon and choose PowerShell (Admin) from the menu.
- In the elevated window, type the command given below to get the list of all the partitions available and hit Enter.
Get-Volume
- Now type the command given below to delete the desired partition and hit Enter.
Remove-Partition -DriveLetter PARTITION-LETTER
Note: Don’t forget to replace the PARTITION-LETTER for the letter of the desired partition you want to remove. For Example, if you want to delete the E partition, replace the PARTITION-LETTER with E.
- In the PowerShell window, Confirm the deletion by typing Y and hit Enter.
The above steps will remove the drive partition and the content available in it.
{2} Using Drive Number on PowerShell
Here is how you can do:
- Open PowerShell with Admin access.
- In the PowerShell window, type the following command to get the list of all available partitions and hit Enter.
Get-Disk
- Type the command given below to get the list of all the partitions available on the particular drive and hit Enter.
Get-Partition -DiskNumber DRIVE-NUMBER
Note: Make sure that you have replaced the DRIVE-NUMBER with the number of the drive having the desired partition you want to delete.
- Now type the command given below to delete the partition along with its content and hit Enter.
Remove-Partition -DiskNumber DRIVE-NUMBER -PartitionNumber PARTITION-NUMBER
Note: Don’t forget to replace the DRIVE-NUMBER with the number of the drive having the desired partition you want to delete. Replace the PARTITION-NUMBER with the number of the partition that you want to delete.
- Confirm the deletion by typing Y and hit Enter.
These steps will delete the desired partition and its contents.
3. Remove a Drive Partition using Command Prompt on Windows 10
Command prompt also offers the feature to delete the drive partition.
{1} Using the Volume command
Here are the steps:
- Open the Command Prompt with admin access.
- In the elevated window, type the command given below to start diskpart and hit Enter.
diskpart
- Now type the following command to get the list of all the volumes and hit Enter.
list volume
- Type the given command and hit enter to choose the volume you want to delete.
select volume VOLUME-NUMBER
Note: Replace the VOLUME-NUMBER with the number of the volume you want to delete.
- Confirm the deletion by typing the following command and hit Enter.
delete volume
- After finishing all the steps, the desired partition and its content are no more available in your system.
{2} Using the partition command
Given below is the tutorial to delete the partition with the partition command:
- Open Run dialog box using Windows + R shortcut key.
- Type cmd and type Ctrl + Shift + Enter to open Command Prompt as administrator.
- In the elevated command prompt window, type the following command and hit Enter to start the diskpart.
diskpart
- Now type the command given below and hit enter to get the list of all the available drives.
list disk
- Type the following command and hit enter to choose the drive having the desired partition that you want to delete.
select disk DRIVE-NUMBER
Note: Replace the DRIVE-NUMBER with the number of drives that have the desired partition that you want to delete.
- In order to list all the partitions available in the above disk, type the command given below and hit Enter.
list partition
- Now select the desired partition by typing the command given below and hit Enter.
select partition PARTITION-NUMBER
Note: Replace the PARTITION-NUMBER with the number of the partition that you want to delete.
- Confirm the deletion by typing the following command and hit Enter.
delete partition
I think now you are can easily remove or delete a drive partition on your Windows 10 PC.


