Creating a System Restore point in Windows 11 or 10 PC is an essential thing, to begin with, while setting your PC. Several of us, don’t create such a backup until we face difficulty accessing our important data, files, or folders. Its importance is much realized when your PC stops responding.

System Restore Point: When its need arises?
Windows 11 or 10 OS is not without bugs or errors. Every time you install a new patch update, there is a possibility of something going wrong. It could be anything like changes in system files, settings, Registry, device drivers, or new apps.
You can create a System Restore point manually as well. However, do so only when your system is working alright or when everything is reset anew.
Ways to use System Restore in Windows 11/10
Before applying any changes in the section aforementioned, do create a System Restore Point so that if anything goes wrong, data can be restored without losing any specific file or folder. By default, System Restore is disabled in Windows 11/10. So, you have to activate this tool first to begin creating the backup. When you enable it, this automatically starts creating a restore point (quite useful).
Here is the process to use System Restore on Windows 11 or 10 PC –
1] Turn on System Restore
Restore Point is nothing but a feature to create a system backup on Windows 11 or 10 devices. Once enabled, this will automatically create a backup point of all your recently modified data or any other changes on the computer. Before you start creating a backup, you need to first enable the system protection. Here’s how to turn On this feature in Windows 11 or 10 PC –
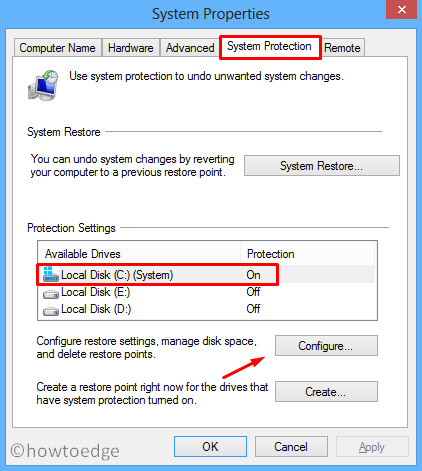
- Press Win + S and start typing “create a restore point” in the text field.
- Click the top result to launch the System Properties window.
- By default, this will land in the System Protection tab. If not, go to the System Protection tab.
- Under Protection Settings, you may see all your disks listed there.
- Select a disc (preferably the root drive), and click the Configure button.

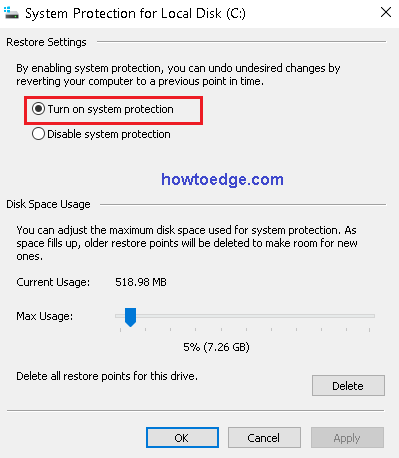
- On the succeeding screen, tick the radio button -“Turn on system protection” and click Apply then OK.

How can I allot more storage spaces to System Restore Point?
By default, the allotted storage space for System Restore is around 550 MB. However, if you wish you may increase or decrease this size. To do so, follow these steps –
- First of all, launch the System properties window (as guided above) and select the System Protection tab.
- Under Disk Space Usage, you may see its current usage.
- Microsoft will display a maximum size up to which you can increase the system backup size.
- Move the slider and stop it at your preferred choice.
- Click Apply then OK to confirm this change.
After you have enabled System Protection and have selected a pre-defined storage space, your device is now ready for generating a restore point.
Tip: Sometimes, you may go out of sufficient space available to create new backups. In such a scenario, you have two options to choose from. Either delete the previously created backup or use the slider to allow even more space. To delete a restore point, follow this guide.
2] Manually create a System Restore point
The restore point would be created automatically, whenever you turn on the system protection checkbox. If this option is not activated, you can create it manually by following the simple steps described below. It will protect and recover the data if any discrepancy occurs.
- Go to the Search bar and type create a restore point, click on the best result from the list.
- When the System Properties dialog box appears up, tap the “Protection Settings,” tab.
- Select the root drive (
C :\) then click on the Create button. - Now type the description here, this will help you to identify the restore point in the near future when you plan to revert your PC back.
- At last, hit the Create button and wait until the task gets finished.

Now that you have created a restore point, you may use it to revert your PC back to this state whenever the need arises. The system corrupts often after installing a buggy update, a faulty application, changes inside the registry, etc.
3] Use System Restore when you can access the desktop
Sometimes you may come across an issue while doing some important changes on your Windows 11 or 10 PC. The bug could be anything like a blue screen error, the system crashes in an infinite loop, etc. If that’s the case, you may roll back the recent changes using a restore point that has been created previously.
Read the steps below to understand it well –
- Go to Start and write Create a restore point in the search box.
- Press Enter to launch the System Properties dialog box.
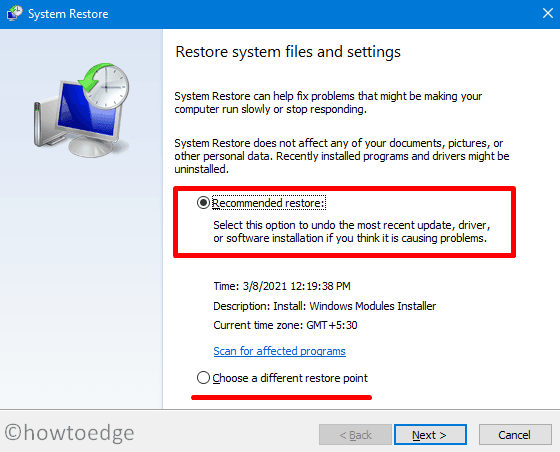
- Under the protection tab, tap the System Restore button thereafter click Next to go ahead.
- Your PC will display the recently created
system backupunder the name “recommended restore”.

- You may either select it or choose a different restore point.
- Click Next.
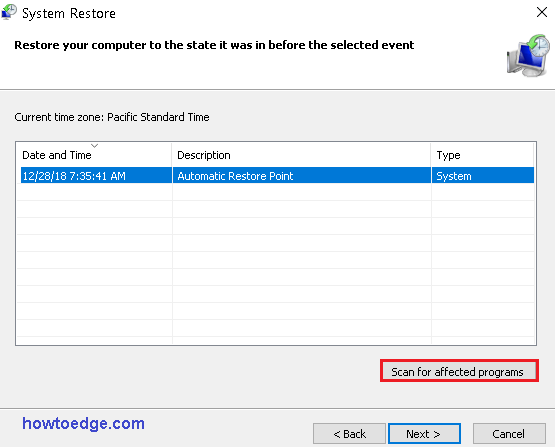
Tip: Make sure to click Scan for affected programs at the lower section to view the applications that will be removed after you went ahead with the restore point. Only those apps which were created after the generation of a restore point will be deleted.

- Click Close and then Finish to begin restoring your device to a working point.
- Lastly, click Finish to complete this task.
In the end, your PC will automatically use the previous settings thus letting everything starts anew and smooth.
4] Undo a restore point when you cannot sign into Desktop
The Undo system Restore tool is only applicable when you can access the desktop. In several situations, this error will make your PC stuck and prevent the sign-in on the Desktop Screen. If that’s the case, you can use your Restore point using the advanced option.
- Press and hold the Power button until the PC is turned off.
- Again push this button and wait till the Window logo appears.
- Repeat this process until the Windows logo screen or automatic repair screen comes up. Usually, you need to try three times.
- Click on the Advanced Startup option thereafter Troubleshoot on the next screen.
- After this click on Advanced options and select System Restore from the list.
- On the succeeding page, hit Next.
- Here choose the most recent restore point to revert your PC back.
- After that hit the Scan for affected programs button. It will look for the applications which have been installed after the last created Restore point and remove them all.
- Click Close and then Next.
- Finally hit Finish to begin restoring your PC.
Note: In case you could not avail of the automatic repair window, insert Windows installation media, and push the power button.
Simultaneously press the respective function key to open BIOS. Here click Next then on the Repair your computer button. Now follow the same steps as guided above.
Final words:
The same system restores steps that are applicable for all Windows operating systems i.e. 11, 10, 8.1, 8, and 7. Do note that this tool does not replace the full backup or reset your system to factory default. In case there is a fault in the hardware, you might not use this recovery tool.
That would be all! If you have any queries or suggestions related to this article, do write in the comment box.


