“Your IP Has Been Temporarily Blocked” is a common network-related issue and it occurs when your IP address has been flagged as suspicious or harmful. Though this might not be the case entirely, you should confirm it with “What is my IP Address?”
If you find yourself unable to access a website on account of this issue, learn what you may do to overcome this issue on a Windows PC. Additionally, we have also discussed the reasons that could trigger this error on your device in the first place.
Why is my IP Address blocked?
There are many reasons why your IP address could be blocked from accessing different websites online. If you are seeing an “IP banned” issue on your Windows PC, this could be because you are involved in either of the following practices.
- Suspicious or Spamming Activities: This is the most common reason why an IP address is banned. If you indeed perform some activities like illegal downloads or sending spam emails, your IP address can get blocked. When some websites or organizations find you involved in such activities, they might impose an IP ban on you.
- Geographical restrictions: Many websites often enforce restrictions like allowing users from certain locations to not view their content. This mostly happens when your residing country is banned from accessing their sites.
- ISP blocking certain sites: Internet Service Provider (ISPs) always follows the rule of the land. As a result of this, they impose restrictions on viewing content that is blocked by your Government. Get in touch with your ISP, and ask them for network security policies.
- Viruses or Malware Infection: The presence of viruses or malware inside your PC might also restrict you from accessing certain websites’ pages. Perform a full scan and get rid of viruses on your computer, and this problem resolves on its own.
Now that you know what possibly could result in an IP ban on your Windows PC, let’s explore the seven solutions that might help you overcome this issue.
1. Check if Your IP Address Is Blacklisted
If you find your IP address banned while visiting some famous sites, this must be because your IP address is blacklisted. Many website owners place a ban on suspicious IP addresses to prevent users from spamming their sites.
You may check if your IP address is indeed blacklisted or not by visiting the What is My IP Address site’s Blacklist Check page. When you open this website in your default web browser, your ID address will be visible in the text field.
Click on “Check IP address“, and you will get a list of domains that have blacklisted you from accessing their sites. If you find some famous sites blocking you, contact your internet service provider (ISP) and request a solution to this problem.
2. Use a Different Network Connection
If you don’t see your IP address blocked by a particular website that you are trying to access, this error must be occurring because of some network issues. Well, connect your device to a different network and check if you can access that specific website now.
3. Restart your Router
In case you don’t have access to a different network, you should try restarting your Router. When you reboot the Router, this will reset your dynamic IP address. A dynamic IP address changes every time you reboot your router and provide you with a new IP address.
Since you are now using a new IP address, you are less likely to get into the same “Your IP has been temporarily blocked” issue again.
Note: This fix is applicable only when you are using a dynamic IP address instead of the conventional static IP address.
4. Enable or Disable VPN/Proxy Server
Depending on whether you use some VPN services or Proxy Servers on your PC, change their current status. If you are connected to a VPN service, make sure to disable it on your computer. The same applies to using a Proxy Server as well.
After you do this, check if this resolves the “Your IP has been temporarily blocked” on your Windows PC. You may alter VPN or Proxy settings by visiting the following path in Windows –
Settings > Network & internet > VPN/Proxy

5] Enable Hotspot in your Mobile and connect it to your computer
Most of us have separate internet connections on our Computers and Mobiles. If your PC’s IP address has been blocked, enable Hotspot on your mobile, and connect your PC to it via WiFi.
Visit the blocked site and check if you can access that site without any issues. In case you may access the “blocked site” for now, this means your IP address has been banned for some suspicious reasons.
6] Run a Full Scan using Windows Security
Sometimes you see an “IP banned” error due to the presence of viruses or malware inside your PC. Consider performing a full scan using Windows Security on your device. And, if it does find any viruses, make sure to quarantine them.
After it’s done, close and reopen your web browser and check if you can now access the blocked sites.
7] Modify the DNS Servers
The “Your IP address has been temporarily blocked” error mostly occurs on account of issues within the DNS Servers. If that’s the case, you should modify the DNS Servers and check if this resolves the website’s accessing issue. Here’s how to perform this task –
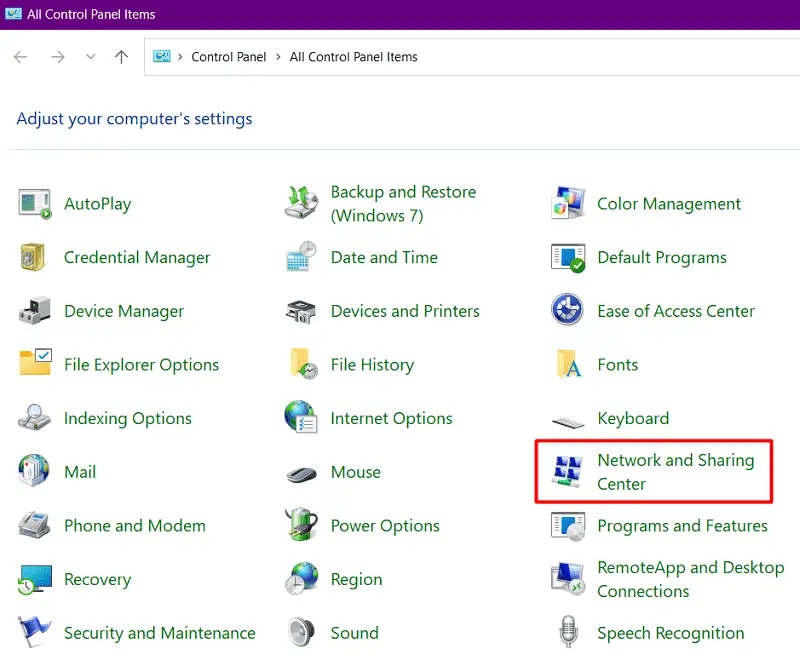
- Launch Control Panel first, and click on Network and Sharing Center.

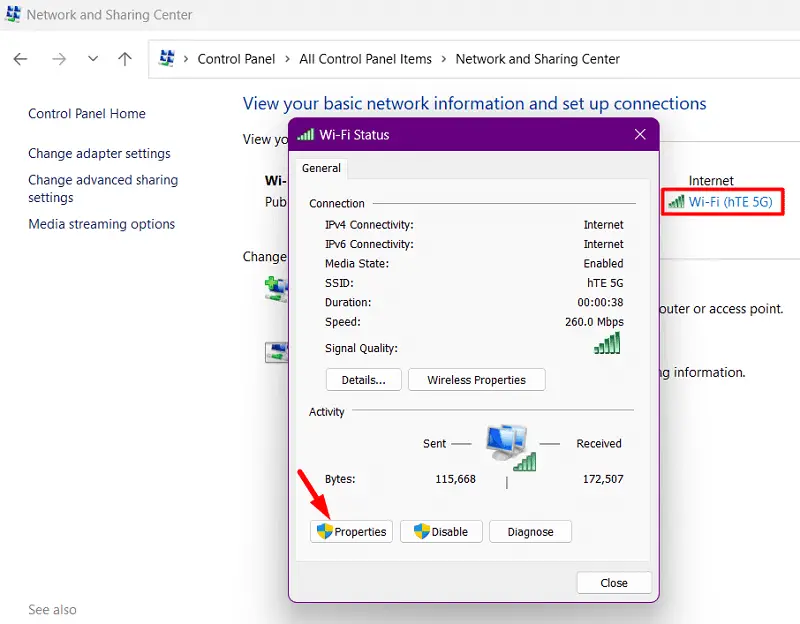
- Double-click on your Wi-Fi connection and select Properties.

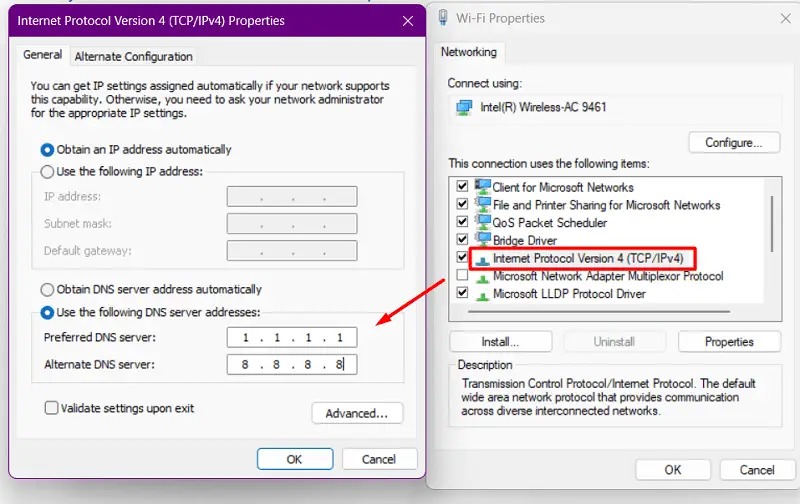
- Choose Internet Protocol Version 4 (TCP/IPv4) and when this opens up, do the following changes inside “Use the following DNS Server addresses”.
- Preferred DNS Server: 1.1.1.1
- Alternate DNS Server: 8.8.8.8

- Click OK to confirm changing the DNS addresses, and then OK again in the WiFi properties window.
- Press the Close button to quit the WiFi status page, and restart your computer.
That’s it, I hope this solution indeed resolves the “Your IP address has been temporarily blocked” issue on you may now regain access to blocked sites on your Windows 11/10 PC. Let us know in the comment section if you are still struggling with the same problem.

