Do you want to Add or Change Admin Login on Windows 10? If you have purchased a used laptop from someone and want to change the login name on the screen, read this article carefully. This is, in fact, a much-required task if you don’t want the other person to log in to appear on the Lock Screen of your system.
Here we will guide you through some easy workarounds to Add or change Admin Login on Windows 10. Clear Browsing data of Microsoft Edge, Create a new Admin Account then delete the old one, and resetting your PC might be the easy solution for this trouble. Let’s explore how to use them in detail:
Here is how to Change or Add Admin Account on Windows 10
1] Clear browsing data of Microsoft Edge
- Go to Cortana and type Microsoft Edge. Now click on the best-matched option to open this app.
- Again click on the Settings and more (…) icon present at the top right corner of the home page.
- Hit the Privacy & Security tab then “Choose what to clear” under the Clear browsing data section.

- Here mark the checkboxes against Browsing History, Cookies and saved website data, Cached data & files then hit the Clear button.
- This will remove the browsing history on Microsoft Edge. Thereafter check whether you can log into your PC or not. If not, try the next methods.
2] Remove the old Admin Account
If the above solution doesn’t get the work done, you need to delete the previous Admin Account. To perform this task, you should have another administrator account. In case you don’t have one, create a new account and then sign in with that account. Henceforth delete the old account. You can follow the below procedure to apply the same-
3] Create another admin account
- Press Win Key + I hotkey together to open Settings.
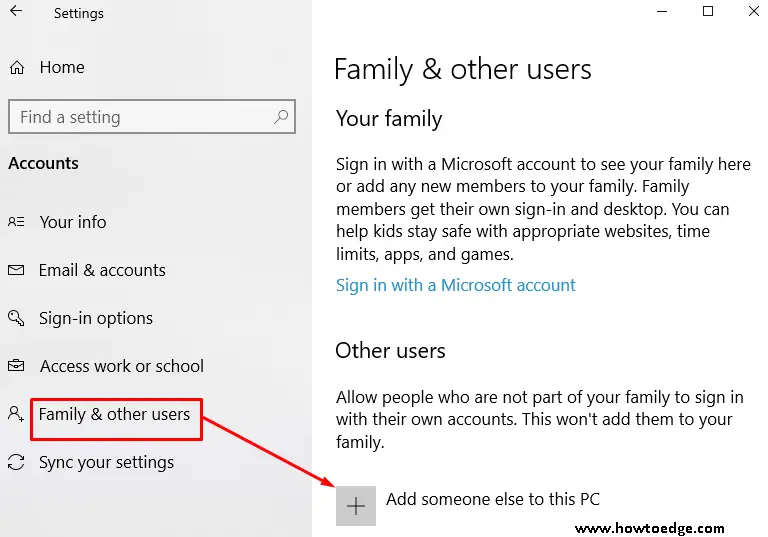
- Here select the Accounts category then Family and other users from the left pane.
- Switch to the right-hand side and choose to add someone else on this PC link.

- On the succeeding page, click sign in with your Microsoft account then hit the Next button.
- Once done, click on the Finish button.
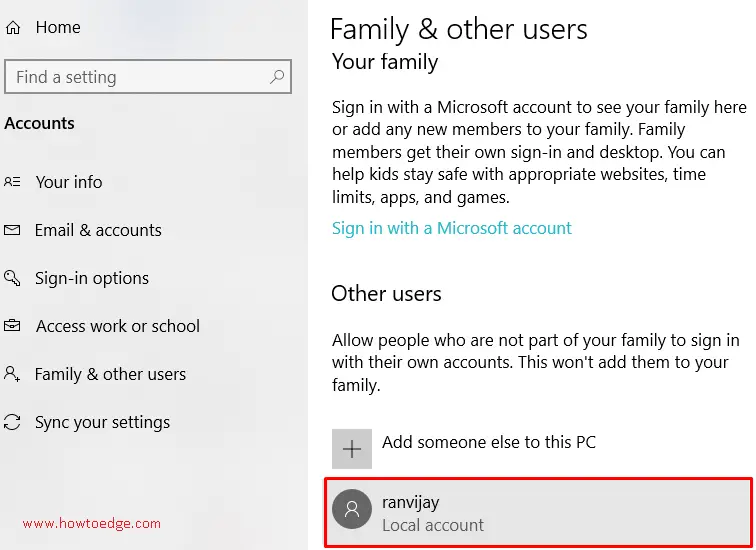
- The Family & other people will again pop up on the screen.
- Now go to the Other Users section and select the new account which is recently created.

- Here click “Change account type” and thereafter select Administrator from the drop-down menu.
- At last tap the OK button.
4] Sign in to the new account and remove the old account
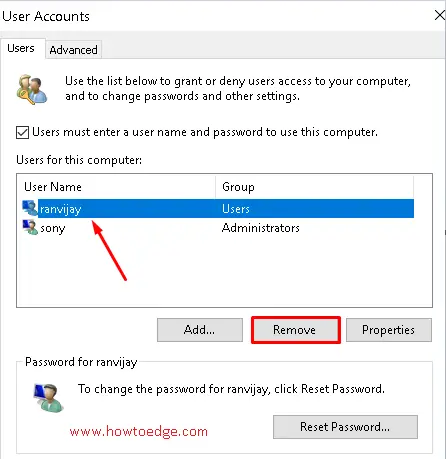
- Go to the Search icon on the Taskbar and type
netplwiz. - Now click on the same to open the wizard.
- Highlight the old account and click on the Remove button.

- Lastly, press Enter to confirm the changes.
- This will delete the old User Account. Now you can log into the system using a newly created account.
5] Reset your PC
In case the deletion of an old user account doesn’t help you to solve this problem, perform a complete Reset of your System. Doing this will perform a fresh install of Windows 10 OS on your System. The third-party drivers or software won’t get installed during this reset process.
The main advantage of this feature is that you don’t require a Windows installation media or product keys. Thus, you won’t need to enter BIOS to boot. Here are the steps to move ahead-
- Press the Windows key and X then select Settings from the list.
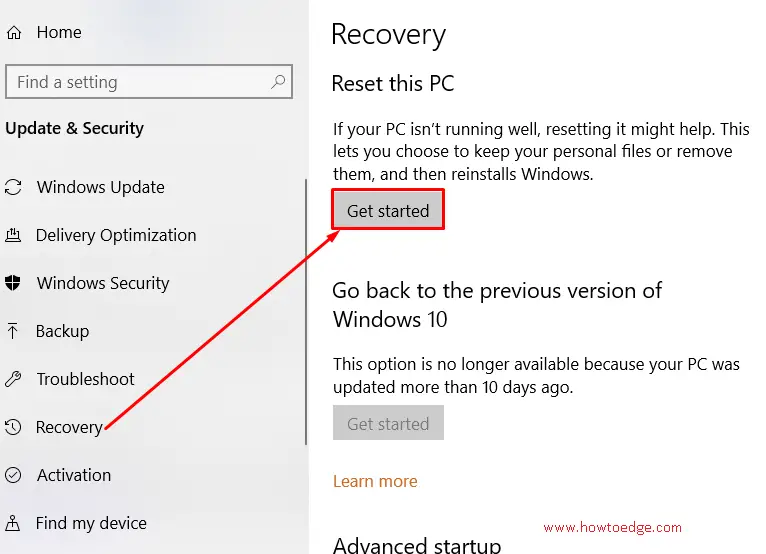
- Go to the Update & Security category and thereafter Recovery on the left column.
- Now switch to the right pane and click on the Get Started button under Reset this PC section.

- Once the PC is reset, the account name on the login screen gets resolved automatically.
Read Next:


