Though it’s a good thing to own a wide range of fonts, it always comes down to 1 or 2 fonts that one uses regularly on his/her device. As a result, all other fonts become useless and continue to consume system resources. In this guide, we will discuss how to block new fonts from downloading in Windows operating system.
Why do new fonts keep appearing on my computer?
There are numerous sources from where you may download and install new fonts for your computer. For example – Adobe, Office apps, Microsoft Store, etc. During a new font installation, a catalog installs as well. It is because of this catalog that new fonts keep appearing on your device. Apart from this, Windows too searches for new fonts that it can install on your computer.

How to Fix PDF Printer Error Invalid Font
How to Block Windows from downloading New Fonts
If you want to stop new fonts from downloading or installing on Windows 11 or 10 PC, try any one of the below two methods –
1] Modify the registry
The best way to prevent new fonts installation on Windows is by modifying the related registries. This works for all editions of Windows 10 or 11. Here’s how this process goes –
- Use Win + R to start the Run dialog.
- Type “
regedit” and hit OK to launch the Registry Editor. - The User account control window will come into view next, hit Yes.
- When the registry window appears, navigate to the following –
HKEY_LOCAL_MACHINE\SOFTWARE\Policies\Microsoft\Windows\System
- Check if there’s a DWORD entry named “EnableFontProviders” on the right pane. If not, create a new subkey and name it “EnableFontProviders”. To do so, right-click anywhere on the right section, and hit New > DWORD (32-bit).
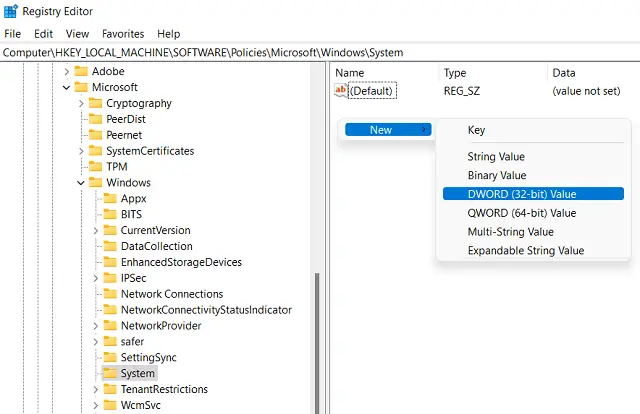
- Double-click on it, and put “0” under the Value data field.
- Click OK to save the current configuration.
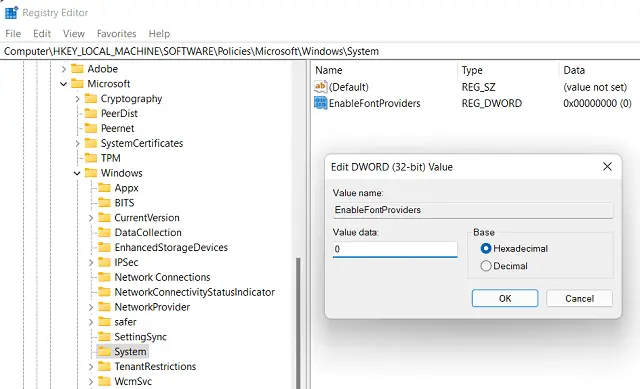
- Close all windows and restart your PC.
How to allow fonts download and install in Windows
If you ever want to undo the changes i.e. allow fonts download/install in Windows, do the following –
- Launch Registry Editor.
- Open the “EnableFontProviders” entry and put value “1” inside the Value data field.
- Click OK to save the changes.
Restart your PC and you may download and install new fonts on your Windows PC.
2] Configure Local Group Policy
Windows Pro or Enterprise edition users may also use Group Policy to restrict downloading new fonts on their PCs. Here’s how to configure local group policy –
- Right-click on the Windows icon (Win + X), and select Run.
- Type “
gpedit.msc” and press Enter. - When the Group Policy window opens up, browse to the path below –
Computer Configuration > Administrative Templates > Network > Fonts
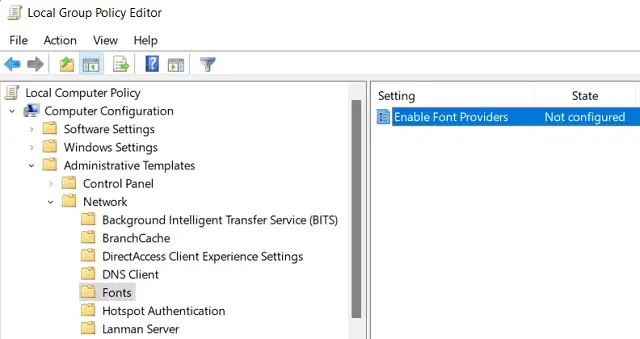
- Head over to the right pane, and double-click on the policy – Enable Font Providers.
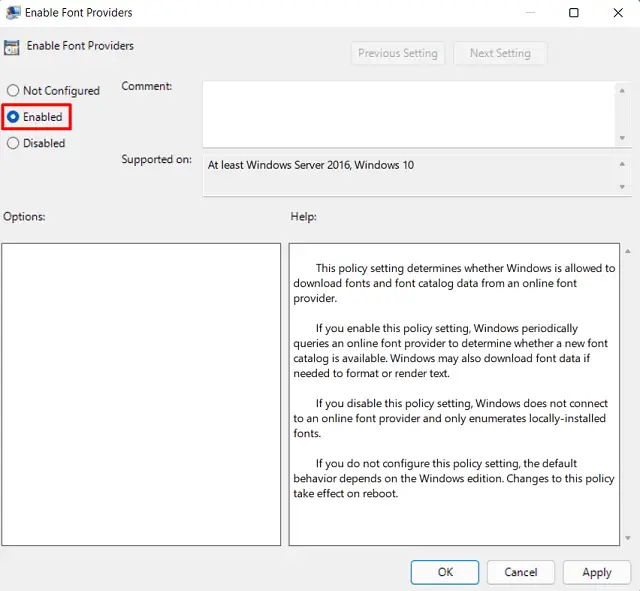
- Moving ahead, mark the “Disabled” radio button, and hit Apply then OK.
- Now that you have configured the fonts policy correctly, reboot your PC.
Note: In case you want to enable fonts downloading or installing in Windows, re-visit the above path, and select the Enabled option.
How do I remove downloaded fonts from Windows?
In the above sections, you read about how to block fonts from downloading on Windows PCs. In case you want to get rid of those fonts that had already been installed, you may do so by following these easy steps –
- Press the Windows icon using the keyboard and select the gear icon.
- The operating system will take you to the Settings window.
- Select Personalization > Fonts.
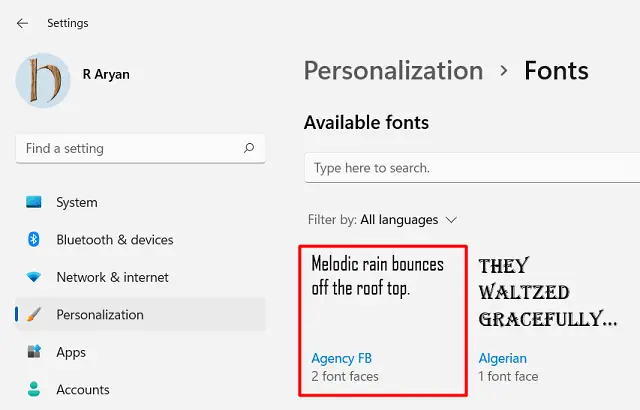
- Select the font that you want to remove from your computer.
- Scroll down to the Metadata section, and hit Uninstall besides Font file.
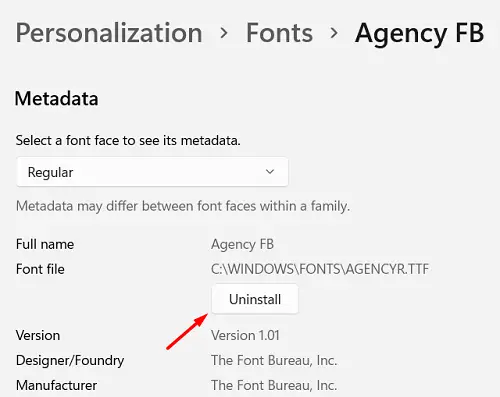
That’s it, the selected font will be removed from your device successfully.


