On Windows 10, you can determine how long your device remains active before the relevant display is automatically turned off. However, if you don’t change the default settings, the display will turn off instinctual after 10 minutes. In this blog post, you will learn a few easy approaches to change turn Off Display After time in Windows 10.
This option is also applicable for all the displays connected to your PC. Here, we depict different ways to change turn Off Display using the Settings app, the control panel and through the ‘powercfg’ tool. Let’s review them one after another-
RECENT GUIDE: Windows 10 19H1 Minimum system requirements
Methods to change turn Off Display After time in Windows 10
Follow these easy steps to change turn Off Display After time on Windows 10-
1. Change Turn Off Display using the Settings app
Using the Settings app is the easiest way to perform any task like turn Off Display After time. Let’s explore steps-wise workaround which covers this process-
Step-1: At first, press Window + I hotkey to open the Settings app.
Step-2: Locate and launch the System category.
Step-3: Go to the left panel of the window and click on the Power & sleep.
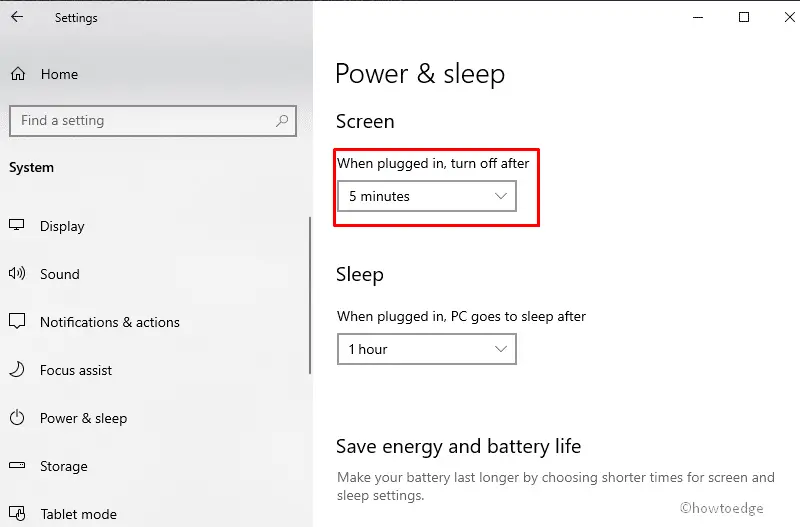
Step-4: Henceforth, move to the right side. Here, under the Screen section, specify the number of minutes after which the display turns off. In the below snapshot, we have selected 5 minutes.

Step-5: On laptops, when it is plugged in; you can set this parameter separately using battery power.
2. Change Turn Off Display After Time using Control Panel
Alternatively, you can also perform the same task using the Control Panel desktop app. This is quite easy, just follow these steps-
- Press Window + R and let open the Run dialog box.
- Type control panel in the search box and press the Enter key.
- Top Right pane, under view by option select Small icons.
- On the new page, click on the Power Options.
- Thereafter click on the ‘Change plan settings‘ link from any section.
- On this page, locate ‘Turn off the display‘ and next to it, specify the number of minutes after which the display turns off.

- Move to the lower pane of the same window and click on the Save changes button.
- Congrats you are done, now enjoy these changes.
3. Change Turn Off Display After Time with Advanced Power Plan Settings
This is yet another nice way to manage Turn Off Display After Time using Control Panel. Here are the steps-
- Go to Cortana and type Control panel. Once found, open the same.
- Select Small icons in view by: section.
- Navigate the following address Power option->Change plan settings.
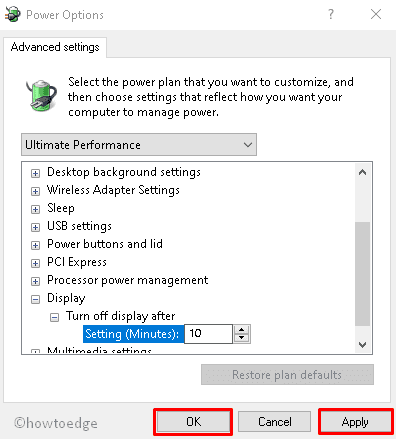
- After that, click on the link – ‘Open advanced power options‘.
- Scroll down and locate then expand Display thereafter Turn off display.
- under the settings section, determine the number of minutes after which the display turns off.
- Now click Apply and OK to confirm the changes.

Note: In case, you are a laptop user; you can set this number individually using battery power while power cable plugged in.
4. Change Turn Off Display After Time In Command Prompt
You can also use powercfg, a built-in console tool that allows managing power options from the command prompt. Powercfg.exe exists in Windows since Windows XP. Using the options provided by this app, it is possible to manage various power settings of the operating system.
To change the Turn Off Display using the command prompt, do the following.
- Press the Win logo and R to open the Run dialog box.
- Type cmd in the search box and simultaneously hit Ctrl+Shift+Enter to launch Command prompt as an administrator.
- If UAC prompt appears, tap Yes to permit the access.
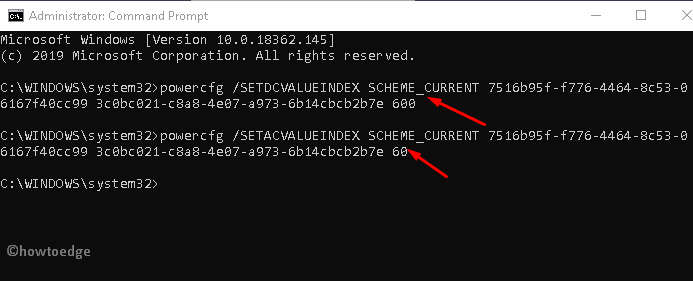
- A new command prompt window will open. Here, type the following command-
powercfg /SETDCVALUEINDEX SCHEME_CURRENT 7516b95f-f776-4464-8c53-06167f40cc99 3c0bc021-c8a8-4e07-a973-6b14cbcb2b7e 600.
- This will set the number of seconds after which the display turns off when on battery.
- The following command does the same when plugged in-
powercfg /SETACVALUEINDEX SCHEME_CURRENT 7516b95f-f776-4464-8c53-06167f40cc99 3c0bc021-c8a8-4e07-a973-6b14cbcb2b7e 600.

That’s it!!


