With Windows 11, Microsoft has overhauled several features including the way File Explorer represents its contents. Though it looks impressive, this is something that may differ from one person to another. If you are looking for ways that can help to switch back to the Classic File Explorer on Windows 11, follow this tutorial till the end.
There is no such option to get back the Windows 10 File Explorer inside Windows 11 settings page. So, to switch back to the Classic Explorer, tweak a key entry on the registry editor named “SeparateProcess”. Windows users are looking for ways to move back to traditional File Explorer is just because the new context menu doesn’t provide options that it used to on Windows 10 OS.
How to Get back the Classic File Explorer on Windows 11
If you do want to get back the Classic File Explorer on your Windows 11 PC, use these steps –
Note: Make sure to create a system restore point and full registry backup in order to avoid any data loss.
- Press WinKey + X to launch the Power Menu and hit Run.
- On the Run dialog box, type “
regedit“, and press Enter. - In case the UAC window prompts, tap Yes to authorize opening the registry.
- When the Registry Editor opens up, navigate to the following –
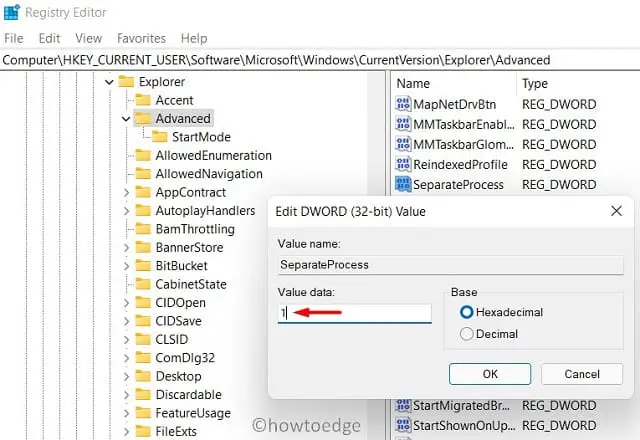
HKEY_CURRENT_USER\Software\Microsoft\Windows\CurrentVersion\Explorer\Advanced
- Move to the right pane and search for an entry with the name “SeparateProcess“.
- If you are on Build version 22000.51, this setting is there under the Advanced folder.
- In case you can’t find this REG_DWORD, create one by right-clicking anywhere on the right pane.
- On the context menu, select New > DWORD (32-bit) Value.
- After creating a new entry, double click on the same, and change its name to “SeparateProcess”.
- Make sure to change the Value data as well to “1”. Its default value is set to “0”.

- That’s it, log out of your user account or restart your PC and the File Explorer switches back to its previous look.
Restart File Explorer
You may skip restarting or logging out of your device. However, then you need to restart File Explorer. Here’s how to perform this task –
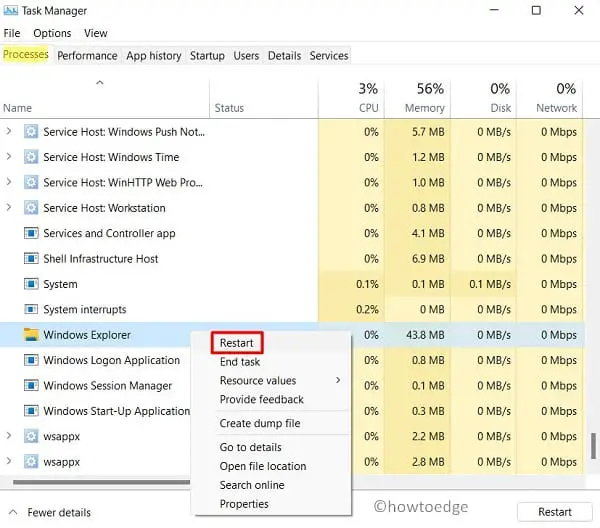
- Press Ctrl + Shift + Esc to open the Task Manager.
- Under the Processes tab, you will find Windows Explorer. If the explorer is not running, you may find it inside the background processes. Just keep scrolling till the end and you will find this item.
- Right-click over it and select the option – Restart.

- Performing so will restart the explorer and you can see the Windows 10 folder icons on your Windows 11 PC.
Note: This way your computer might take a few minutes to adapt to the new setting on the registry. Don’t rush, the classic file explorer indeed comes back to you. If you can’t wait, just restart your PC.
In case you ever want to revert back the currently performed changes, browse to the same location on the registry, and this time change SeparateProcess Value data back to “0”.
I hope you find this article useful and can easily change it back to Windows 10 File Explorer on your Windows 11 PC. Check if everything is running smoothly on the Classic Explorer.


