Microsoft rolls out a new feature to create a backup of entire system core files on Windows 10 PC using the System Image Backup tool. This assists you to initiate a backup of the entire PC including Windows installation, updates, configuration, and Applications. You will also avail of File History or One Drive’s protection tool to create the backup. This helps to avoid duplicate files and keep the documents up-to-date which can be used during the crucial phases like a system failure. In this article, we explore how to create full Windows 10 backup and restore it when needed.

Downsides of creating Windows 10 backups with the System Image tool
Aside from these features, the main drawback of this tool is that it doesn’t restore specific files on the hard drive. In order to restore such files, you need access to all files in Libraries, Documents, Images, Music, etc. To avoid the sudden crash of the entire system, it is recommended to create a backup on a regular basis. In that case, you can restore the last backup by using the latest image.
Recent Guide: Fix: Media Creation Tool error 0x8007043C – 0x90017 on Windows 10
How to create a full backup of Windows 10
Below we describe in detail how to create a full backup of your Windows 10 computer by using the System Image backup tool.
Using the System image tool, you can create a backup of the whole System’s files and Configuration. This tool uses Shadow copy technology to create a mirror image of your system. Doing so, it also copies ongoing applications without any interruption. To make the full backup of your system via System Image, you should follow these steps-
- Open the Control Panel and set the View as Category.
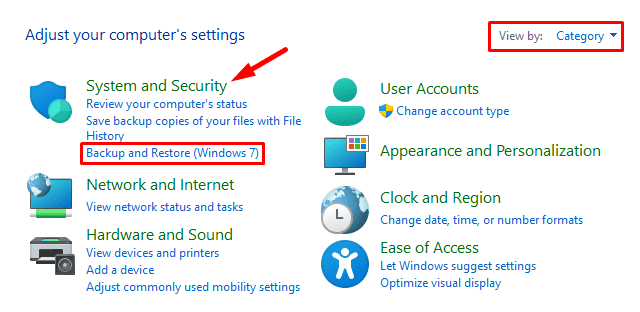
- Now click on System & Security > Backup and Restore (Windows 7).

- On the left side of the screen, click the Create a system image option. This will open a new page “Where do you want to save the backup page”.
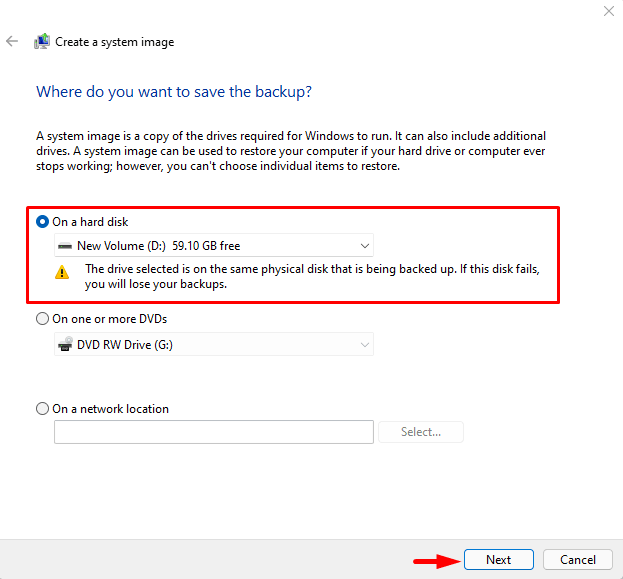
- Choose the specific location On a hard disk radio button section.
- Then click on the Next button.
- In case, you want to add an external device for backup purposes; you can choose any underlying option. There forth hit Next to proceed further.
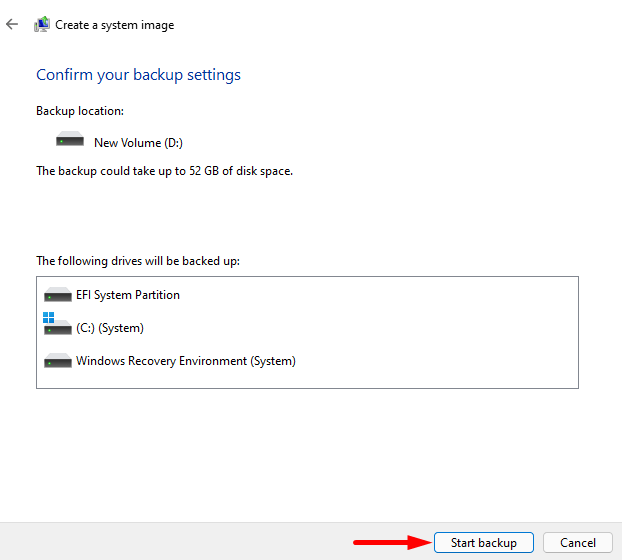
- On the next screen, tap Start backup to confirm the changes. This will create duplicate images of all selected files on the HDD partition.
Note: Depending upon the data archived, the process might take approx 10 minutes to 2 hours in order to create full Windows 10 backup. It will save the files to a specific network location or secondary storage (chosen by you). It is always best to keep such files on USB in order to prevent any accidental loss.
- When you finish the above task, a new prompt will appear, asking you to create a system repair disk. It will help you to restore the files when your system undergoes unwanted damage.
- In case you use a bootable USB flash drive to access the recovery option, you can skip this feature.
Restore System image backup
When you have created a backup of your system, you can use the same when some unexpected thing happens like can’t boot your PC properly. To restore the files using these backup files you need to follow the below steps.
- Firstly, attach the recovery disk or Windows Installation Media to its respected port.
- Restart the computer to default launch Windows Setup Wizard.
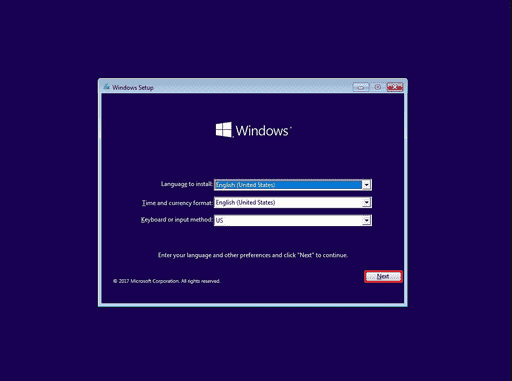
Note: In case the setup window doesn’t appears up, simultaneously hit any of the function keys like F1, F2, F3, F10, F12, or the Esc and Delete button. The keys depend upon your system’s model, hence know beforehand your PC’s configuration and its supporting function’s key.
- Click on the Next button.
- Then select System Restore on the left bottom corner.
- Now select Troubleshoot using three consecutive options.
- Under the Advanced Options window, hit System Image Recovery followed by Windows 10 as the target operating system.
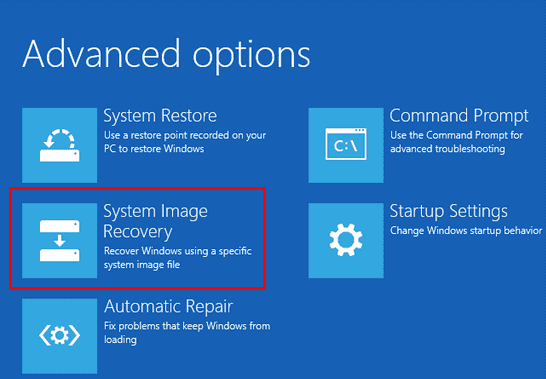
- Now tap Use the latest available system image tool > Next.
Note: If your PC has multiple backups, tap the Select system image option. This will restore the previous copy of the files.
Again, if the system image files are stored in a hard disk drive; you can select Format and partition disks before using these files.
- Subsequently, press the Next button followed by Finish to begin the process.
- At last hit Yes on the confirmation window to permit these changes.
The restoration of system core files will start automatically. This takes a huge time to complete the whole task, hence wait accordingly. A sudden interruption like power fluctuation might disturb this process. It is thereby recommended to connect your PC with UPS as well. If you are a laptop user, ensure the system is connected to the continuous Power source.
When the files recovery gets over, try updating your system. To Perform this, navigate to the following path-
Settings > Update and Security > Windows Update
- Switch to the right panel and tap the Check for updates button to automatically download and install the pending available Updates.
Closing Words
When you update the PC with the latest version, these system images of all files will help you to return back to the previous version if something goes wrong like hardware or system failure. It also safeguards your system from other nuisance like- fault in the Hard drive, Malware attack, etc.
Note: If you have adjusted any program or settings after the backup is likely to change when you start the restoration.


