You might have come across situations when the Printer gets stuck and the print jobs keep entangled in a queue. When this occurs, you won’t be able to print any new documents instead keep waiting for the files in the long queue to be printed. The items in the line may take forever to print, so it’s better to cancel all the ongoing Print jobs. If you are wondering how to clear Printer Queue in Windows 10, read this tutorial in detail.
When a user initiates a print command, a print-job is created and is processed by the spooler service. If there are already other files that require printing, the system prints your file only when the queue gets cleared. In case, the printer stops working for any reason, all the print jobs get jammed, and you must clear all attachments whether they are recent or older ones. In today’s post, we outline six working ways that can easily attain this task i.e. clearing the Print Jobs from the queue.
Remove or Clear Printer Queue in Windows 10
If you are not able to print new documents due to a stuck Printer queue, try out these workarounds –
1. Manually clear the Printer Queue
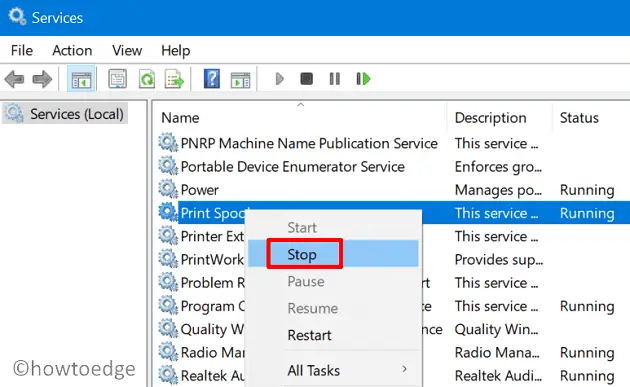
In order to clear the existing print queue, you must stop and restart the Print Spooler service. Here’s how to manually perform this task –
- First of all, switch off the Printer and get the cables removed.
- Press Win + R to open the Run dialog.
- Type
services.mscin the text field and hit OK. - On the Services window, scroll down and locate Print Spooler.
- When found, right-click on the same, and choose the Stop option.

- After you stop the Print spooler service, go to the below location, and delete whatever lies inside this folder.
C:\Windows\System32\spool\PRINTERS
- After clearing all documents inside the Printers folder, go back to the Services window.
- Right-click again on the Print Spooler service and this time choose the Start option.
2. Delete all Print Jobs via Command Prompt
Alternatively, one may also remove the entire Printer queue by executing a few codes on the Windows Console. Here’s how to delete all Print Jobs that are stuck –
- Open Command Prompt having administrative privileges.
- When the UAC prompt comes into the display, hit Yes.
- Stop the Print Spooler service by running the below command line –
net stop spooler
- Next, execute the following code to delete all the contents of the Printers folder –
del /Q /F /S "%windir%\System32\spool\PRINTERS\*.*"
- When this code runs successfully, restart the Print Spooler service. To do so, run this command on the elevated prompt –
net start spooler

- Type “exit” and press Enter to come out of the Windows console.
- Restart your computer.
Sign back into your device, attach the Printer cables, and you may now go for new Print Jobs.
3. Use Print Management to Clear Printer Queue
Print Management is another viable option that you can use to clear all the printing jobs that were in the queue. Here’s how to proceed –
- Press Win + S to launch the Search window.
- Type “print management” and double-click the top result.
- Navigate to the “All printers” tab on the left pane. Or, select the Action tab on the Menu bar and click Open Printer Queue.
- On the center panel, you may see the Queue Status, Jobs In, and others alongside a particular “Printer Name”.
- Right-click on the Printer and select “Open Printer Queue”.

- On the next screen, select all the items that you no longer wish to print, do the right-click, and hit Cancel All documents.
4. Using Control Panel
Control Panel also provides an option to get rid of the current Print queue in Windows 10. To clear the printer queue via Control Panel, use these steps –
- Launch Control Panel.
- Go to the right top corner and select “Large icons” using the drop-down menu next to “View by”.
- Doing so will display all control panel items.
- Select Devices and Printers.
- Next, choose the Printer from where you want to cancel all print jobs.
- Go to the menu bar and hit See what’s printing.

- Select the print jobs that you no longer want to resume and hit the option – Cancel All documents.
- In case there appears any confirmation message, hit Yes.
5. Via Windows Settings
Similar to the Control Panel, users may also use the Settings app to cancel the recent printing tasks on a Windows 10 PC. Here’s how to perform this task –
- Browse to the following path on the Settings app –
Settings (Win + I) > Devices > Printers & Scanners
- Head over to the right side, select your Printer, and hit “Open queue” on the extended pane.
- A list containing all the recent Print jobs should appear next.
- Right-click anywhere and choose the option – Cancel All Documents.
6. Create and Run a Batch File to clear the Print Queue
You may use any of the above methods to get rid of a stuck Print Job in Windows 10. However, what if, your printer gets stuck every now and then? Well, in such instances, one should create a batch file, and run it whenever required. This works like a simple process whose sole purpose is to clear the existing Print queue. Here’s how to create and use such a file –
- Right-click anywhere on the Desktop and select New > Text Document.
- When the notepad opens up, copy/paste the below cmdlet inside this.
@echo off
echo Stop Print Spooler service
echo
net stop spooler
echo Erase whatever lies inside the Printers folder
echo
del /Q /F /S "%systemroot%\System32\Spool\Printers\*.*"
echo Start Print Spooler service
echo
net start spooler
- Go to File and click Save As.
- Subsequently, using the “Save as type” drop-down menu, select All Files.
- Under the “
File name“, typeClearPrintQueue.batand hit Save. You may go for any other name as well, just make sure to put “.bat” in the end.

- Right-click on the newly created batch file and select Run as Administrator.
- When the UAC prompts, hit Yes to authorize accessing Command Prompt.

I hope, you are now able to easily get rid of a stuck Print Queue on your device. If you have any queries or suggestions, let us know in the below comment section.


