Windows.old folder comes alive automatically each time you update your persisting OS to the new Windows 10 version. This creates a mirror image of all the files as well as folders before proceeding to Update. In simple terms, this works as a back up of all the important files and Data. This folder is extremely helpful in case something goes wrong even after the update. Normally this folder lasts for 10 days only and gets deleted when this time period is over. However, if you wish, you may delete Windows.old folder before completing 10 days time frame as well.
Windows.old folder is known to occupy large space on your HDD, near about 30 GB or more. This is the prime reason why several users opt to delete this folder. Today, in this tutorial, we discuss four different ways to remove this folder entirely from your Windows Machine. They are – Disk Cleanup Tool, Command Prompt, and Linux Live CD, etc.
Note: Bear in mind, When you discard Windows. old folder, this will also delete the previous restore point. Hence, do create the System restore point forthwith after upgrading OS and installing apps.
- Use Disk Cleanup tool
- Via Command Prompt
- Remove Windows. old folder using Command Prompt while booting
- Use Linux Live CD
How to Delete Windows.old folder in Windows 10 after the Update process
Here are the quick events to Delete Windows. old folder after Windows 10 Update.
1. Use Disk Cleanup tool
Windows 10 supports the inbuilt tool i.e. Disk Cleanup which can delete temporary as well as leftover files after Update. This tool is quite easy to operate, just go through the following steps-
Step-1: Jointly press Win & S hotkey and type Disk Cleanup in the void area.
Step-2: In the pop-up dialog, select the primary drive (C:\) then click OK button.
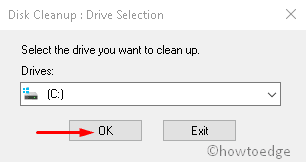
Step-3: This will take approx 1 to 2 minutes or more (depending upon the disk partition size) to scan old as well as temporary files.
Step-4: Here, tick all the checkboxes except Download Program files then hit Clean up system files option at the lower section. See Snapshot below-
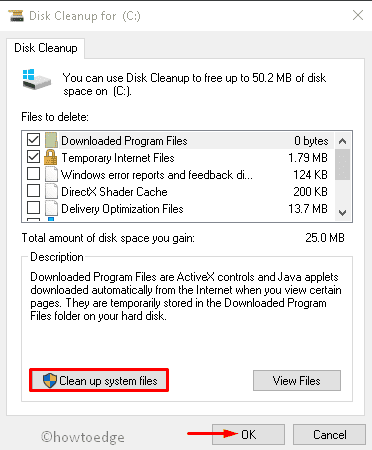
Step-5: Wait patiently, as your PC starts looking for the temporary files or Windows.old folder. Once finished, hit OK to proceed.
Step-6: On the next dialog, select Delete files to do the confirmation. This will delete the older version of updates and thus frees up more space on your System.
After the process is completed, it will ask you to Restart the system. Do the same and you won’t find the Windows .old folder on your PC.
RECENT GUIDE: How to retrieve deleted files after windows 10 update
2. Via Command Prompt
Command prompt bestows us an easy possibility to delete Windows.old after Windows update. This process is a little bit complex as you need to change its attributes. To do this, following the below steps-
- Hit the Search button and type cmd in the text area. Thereupon, Right-click on the Command Prompt and select Run as administrator option.
- If UAC prompts, tap Yes to permit the access.
- In the blank box, copy/paste the following command line and hit Enter at the end of each code.
attrib -r -a -s -h C:Windows.old /S /D
RD /S /Q %SystemDrive%windows.old
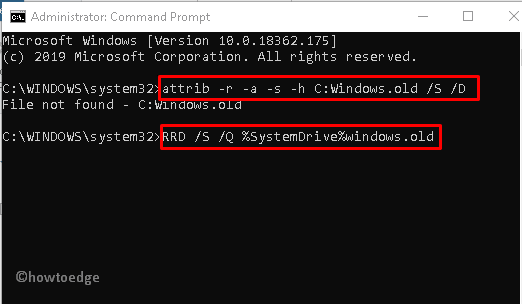
- Once you execute the above commands, come out off Command Prompt.
Windows.old folder is longer available on your System.
3. Remove Windows. old folder using Command Prompt while booting
You can remove the windows. old folder utilizing command prompt while booting as well. Besides, if you don’t want to lose your System settings and stored files and folders, this might not be the best workaround. In case, you are willing to proceed anyways, follow these easy steps-
- Press the Windows key and select the Power button. Hold the Shift key and choose Restart from three consecutive options.
- When the boot option appears, select Troubleshoot followed by Advanced options.

- From the appeared list, choose Command Prompt.
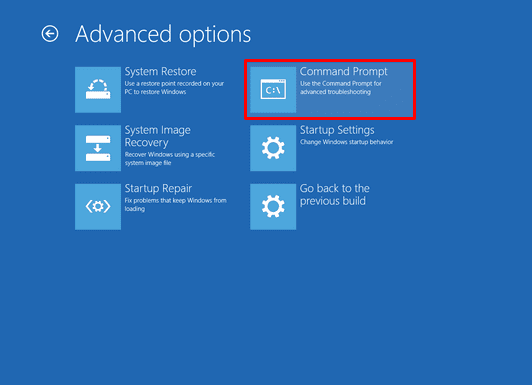
- In the prompt area, type diskpart then hit Enter. This will point out the drive letter of the disk.
Note: The diskpart is a powerful command, so you have to take extra caution while using it.
- Afterward, enter the list volume to see the available partitions on your system.
- Now you need to specify the drive letter. Just check the Ltr column of the desired partition and remember the specified letter.
- Most probably, the letter would be D. However, it might be different as per your system’s configuration.
- Succeeding that, type exit to close the running diskpart command.
- Further, type RD /S /Q “D:Windows.old code on the prompt and press Enter key. Here D: is the drive letter, you can correct the same accordingly.
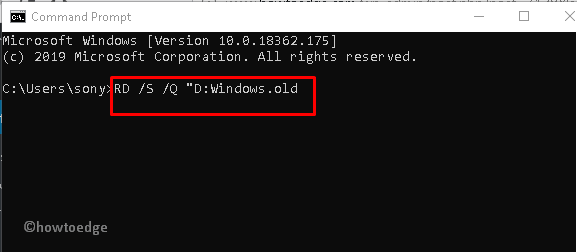
- At last, close the command prompt and start Windows normally.
4. Use Linux Live CD
In case you didn’t succeed to delete Windows. old folder, Linux live CD provides a unique approach to remove the same. This task is not that easy owing to its complexity, hence require expertise. Before performing this task, you must create Linux create CD first by visiting the official website. Later, follow these steps-
- First and foremost, download any version of Linux’s setup file and create a bootable file.
- Henceforth, inset the bootable media at its respective port and Restart your system.
- Press suitable function keys like F2, F9, F10, Del, Esc, or others while booting in order to load the media on the Display Screen.
- Linux will start automatically after the next login, locate Windows. old folder and delete the same.
After you delete Windows.old folder, remove the bootable media, and Restart your system normally.


