In this post, we will see what OneDrive free storage space is all about, and how you may enable or disable OneDrive in Windows 11. Contrary to its previous setting, OneDrive now allows only 5 GB of storage space that you can use for free. You must buy a plan to have more spaces, otherwise, OneDrive won’t function properly.
Since there are numerous cloud backup options available these days to choose from, users simply go for the best plan. A few examples of this are Google free spaces of around 15 GB, iCloud, and several others. If you have already purchased a cloud backup plan elsewhere, you may uninstall OneDrive permanently.
In case you don’t want to let go of its free spaces, you may continue using that and temporarily disables the file storage in OneDrive. Let’s explore the disabling ways in detail –

Note: 1 TB plan on OneDrive comes at a cost of $5 per month per user.
Ways to Disable OneDrive in Windows 11
Learn five different ways using which you can easily disable, remove, or uninstall OneDrive from your computer –
1] Pause OneDrive using Task manager
The best way to disable OneDrive is via ending its process on the task manager. OneDrive is still there, however, not running in the background. Here’s how to perform this task –
- Press the Win + X to open the Power Menu.
- Select Task Manager and tap the Processes tab.
Note: Many a time, the task manager opens as a minimized window. Click More details and then go to the Processes tab.
- Scroll down and locate Microsoft OneDrive.
- When found, right-click on it, and hit the option – End Task.
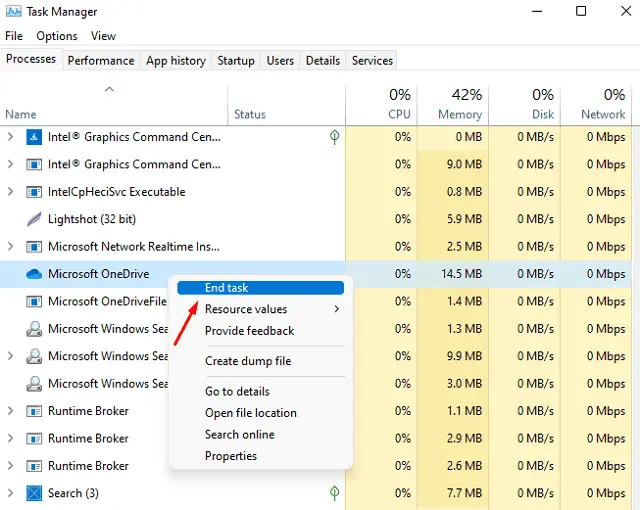
- OneDrive now stops running in the background. You may use your device normally now.
Tip: The moment you restart your PC, OneDrive starts running again. If your purpose is to disable it when Windows reloads, go to the startup tab on the task manager, right-click on OneDrive, and hit disable. Proceeding this way, you need to manually click on its icon to launch it. Else, this will remain disabled.
2] Disable OneDrive using Group Policy Editor (GPE)
Group Policy Editor also provides a way to disable OneDrive temporarily in Windows 11. To do so, follow these easy steps –
- Press Win + S and type gpedit in the text field.
- Press Enter to launch Local Group Policy.
- On the next screen, use the left navigation to browse to the below path –
Computer Configuration > Administrative Templates > Windows Components > OneDrive
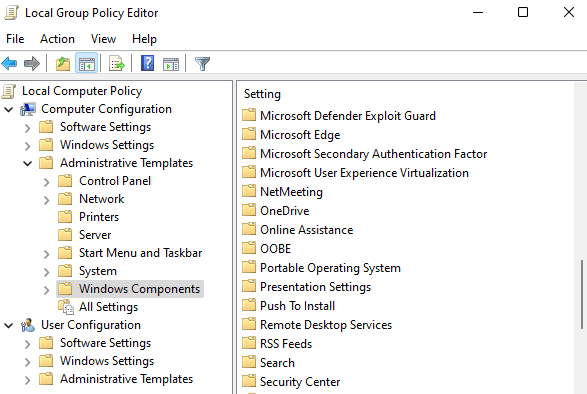
- When the OneDrive folder expands, double-click on the policy – “Prevent the usages of OneDrive for File storage“. See the Snapshot below –
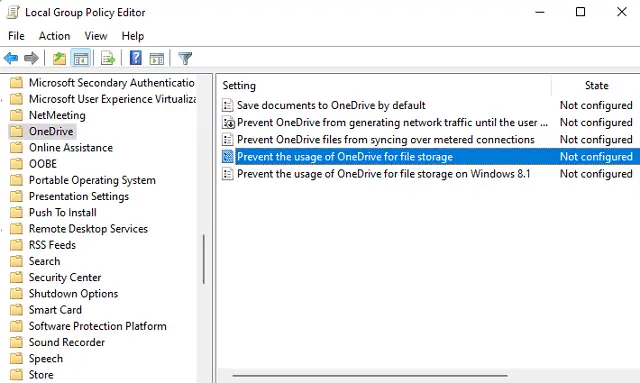
- Tick the Enabled radio button and then hit Apply > OK.

- The edited policy will now prevent OneDrive from saving any local files on its servers.
- Do restart your PC so that changes made become effective from the next logon.
3] Disable OneDrive using Unlink this PC
Users may disable OneDrive using its interface as well. Let’s see how you incorporate its settings to stop using OneDrive for file storage purposes in Windows 11 –
- Click the cloud icon (OneDrive) available on the Taskbar.
Note: If the icon is not visible in the notification area, go to Start, type OneDrive, and hit Enter.
- Click the Help and Settings (Gear icon) thereafter Settings from the drop-down list.
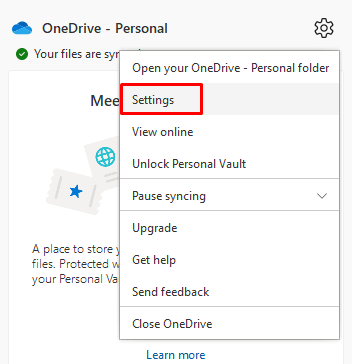
- Under the Account tab, click Unlink this PC.
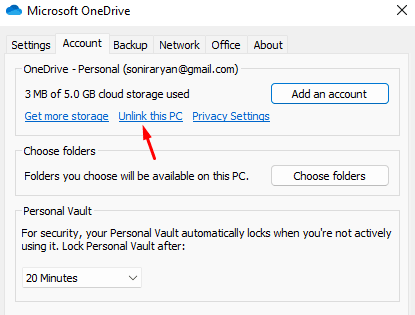
- A confirmation window may pop up next, click Unlink account to proceed ahead.
- OneDrive will now stop syncing files available on your computer to your Microsoft Account.
4] Uninstall OneDrive using Settings
Though OneDrive provides 5 GB of free cloud spaces to save your personal data, photos, etc. this plan might not seem enough for most users. You may purchase its premium plan to have more spaces. However, if you don’t, it’s better to uninstall it from your computer.
The reason could be anything like you have already purchased some cloud storage plan elsewhere. In any case, there’s no point in having an application and never using it. Let’s learn how you may remove this app from your Windows 11 PC –
- Press Win & I shortcut to launch Settings.
- Select Apps from the left pane then Apps & features on its adjacent right side.
- Scroll down to Microsoft OneDrive and click on three vertical dots available to its right-end.
- When this expands, click the Uninstall button.
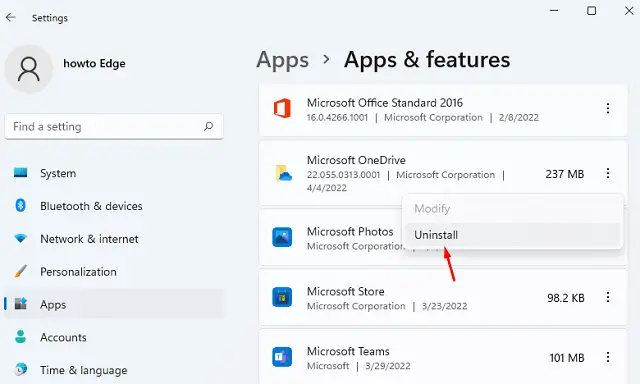
- A confirmation window may pop up next, hit uninstall again.
- Reboot your PC next so that any leftover or residual files delete as well.
5] Via Command Prompt
Alternatively, you may also uninstall OneDrive by running a single line code in the Command Prompt. Keep in mind you need to open CMD as administrator to complete the uninstallation.
- Press Win & S and type CMD in the Search box.
- Right-click on the Command Prompt option and pick Run as administrator.
- Press Yes on the UAC prompt to authorize opening it with admin privileges.
- On the elevated console, run the below codes one after another –
taskkill  /f  /im  OneDrive.exe
%SystemRoot%\SysWOW64\OneDRiveSetup.exe  /uninstall
- Following this way, OneDrive will be permanently removed from your Windows 11 PC.
Note: If you want to reinstall OneDrive again, go to the C:\Windows\SysWOW64\ location and double-click on its setup file i.e. OneDriveSetup.exe.
Read Next:


