Windows 11 ISO file is now officially available in Microsoft’s software-download section. Alternatively, you may also get the new operating system iso image directly via the tool – Rufus. In this tutorial, we will present a complete guideline on how to download Windows 11 OS and make it bootable using both Media Creation Tool and Rufus.
How to Get Windows 11 ISO File officially
Before you begin to download the Windows 11 ISO image, make sure to read these essential points –
- This new OS is compatible with 64-bit and later system architecture-supported systems.
- The ISO file is available in more than one language, so choose it before downloading it for your computer.
- Download and install PC Health Check App to confirm your device is compatible with the new OS.
- The file size of this ISO image is around 5.1 GB, so you need to have high-speed net connectivity. This is to ensure that the downloading process doesn’t fail in the meantime.
Now that you know what to check beforehand, follow these steps to get a Windows 11 ISO copy for your device.
- First of all, visit Microsoft’s official site.
- Scroll down to the section – Download Windows 11 Disk Image (ISO).
- Using the drop-down menu, select Windows 11.

- Click Download and then choose your preferred language.
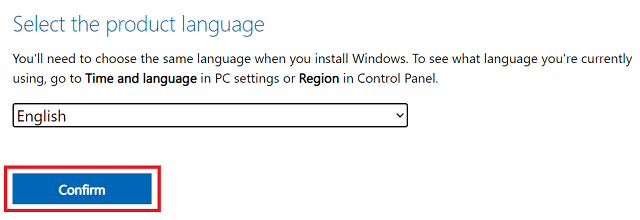
- Hit Confirm and then click 64-bit Download.

- File Explorer will appear next asking where to save this file.
- Browse to a location where you would like to save this ISO image and hit Save. The downloading begin soon afterward.
- Windows 11 ISO file size is around 5.1 GB, so you must have this much amount of free space on your PC.
Download and install Windows 11 via Media Creation Tool
To download and install Windows 11 directly into your device, follow these steps sequentially –
- Get the Windows 11 Media Creation Tool first and install it on your computer.
- After this installs successfully on your device, double-click on its icon.
- A list of applicable notices and license terms will appear next, read all of them, and hit the Accept button. If you find this boring to read such a long list of terms and conditions, simply skip reading this.
- Choose your preferred language and edition and then click on the Next button.
- You may keep the checkbox – “Use the recommended options for this PC”, and hit the Next button again. Or, simply remove the checkmark and hit Next.
- If you want to download the ISO image, check the respective radio button, and hit Next. Else, attach an 8-GB USB drive to your PC, enable the USB flash drive radio button, and click Next.

- Whichever option you opt for, the ISO image starts downloading immediately afterward. In case you had chosen the USB way, this tool will make the USB drive bootable automatically once the download finishes.
Now that you have the Windows 11 installation media, restart your PC, and apply this new OS to your device.
How to make Windows 11 ISO file bootable
Assuming you have already downloaded the Windows 11 ISO image, here’s how to make it bootable using Rufus –
- Open your default web browser and visit Rufus’s official site.
- Under the Download section, click Rufus 3.15 (1.1 MB) i.e. the first link.
- After you have the required setup file, double-click over it to begin its installation.
- When the Rufus interface launches, plug an 8-GB USB flash drive (Pendrive) into your computer.
- The plugged-in Pendrive should appear in the drop-down menu just below the Device.
- Go to the Boot selection menu next and choose the option – “Disk or ISO image”.
- Click Select and browse to the location where you have saved the Windows 11 ISO file.
- Keep all other settings as they are, and hit the Start button.
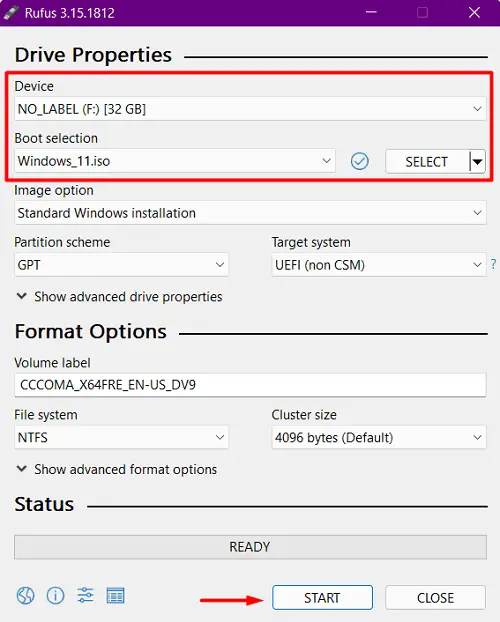
- This usually takes 15-20 minutes to make an ISO image bootable, so wait patiently.
Now that you have created a bootable Windows 11 USB drive, restart your PC, and install the new OS into your computer.
Note: Rufus also allows downloading Windows ISO images from its interface as well. To do this, you need to click Download using the drop-down menu next to the “Select” button.

How to enroll your PC into Windows Insider Program
If you still want to use the Windows 11 Insider program on your device, you may easily do so by following these easy steps. For this to achieve, you have to first register your device with the Windows Insider program. And as you may know, while doing so, you need a valid Microsoft account as well.
Both parts are essential as you can’t get an ISO file if you skip either of these two steps. So, if you are ready to explore what lies within Windows 11 and your device is compatible, go ahead and follow the sections below.
Here’s how to do that –
You may access Windows 11 ISO file only after enrolling your PC for the insider program. If you are already an insider, skip to the next section. Else, join an insider program using the steps below –
- Press Windows + I to launch the Settings app.
- Select Update & Security and then Windows Insider Program on the left pane.

- Head over to the right side and click the button – Get started.
Register your PC
- First of all, hit the button – Register.

- A pop-up may appear providing a basic summary to “Join the Windows Insider Program”. Click the option – “Sign Up“.
- Next, mark the check box that says “I’ve read and accept the terms of this agreement”, and click over the Submit button.

- Now that your PC is registered, you will receive a message – “You’re good to go”. Click the Close button to go ahead.
Sign in to your Microsoft Account
- When Windows prompts to “Link an account”, hit the “+” icon.

- Use a valid Microsoft account to sign in and hit the Continue button.
- Moving ahead, choose Release Preview Channel as your insider, and click Confirm.
Quick Note: As our purpose is to download Windows 11 ISO file, go for the option – Release Preview Channel. If you want to install an insider via Windows update, you may either select Dev or Beta channel.
- Click confirm again and then restart your PC. You may hit Restart Now on the upcoming prompt to reboot your device.
That’s it, your device is now enrolled in the Windows Insider Program. Let’s now learn how to download a Windows 11 ISO file.
How to Get Windows 11 ISO file officially
Follow the steps below to get a copy of Windows 11 ISO for your future usage –
- First, visit the official software download page by Microsoft.
- In case you are already signed in to your Microsoft account, you may please proceed further. If not, sign in first then only go ahead.
- Scroll down to Select Edition, and use the drop-down menu to select Windows 11 Build OS.
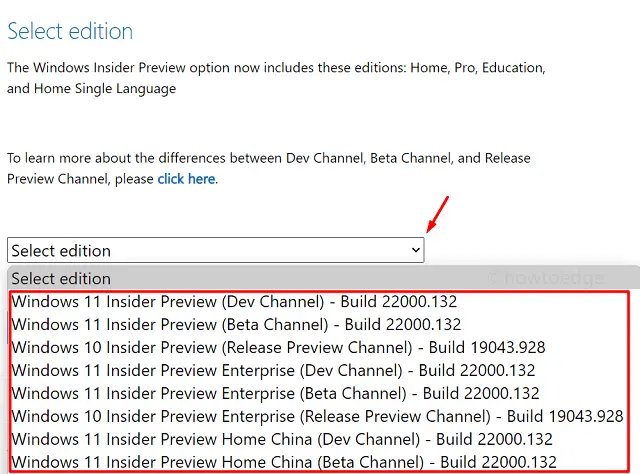
- When you are done choosing the insider build that you want to clean install, hit the Confirm button.
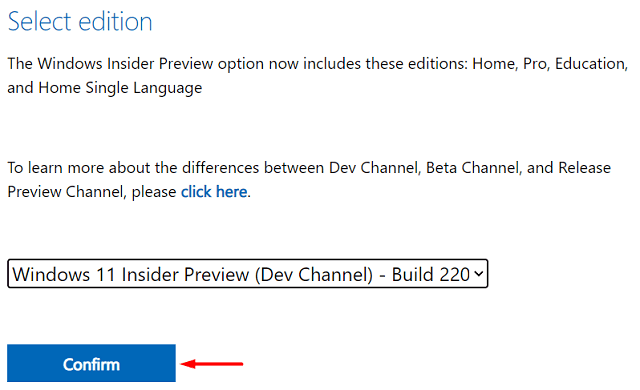
- Use the drop-down menu again to select the product language and click the Confirm button.

- Since Windows 11 supports only 64-bit and above system architecture, you will get a link displaying “64-bit download”.
Note: This link will be available for a maximum of 24 hours and will vanish as soon as the allotted time range is over.
- So, hit the 64-bit download button, and the chosen Windows 11 insider version starts downloading immediately afterward.

Now that you have the Windows 11 ISO file, use Rufus to create a bootable media, and later clean install Windows 11 on your device.
I hope this article was easy to follow and that you now have successfully downloaded the Windows 11 ISO file.


