Microsoft has effectively resolved the Bluetooth connecting or pairing issues in Windows 10 with Swift Pair. This is basically a new feature that allows a quick connection between Bluetooth peripherals and the computer. Although this came way back with April 2018 update, the company lately improved this on Windows 10 May 2020 update.
Enabling this feature will reduce the steps required to pair up your device to the computer. Once turned On, users may directly connect to the PC via notification section on the taskbar. In this post, we have covered two different ways to activate the Bluetooth Swift Pair on the computer.
Recent: Uninstall or Reinstall the Bluetooth driver in Windows 10
Ways to Activate Bluetooth Swift Pair on Windows 10
Here, we discuss two different ways enabling the Bluetooth Swift Pair on Windows 10 PC. They are –
1] Windows Settings
To start using the Swift pair in Bluetooth on the computer, follow these easy steps –
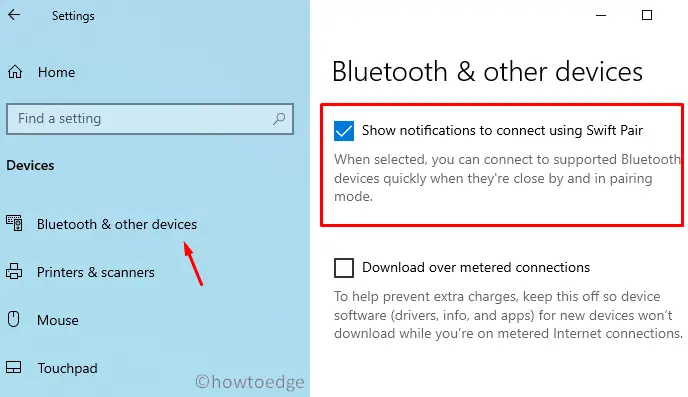
- Use Win + I to launch the Windows Settings.
- Click Devices thereafter Bluetooth & other devices on the subsequent screen.
- Head over to the right page and mark the checkbox left of “Show notifications to connect using Swift Pair“.

That’s it, you may now easily connect to any supported Bluetooth devices directly from the notifications section.
How to connect Bluetooth devices using Swift Pair
To connect a Bluetooth device using Swift Pair, use the below steps –
- First of all, enable Bluetooth on both devices.
- Now, take the device closer to the PC so that Windows triggers a setup.
- Click the connect button and the device pairs to the computer.
That’s it, you may now start transferring data or listening to Phone Music on PC or vice-versa.
2] Via Registry Editor
If your Windows 10 device doesn’t support Swift Pair, modify a few entries inside the registry. Here’s are the steps to work upon –
- Make a right-click on the Windows icon and select Run.
- Type “
regedit” in the text box and press OK. - When the UAC window comes into view, tap Yes.
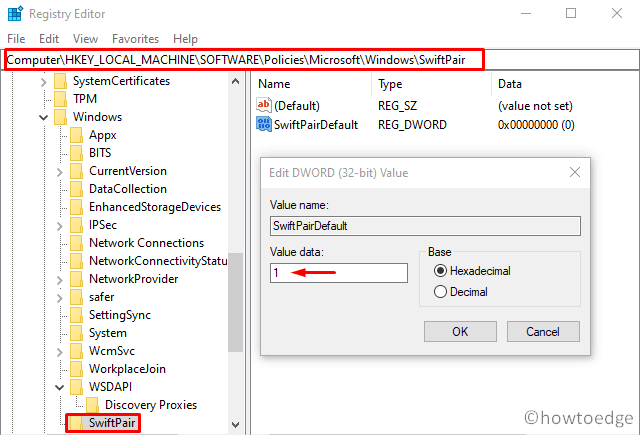
- Now, browse to the below location –
HKEY_LOCAL_MACHINE\Software\Policies\Microsoft\Windows\SwiftPair
- Double-click the “SwiftPairDefault” and assign its value to “1” from “0”.

Create SwiftPair folder on the Registry Editor
Sometimes, reaching out to the above path simply doesn’t display any files or folders. If that’s the case, you need to create a new key then DWORD entry. Here are the essential steps to work upon –
- First of all, copy/paste
HKEY_LOCAL_MACHINE\Software\Policies\Microsoft\Windowsat the address bar and hit Enter. - Right-click on the Windows folder and select New > Key. Make sure to name this key folder to “SwiftPair“.
- Next, right-click again on the right pane and select New > DWORD (32 bit) value.
- Rename this entry as “
SwiftPairDefault“. - Double-click over this and put “1” instead of by-default value i.e. “0”.
- Lastly, click OK to come out of the registry editor and Restart Windows.
That would be all, I hope this article helps to address the Bluetooth Swift Pair issues in Windows 10. If you have any queries or suggestions, let us know in the comment section.
Read Next:


