Error 0x80180018 is a direct result of using two or more user accounts on a Windows PC. This error may also occur when you use two or more Microsoft Office 365 products on the same computer.
Whatever the issue is in your case, you may resolve this issue by switching to a local user account and then setting up your Microsoft 365 and Azure AD directory accounts to this account.
What is Error 0x80180018?
Error 0x80180018 is an MDMLicense-related issue that is known to manage the device’s permissions. This mostly occurs when you try to add two or more Office 365 user accounts on your Windows PC. Using two or more user accounts often results in some license conflicts, and thus results in this error code.
When you encounter this bug, you might also receive an error message that reads the following –
A problem occurred
Server Error Try again.(0x80180018 )
Though this error mostly appears when using Office 365, this may also occur when you use two or more user accounts on your Windows PC.
Note: As per the official Azure AD documentation, Error 0x80180018 represents an issue with the MDMLicense.
Fix Error 0x80180018, There was an error with your license
If you are encountering an error 0x80180018 while registering with Device Management, you need to create a new local user account and then link a new work or school account to it.
After you perform both these steps, you will be able to resolve this error code on your Windows PC. Do note that you need to sign into your computer as administrator, so that you may create the local user account successfully.
1] Create a Local User Account
Follow the below steps to create a local user account on your Windows PC –
- Right-click on the Windows icon, and select Settings.
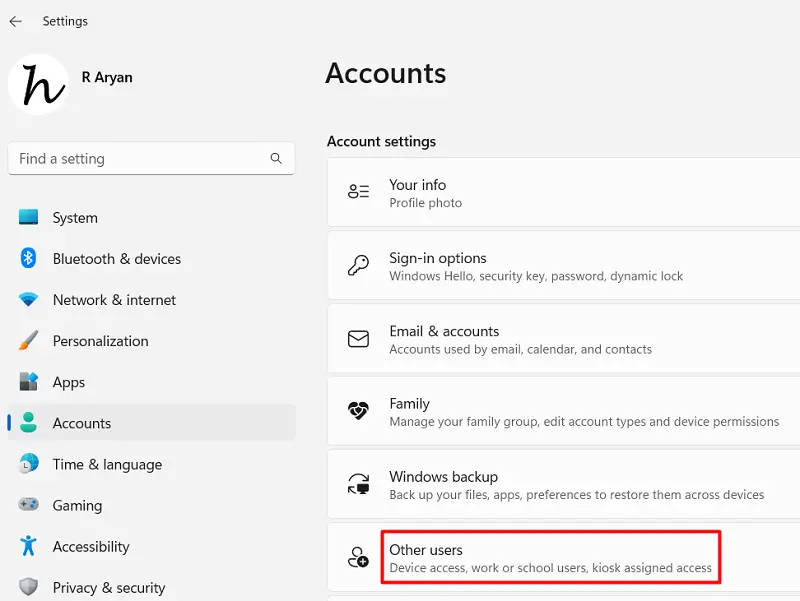
- Go to Accounts on the left navigation, and select Other users on the right pane.

- On the next screen, click the “Add account” button next to “
Add other user“. - A pop-up window will appear next prompting you to sign into your Microsoft account.
- Click “I don’t have this person’s Sign-in information“.

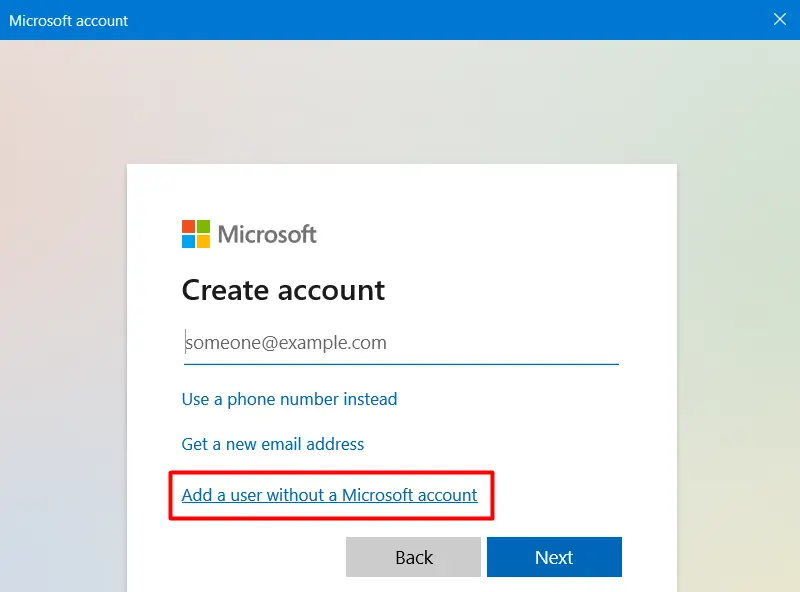
- On the next screen, click on “Add a user without a Microsoft account“.

- You may now fill in the details against the User name, and set a password for this user account.

- Click Next and a local user account will soon be generated on your Windows PC.
Restart your PC and when this reboots, sign into your newly generated local user account.
2] Add Work and School Account
In order to add a work and school account on your Windows PC, you need to first sign in using the newly created local account credentials. After you sign in to your computer successfully, use these steps –
- Press Windows + I to launch Settings.
- Locate and click on Accounts, available on the left pane.
- Head over to the right pane and scroll down to Account settings.
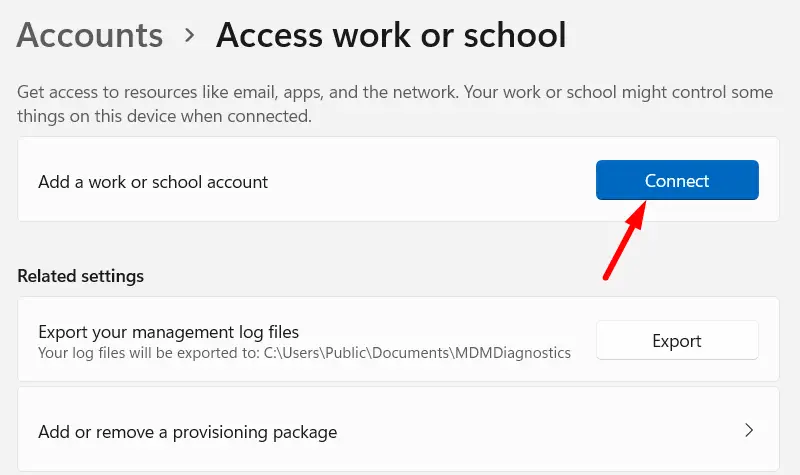
- Here, you will find the settings to “Access work or school“. Click on it.

- Locate and click on the Connect button next to “Add a work or school account”.

- When prompted, provide your Microsoft 365 email id on the pop-up window and hit the Next button.
- You may now follow the on-screen instructions to sign into your first work or school account.
Note:
- You must join your computer to Azure AD Directory, add DEM user credentials, and click on Next and Sign In.
- Repeat the above steps to add your other school or work account.
After you successfully add both a work and a school account to your local user account, the error 0x80180018 should get resolved automatically from the subsequent login.
Read Next: How to change Local Account Password on Windows 11


