DRIVER_IRQL_NOT_LESS_OR_EQUAL is a BSOD error that usually prompts up at Windows Startup. This is mainly a driver related issue but sometimes it also occurs because of some corrupted internal files. In this situation, you will also experience an error code called STOP: 0x000000D1 which is not much problematic. However, it should be repaired as soon as possible, because it indicates the system malfunctions and may cause further damage if ignored.
This problem can appear on any version of Windows while working or using the computer system. Besides, it occurs in the midway of the Windows upgrading process with an infinite system restarts loop. Reach out the below section where we’ve made a quick fix guide that will not cost you a dime, just a few minutes of your time. Try the solutions by following the instructions step by step.
List of Contents
- Remove McAfee
- Roll Back Network driver
- Disable Automatic Restart
- Run Blue Screen Troubleshooter
- Remove the faulty Windows update files
- Reconnect the External Hardware Devices
- Update corrupted Drivers with Device Manager
- Uninstall third-party antivirus
- Full Scan your device
- Use Windows System File Checker
- Run the DISM tool
- Run CHKDSK Utility
- Use Previous System Restore Point
- Install the Windows Updates
- Clean Junk from the system using Disk Cleanup
- Perform a clean install
- Recover Data Lost due to BSOD Error Screen
DRIVER_IRQL_NOT_LESS_OR_EQUAL – Error 0x000000D1 Solutions
To Fix BSOD Error 0x000000D1 in Windows 10, use the steps –
1] Remove McAfee
The root cause of Error 0x000000D1 might be the driver for McAfee Total Protection. Therefore, we recommend you to uninstall this anti-virus application and then try to upgrade the operating system again. Furthermore, this error will not let you access your device, so you will have to launch your system in the Safe Mode using the following steps –
- Open your device in Safe Mode.
- Click on the Windows Search bar and type “Control Panel”.
- Select the result from the list and then open it.
- Locate and open Programs and Features item.
- Look for the McAfee application you want to remove.
- Right-click on the program and select the Uninstall button.
- Follow the on-screen instructions to complete the process.
Restart your machine and check if the problem is resolved after removing McAfee. If it is, you might want to keep using Windows Defender or switch to a different application for giving your system proper safeguards.
2] Roll Back Network driver to fix Error 0x000000D1
If the above workaround doesn’t fix the Error 0x000000D1, you need to roll back your network driver. For further instructions, follow the steps given below –
- Right-click on the Start button and select Device Manager.
- On the following window, locate Network adapters and expand it.
- Right-click on the device you want to rollback and select Properties.
- In the properties window, go to the Drivers tab.
- Click on Roll Back Driver and then hit the OK button.

3] Disable Automatic Restart
Sometimes, the automatic Restart setting is considered as the main culprit causing the issue of prompting BSOD Error 0x000000D1 in Windows 10. However, this is a basic settlement and will not probably resolve the problem completely. Go with the following steps given below –
- First of all, open Control Panel.
- Make sure the View of the control panel is either into a small or large icon.
- Find out the System and then open it.
- On the left side, select Advanced system settings.
- In the System Properties window, go to the Advanced tab.
- Under the Startup and Recovery section, select the Settings button.
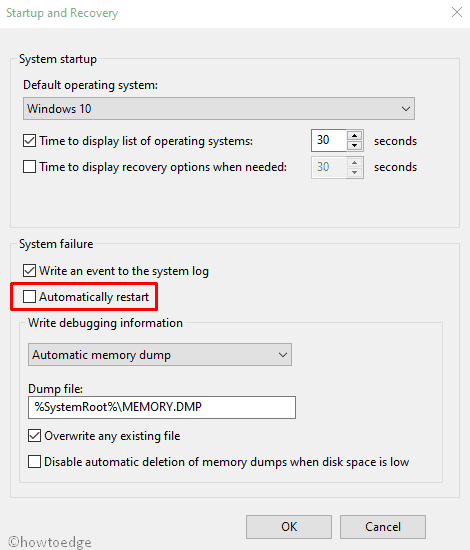
- On the following page, go to the System failure section and uncheck Automatically restart.
- Click on the OK button to save the changes.
4] Run Blue Screen Troubleshooter to fix Error 0x000000D1
Out of the several resolutions, Blue Screen Troubleshooter is yet another potential utility to fix the root cause of Error 0x000000D1. However, this section is by default disabled. Go to the below section and learn how to tackle this issue using the Blue screen troubleshooter –
- Press Win+I to launch the Windows Settings.
- Open the Update & Security section.
- Select Troubleshoot and then switch to the right pane.
- Scroll and locate Blue Screen option from there
- Once you find, click on it and select Run the troubleshooter.
- Upon performing the tool properly, Windows 10 will fix this error automatically.
5] Remove the faulty Windows update files
Windows Update brings quality updates or cumulative updates to make your device free from malicious applications in the form of viruses and trojans. It is recommended to download them through the Windows Settings. However, sometimes it results in perilous issues during this process which can cause BSOD Error 0x000000D1. At this situation, you have to clear these files from the system using the given steps –
- Press Win+I together and let the Settings app appear.
- Select Update & Security icon.
- On the next page, you will be on Windows Update.
- Go to the right pane and choose the View update history link.
- Click on the Uninstall updates option and wait for a moment.
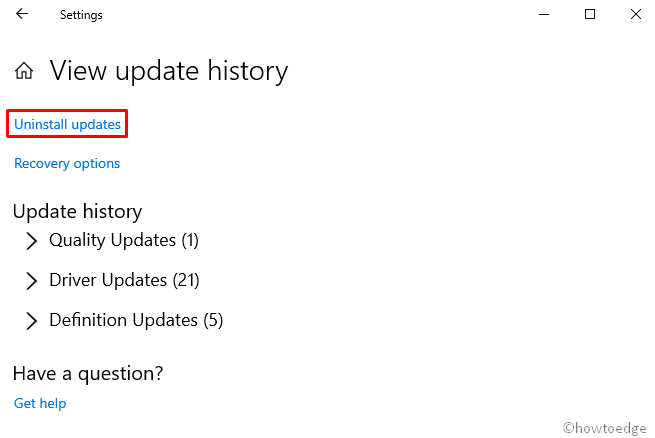
- It will show the list installed updates on your device.
- Click on the Uninstall button available at the top of the page.
- Follow the on-screen instructions to complete the process.
6] Reconnect the External Hardware Devices
Sometimes DRIVER_IRQL_NOT_LESS_OR_EQUAL BSOD error hits your device when you connect an additional hard drive there. In that case, you have to remove the related drives and connect them again by following proper processes. Here is how to do it –
- At first, disconnect all the plugged accessories from your device.
- Thereafter, restart your computer.
- Once the OS boots successfully, connect the accessories again with your PC
- Now, check which one is causing Error 0x000000D1.
- Visit the manufacturer site and download the updated drivers for that particular hardware.
- Install the application and this might potentially fix the issue.
7] Update corrupted Drivers with Device Manager
The corrupted driver is one of the possible reasons for which DRIVER_IRQL_NOT_LESS_OR_EQUAL BSOD appears in your Windows 10 PC. To mitigate this issue, you should open the Device Manager and look for the yellow exclamation mark next to the driver. For further instructions, follow the steps given below –
- Open the Run dialog box using Win+R keys.
- When the popup opens, type ‘devmgmt.msc’ and hit Enter.
- In the Device Manager window, find the devices having an exclamation mark before them.
- Once you find, expand it by double-clicking.
- Right-click on the driver and select Update driver option.
- At this time, two options will appear, choose Search automatically for updated driver software.
- Finally, Restart the Windows to make the changes effective.
8] Uninstall 3rd party antivirus causing Error 0x000000D1
It’s a common tradition to have a third-party anti-virus program so as to remove malicious software like – viruses and Trojan files. However, your PC doesn’t need such installation as its features are already added in the Windows Defender app. It would be higher chances to solve BSOD Error 0x000000D1 by removing external anti-malware programs in the system. Here’s how to do it –
- Right-click on the Start button and select Settings.
- Choose the Apps option.
- On the next page, select Apps & features.
- Find the program that may cause Error 0x000000D1 or you have recently installed.
- Once found, click on it and select the Uninstall option.
- In the pop-up menu, again click Uninstall to confirm.

- On performing the Uninstallation process, go to the official manufacturer page.
- Download and reinstall them again on PC.
9] Full Scan your device to fix Error 0x000000D1
Malicious software like viruses and trojans are now everywhere on the web. Once they enter into the systems, you might get stuck with your PC anywhere and anytime. Furthermore, it wipes out the most important data required for Windows that causes the BSOD Error 0x000000D1. Fortunately, there is the Windows Security app that is able to detect and dismiss the threats. To perform this task, here are the following instructions –
- Open Windows Settings as we explained above.
- Once the app opens up, click the Update & Security icon.
- From the left column, select the Windows Security option.
- Go to the right side and choose Virus & threat protection.
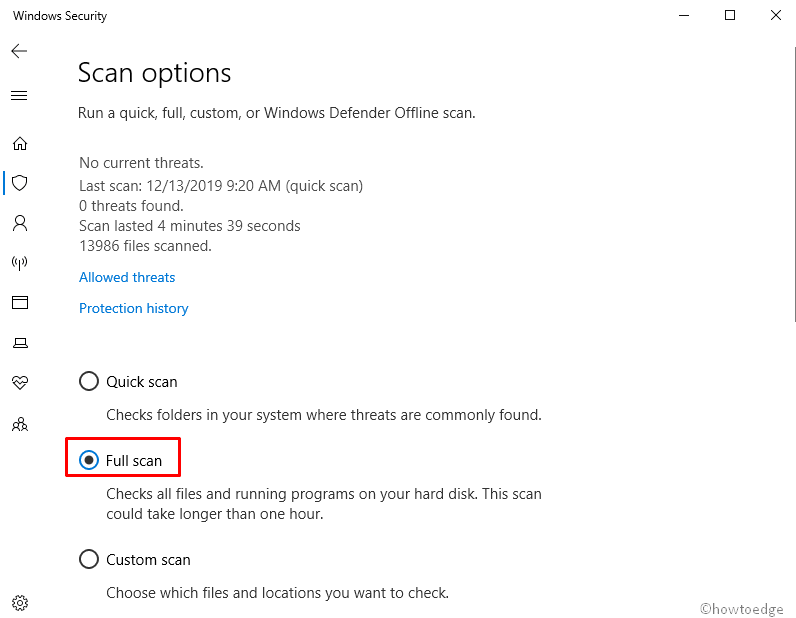
- On the following page, select the Scan options link.
- Select the radio button of Full scan and then click Scan now option.
- This will start the scanning process.
- It may take a while to search viruses in every file of the system.
- If any malware is identified, click on the Clean threats to remove them.
10] Run Windows System File Checker
Windows system components fall into corruption for various malware infection which results in BSOD Error 0x000000D1. Also, supporting this action can be threatening to the system. Luckily, Microsoft discovered a new utility namely System File Checker that can fix the BSOD DRIVER_IRQL_NOT_LESS_OR_EQUAL effectively. This is how you need to proceed to recover the missing DLL files –
- Right-click on the Windows logo and select the Run option.
- Type cmd.exe, and press Ctrl+Shift+Enter together.
- Click on the Yes button, when UAC prompts.
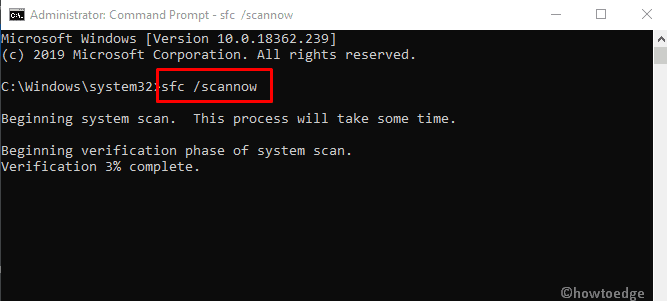
- This will launch the elevated command prompt on the screen.
- On the following page, type the following URL and hit Enter – sfc /scannow
11] Use Deployment Image Servicing and Management (DISM) tool
In some cases, Windows image files become damaged and cause BSOD Error 0x000000D1 in Windows 10. The software giant develops a command-line application named as DISM that can repair the corrupted Windows images files. To execute the workaround follow the instruction –
- Open the elevated Command Prompt as we explained above.
- If a UAC prompts up, click on Yes to give consent.
- On the following screen, type the following text code and hit Enter –
DISM.exe /Online /Cleanup-image /Restorehealth
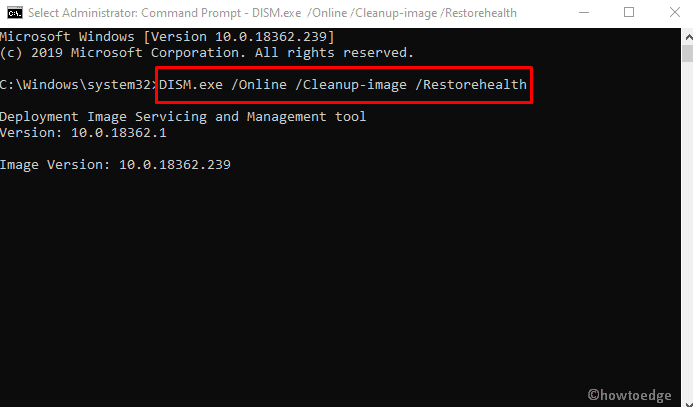
- When the DISM scan gets over, restart your device to make the changes effective.
Note – This process might get stuck when it reaches 20%, which is a normal phenomenon.
12] Run CHKDSK Utility to fix Error 0x000000D1
Sometimes BSOD Error 0x000000D1 also hit the devices because of the creation of bad areas in the Hard Disk. Here, we need to use Disk Checking utility that can identify these harmful areas and eliminate such errors efficiently. Proceed with the following guidelines –
- Press the Window button and type “cmd”.
- Right-click on Command Prompt and choose Run as administrator option.
- When UAC prompts, tap Yes to continue.
- Type the following command on elevated Command Prompt –
chkdsk C: /f /r /x
- Press the Enter key and the Disk Checking Utility will start scanning the error causes.
- This process will take time therefore, wait until it gets over.
- Thereafter, reboot the PC so that changes made come into effect.
Here, all the letters have their specific meanings –
C:– represent the Disk where the OS is installed. You can change this to D:, E: or any depending upon your usage.
f- implies fixing the scanned bugs.
r- implies detecting the existing problems in the Disk.
x- stands for splitting up the disk volume to help the detection process.
Note – C: is the drive letter where the OS is installed. If you are using other drivers to do the same task, substitute the letter with D:, E: and so on.
13] Use Previous System Restore Point
Sometimes, when you install new apps or uninstall the existing ones, this may result in errors inside Registry which and cause BSOD Error 0x000000D1. In this case, you must revert back the existing OS to an earlier version when everything was functioning properly.
Note – This is an optional solution, as it needs a previously created Restore Point. Therefore, you can certainly skip this one and go to the next method if you haven’t made it.
Here’s how to do it –
- Press the Windows button and type rstrui.
- Look for the best match and then click on it
- In System Restore wizard, click on the Next option.
- This will allow the device to generate your PC’s Restore points.
- Mark the box Show more restore points option.
- Choose the last Restore Point you have created on the device.
- Click on Next and then the Finish button to initiate the full process.
14] Install the Windows Updates
The outdated Windows Operating System is more likely to cause BSOD Error 0x000000D1 in Windows 10. Accordingly, download the available updates using the below instructions –
- Right-click on the Start button and select Run.
- Click on the Update & Security option.
- Move along the right pane of the Windows Update.
- Here you might see ‘You’re up to date dialog’, even so, hit Check for updates option.
- The system will look for available updates for your windows.
- On completing the searching process, you will see the updates on the screen.
- Click on the Download option.
15] Clean Junk from the system using Disk Cleanup
Operating System creates a large number of useless Junk files that just pile up over the period of time in the Hard disk. Because of the lump of files, your system might not have enough space to execute the task properly and causes BSOD Error 0x000000D1. In such situations, you can use the Disk Cleanup Tool to remove these junk files. Here’s how to perform this task –
- Press the Win+R key together to invoke Run dialog.
- Type cleanmgr in the search field and hit Enter.
- In the pop-up menu, choose C: drive and hit the OK button.
- The tool will start searching for the spaces that it can free-up.
- Select the “Clean up system files” button.
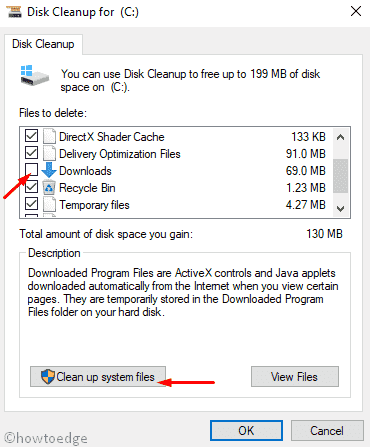
- Choose C: drive again and click on the OK button.
- It calculates the storage capacity that can be retrieved by deleting the system files.
- Restored any important items from Recycle Bin if available.
- Check all the options except Downloads, and hit the OK button.
16] Perform a clean install
Unfortunately, if you could not fix Error 0x000000D1 using any of the above resolutions, It would be really unpleasant and frustrating. You can perform a clean installation of Windows 10 for fixing BSOD DRIVER_IRQL_NOT_LESS_OR_EQUAL. Perform this solution with utmost perfection and there will be no chance of any error or issue further. Here the most important thing you have to create a backup of all the necessary files and data. Furthermore, as this is a professional work, it would better if you take help from skilled people to accomplish.
17] Recover Data Lost due to BSOD Error Screen
Sometimes, even after performing a clean installation doesn’t resolve the exact cause that leads to the BSOD error in the first place. Moreover, if the cause of BSOD is somehow related to any hardware changes, Resetting PC is not going to help you at all. Hence, it is necessary to find and fix the exact reason so that this bug won’t come again and again.
Whenever we face a sudden BSOD error, we loose our latest pictures, files, and programs as well. Though we can restore our PC to an earlier point, the recent changes will simply disappear. This is why we suggest you install software that claims to recover the lost data effectively. To use this product, follow the steps –
- At first, download and install the Stellar Data Recovery – Standard software.
- Once installed, tap on its desktop icon to launch this program.
- On the succeeding wizard, press “All Data” followed by “Next”.
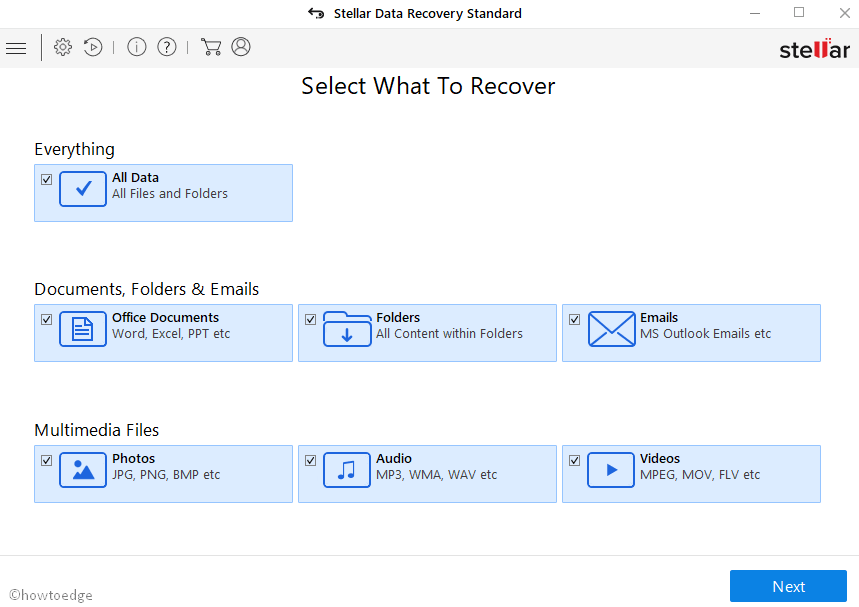
- Here, choose the location where you want to look for the lost data. If you are not well aware of the missing files, tick all the check-boxes and enable the ‘Deep Scan’ toggle switch.

- After you press the “scan button”, the software will start searching for any lost data on your PC –
- You may see a ‘Tree View’ consisting of all the data on the left pane. All you need is to expand the tree and click on a folder to view its contained files and sub-directories on the right panel.
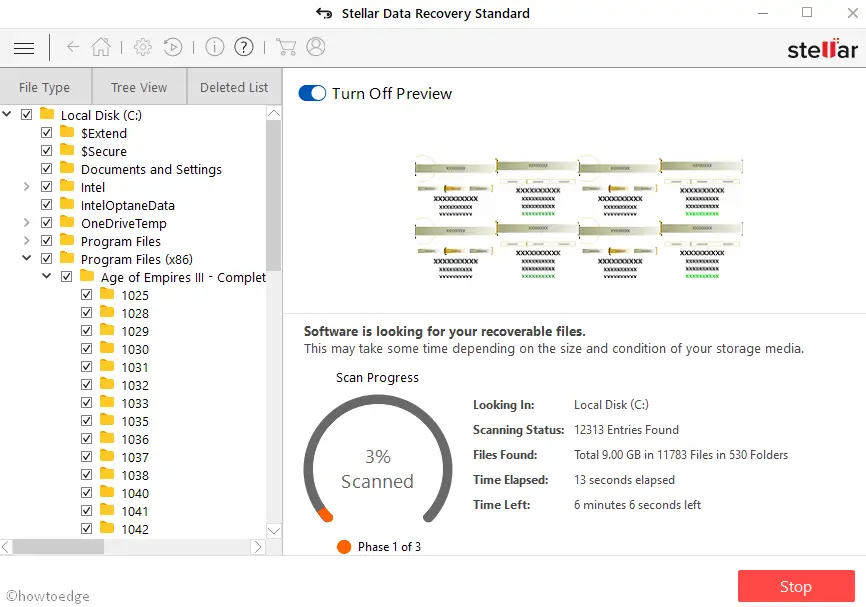
- Henceforth, click on a file to preview and if found necessary tick the checkbox against it and hit the “Recover” option.
- Next, tap ‘Browse’ and choose a location on a different partition or use an external drive.
- Click ‘Start Saving’ and wait for the software to finish saving your recovered data.
That’s it, once you recover the file, you may transfer the file to its original location.


