Several users reported receiving an error code 0x80000003 with a message that says – Exception Breakpoint has been reached. In this post, we will look into the reasons causing this error code, along with five workarounds that might help you to overcome it on Windows 11/10 PC.
Upon encountering this error code, you might receive an error message as well that says the following –
The exception Breakpoint, A breakpoint has been reached, (0x80000003) occurred in the application.

What causes this Exception Breakpoint error 0x80000003?
This error might appear when you are simply opening an application or performing some basic operations on Windows. It could be the direct result of some bad sectors inside the hard disk or Memory. Consider inspecting both the HDD and RAM and if only both passed the tests, go to the software solutions.
Considering, your device indeed passes both the hard disk and Memory diagnostic tests, the error 0x80000003 must be appearing due to some software glitches. Or, it could be because of some missing system files and folders. Boot into the Clean Boot state and check if the problem resolves there.
How do I solve Exception Breakpoint Error 0x80000003?
If you are encountering this error code while performing basic tasks or opening a particular app on Windows, attempt the below fixes one after another. Make sure to apply the solutions in the same order as they were put in. In case you have created a system restore point sometime back, you may use that and check if the problem resolves this way.
If the error 0x80000003 persists even after restoring your device to its previous state or you don’t have a backup point, consider applying these fixes one by one –
- Check the Hard disk using CHKDSK
- Inspect Memory
- Enter Clean Boot
- Try System File Checker
- Check driver compatibility issues
- Get in touch with the Developer
1] Check the Hard disk using CHKDSK
Exception Breakpoint errors mostly occur when there are some bad or corrupt sectors inside your HDD drive. CHKDSK is a useful tool in such cases to determine if there are indeed some issues within your hard drive. Here’s how to begin inspecting the hard disk on your computer –
- Press Win + X, and select Run from the power menu.
- Type “CMD” on it, and press the ctrl + shift + enter keys altogether.
- The UAC window will prompt next, hit Yes to authorize opening Command Prompt as admin.
- On the elevated console, type the following, and press Enter –
chkdsk C: /f /r

- Since you are already using the root drive, the hard drive scan won’t start. Instead, it will ask if you want to begin diagnosing the hard disk the next time you restart your computer.
- Type “Y” without quotes and hit Enter. Now, restart your computer and you will see the CHKDSK command taking over.
Wait for this tool to inspect your hard disk and provide you with a detailed report. In this report, you can find the bad sectors on your hard drive and suggestions on whether you can continue using the HDD or replace it with a new one.
Note: If you are willing to change your hard disk, make sure to purchase an SSD instead as this will be 5-10 times faster than a conventional hard drive.
2] Inspect Memory
The error code 0x80000003 may also occur when there are some issues with your RAM. Use the Memory Diagnostic tool to check if there are indeed some problems with your RAM or not. Here’s how to inspect Memory on Windows –
- Press Windows + R to launch the Run dialog.
- Type mdsched.exe on it and hit OK.
- Click Restart now and check for problems.

- The system will immediately start inspecting for bad components inside your RAM.
- If you wish, you may even go for the Advanced options like Test mix or Pass count.
- Press the F10 button to begin testing your Memory.
Note: When the system is diagnosing the RAM, you may even try to find and fix Memory leaks as well.
After this testing completes, you will receive a report stating whether your Memory is all okay to use or requires a replacement.
3] Enter Clean Boot and fix the error 0x80000003
The presence of corrupt files and folders might also result in an error code 0x80000003. This happens mostly when you are using some third-party programs, especially an antivirus program to find and fix malware or viruses inside your PC.
Try booting into the Clean Boot state and check if the problem occurs here as well. If not, the problem must be within the external applications or games which you have installed using their executable files. Remove all such apps through Control Panel and boot normally into your Windows device. Make sure to repair the corrupt as well as missing system files using SFC (discussed below).
However, if the error occurs inside Clean Boot as well (very little chance), you better perform a clean installation of Windows 11/10 on your computer.
4] Try System File Checker
As stated above, the error 0x80000003 might appear when there are corrupt or faulty apps running on your PC. It is because of this constant interaction between system files and the third-party app, the system files become corrupt. An external program is even known to delete some internal files and folders to modify the system configuration. Though you have stopped all such apps, the corrupt system files and folders are still lying on your computer.
System File Checker is a useful utility program to detect and repair such files on your Windows PC. Here’s how to initiate the SFC scanning –
- Press Windows + S, and type CMD in the text field.
- Right-click on the top result and select Run as administrator.
- When the UAC prompts, hit Yes to authorize accessing the Command prompt with admin privileges.
- Type the following near the blinking cursor, and hit Enter –
sfc /scannow

- This will take 10-15 minutes to scan and repair all system files and folders. The timing may increase depending on the number of files and folders present on your Windows PC.
After the scanning/repairing process is over, close CMD and restart your PC. Sign back in and check if the error code 0x80000003 resolves while executing normal tasks inside your computer.
5] Check driver compatibility issues
The error 0x80000003 could also appear when the existing device drivers have been corrupted somehow or you haven’t updated them for a long time. Navigate to Settings (Win + I) > Windows Update > Advanced options > Additional options > Optional updates, and check if you see some pending updates there. Make sure to download and install all updates that you find after reaching out to the above location.
6] Get in touch with the Developer
If none of the above solutions work to resolve the error code 0x80000003, you better contact the developer of the game or application and get a resolution from there. You may search online for the official support page of a particular game or app.
How do I solve Xbox Error 0x80000003?
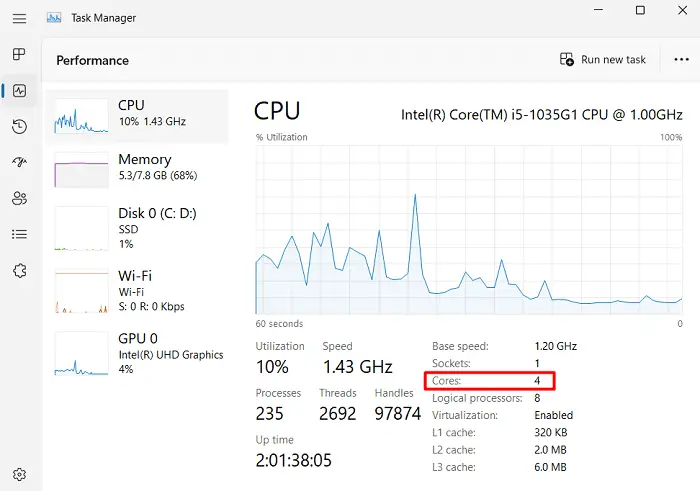
Some users reported encountering a similar error code while playing Halo 5 on their Xbox consoles. You may receive an error 0x80000003 only if your CPU doesn’t have at least 4 physical cores. Proceed ahead and check if your device meets the minimum system specifications set for Halo 5 –
- Use the Ctrl + Shift + Esc keys to invoke the task manager.
- Go to the Performance tab next.
- Head over to the right pane, and locate the installed CPU.
- At the bottom, you may see the number of cores available inside your CPU.

If it is 4, you must be able to play Halo 5 games after a plain restart of your Xbox console and Windows PC. For devices that don’t have 4 cores, you can’t play Halo 5 games.


