Unlike several Windows 10 update-related issues, the Error 0x80070070 occurs owing to the less availability of space for new applications. The following error message includes several subsets like – 0x50011, 0x50012, 0x2000c, and 0x60000. If you don’t solve this bug soon, this may corrupt core system files causing different software as well as hardware problems. Today, in this post, we discuss the underlying reasons behind this error code along with some potential workarounds.
Usually, the installation error 0x80070070 arises on account of low space on the hard drive. So, freeing up space on disk drives surely helps to mitigate this issue. In certain scenarios, this bug may also appear because of the attached peripheral devices. Use disk cleanup, Enable disk quota, moving temp data to a partition other than C:\ may help to resolve this re-occurring error. If none fixes the trouble, simply upgrade the existing Windows 10 OS Build to the newer versions. Let’s explore these solutions in somewhat more detail –
Recommended – How to make your Windows 10 fast and Efficient
Ways to Fix Installation error 0x80070070 in Windows 10
To solve the installation error 0x80070070 on Windows 10 PC, use the below workarounds –
The error 0x80070070 is often associated with alternative codes such as –
0x80070070-0x50011
0x80070070-0x50012
0x80070070-0x2000c
0x80070070-0x60000
1] Create the Restore Point
Note: Before proceeding to the solutions, make sure to create a system restore point. This is essential as if anything breaks down while applying the fixes, you can always roll back the OS to the current state using this. Here’s how to proceed –
- Type Create Restore Point in the Search and click the best matching result.
- When the System Properties window launches, hit the Create button.
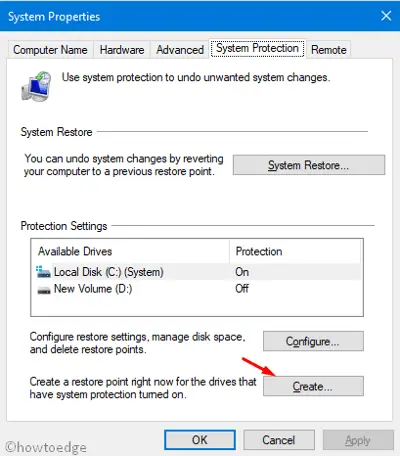
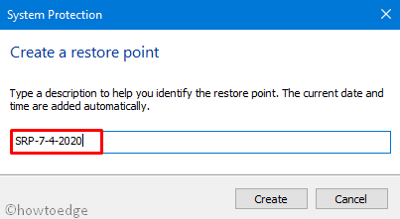
- Type anything including date so as to easily distinguish between the new and old restore points.
- After putting some name to this backup, hit the Create button again.
- Wait for a while as this takes few minutes to create the system restore point.
Once over, close all running apps and Restart your PC so as to apply the recent changes.
2] Remove additional plugins
Sometimes, plugins like Wireless adapter, RAM, SSD, Bluetooth or USB may prevent installing new apps. To be on the safe side, just remove the additional peripheral devices and reboot your PC. After the next login, check whether you still encounter the error 0x80070070 while performing updates or not. If yes, you need to clean up some space on your hard disk.
3] Use Disk Clean up
Windows 10 keeps on piling data unless you manually delete the same. A shortage of space on your HDD may result in the error code 0x80070070. If this indeed is the case, you should use disk cleanup to delete the unnecessary stored cache. To do so, use the following steps –
- Hit the Windows key using the keyboard and type control panel.
- Next, select the top result to launch the Control Panel window.
- Here, click the first option i.e. Administrative Tools thereafter Disk Cleanup.
- A pop-up window starts immediately afterward. Choose the root drive (mostly C:\) and hit OK.
- The app will then calculate the amount of space that it can free up.
- Check all the boxes except Download and click the Cleanup system files button.
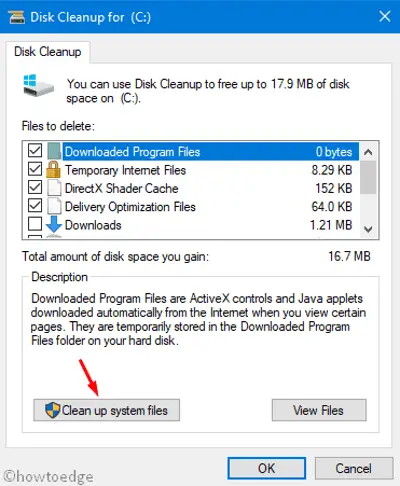
- Again, choose the root drive (C:\) and press the OK button.
- When a confirmation window appears warning about the deletion of the files, click Delete.
Performing the above task should solve the storage issue. Try updating your Windows 10 OS again and check whether you receive the error 0x80070070 or not.
4] Enable disk Quota Management.
Usually, the disk quota is turned off on your device. Enabling this utility authorizes disk quota to automatically arrange the files and thus maximize the utilization of hard drives. Here are the essential steps on how to turn on this feature –
- Hold the Win key and press E to start the File Explorer.
- Now, right-click on the disk drive (over which you want to alter the settings) and select properties.
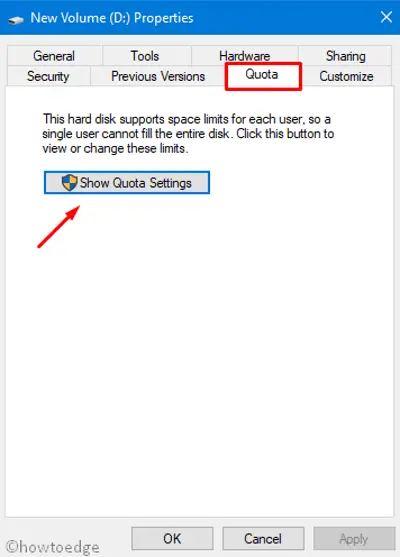
- Head over to the Quota tab and click Show Quota Settings. See the snapshot below –
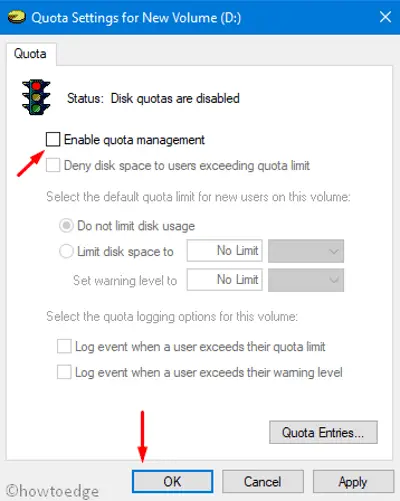
- Here, mark the Enable quota management check-box and click Apply then OK.
- At last, Reboot your PC so that changes performed above come into effect.
5] Move the Temp folder to other disks
In general, the temp folder includes all the update-related files along with some other valuable data that are worth having on your device. If you don’t want to delete this, you may do so by moving the folder to separate disks. Here’s how to perform this task –
- Hit the Start button and type “cp”, click on the top result to launch Control Panel.
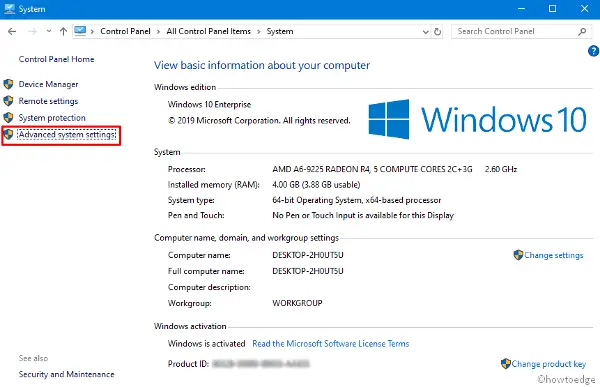
- Select System thereafter Advanced system settings. See the Snapshot below –
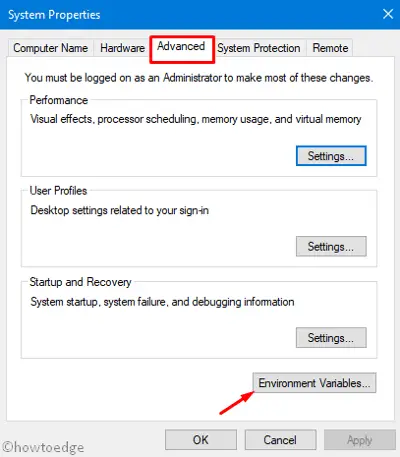
- When the system properties window appears, click Environment variables.
- On the next screen, select the TEMP variable and tap the Edit button.
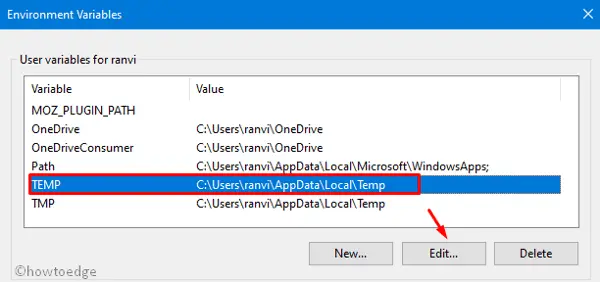
- Under Edit User Variable, click Browse Directory and select a proper path where you want to save this folder. Alternatively, put in the proper pathway including disk drive (D:\) inside the variable value field and tap OK again.

That’s it, your temp folder now moves to the designated location.
6] Upgrade Windows 10 to the latest version
If none of the above fixes solve this installation error 0x80070070, you should use the previously created system restore point. This is pretty a new feature for Windows 10 users and is applicable only if you have created such backups back in the past. If you are not sure what this means, you are left with none other than upgrading your existing Windows 10 Build version. Here is the complete procedure –
- Go to the Microsoft official website and click the Update now button.
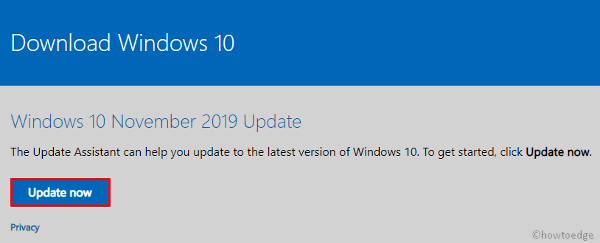
- After the setup file downloads completely, double click over its icon to launch this utility program.
- Mark Upgrade this PC now checkbox, select Downoad thereafter install updates.
- On the succeeding screen, accept the license terms and conditions laid down by Microsoft.
- Make sure to keep personal files and app settings followed by Next again.
- Now, go through the on-screen instruction to complete the remaining processes.
The computer should work now without getting any installation error 0x80070070.

