Network sharing is an important property of Microsoft Windows, which helps two or more users to share resources without using connecting wires. When two or more users remain connected to the same Network, they may share data or any other information among them. In this post, we are going to discuss an error code 0x80070035 that restricts accessing information over the same network.
Error code 0x80070035 must be corrected to utilize the network-sharing feature of Windows. With this error code, you may see the following error message – “Error code: 0x80070035. The network path was not found.” You may resolve this issue by following one or other solutions discussed in this post.

What causes error code 0x80070035?
This error usually occurs when your PC can’t find the path of a network to which it is connected to. As a result, when you try to share files among your friends joined to the same home network, you face certain restrictions, or simply this error code.
Error code 0x80070035 in Windows Internal Network
To fix Error code 0x80070035 in Windows Internal Network, follow the below steps:
1] Enable the NetBIOS Over TCP/IP
Network Basic Input Output System helps two devices to communicate with LAN (Local Area Network). It is essential to enable NetBIOS, as it allows applications to rely on NetBIOS. You can follow the below steps to enable it:
- Open the Run command by typing the Windows + R key.
- Type “NCPA.CPL” in the text field and press OK.
- Right-click on the Default Network and choose Properties.
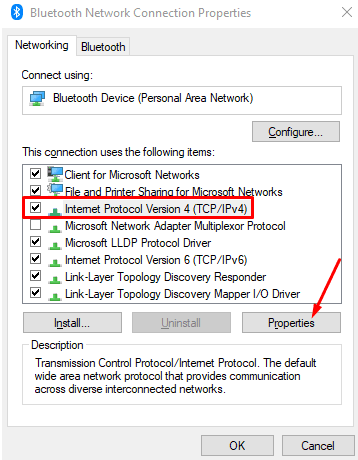
- Select Internet Protocol Version 4 (TCP/IPv4) and click Properties.
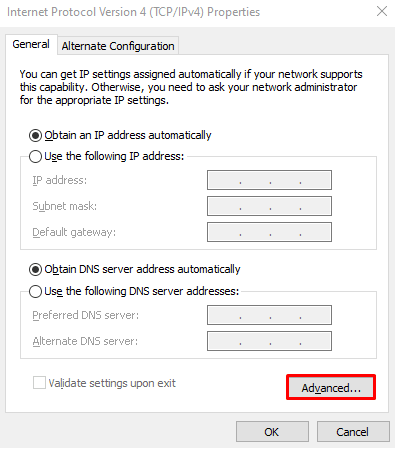
- On the General tab, click the Advanced button.
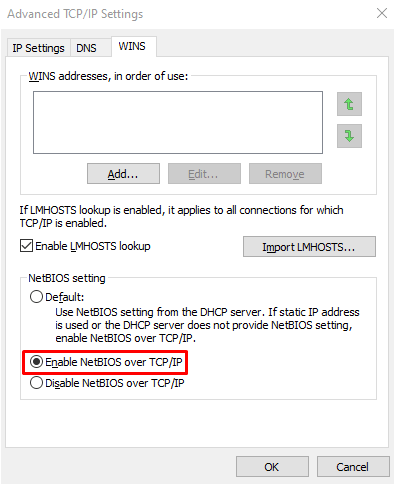
- Go to the WINS tab and mark the “Enable NetBIOS over TCP/IP” checkbox.
- Click the OK button to save the changes.
- Restart your computer and check if it works.
2] Make sure the TCP/IP NetBIOS Helper service is running
TCP/IP NetBIOS helper service runs at the backend to start network sharing between devices. This is a permanent service running in Microsoft Windows that provides support to NetBIOS over TCP/IP. In case the TCP/IP Net BIOS helper service is disabled, you need to enable it using the following process and check if it works.
- Open the Taskbar search option using the Windows + S keys.
- Now type Services and open Services Folder.
- Look for the TCP/IP NetBIOS Helper in the services folder.

- Once you find it, do a right-click on it and select Properties.
- In the Properties window, go to the General tab.
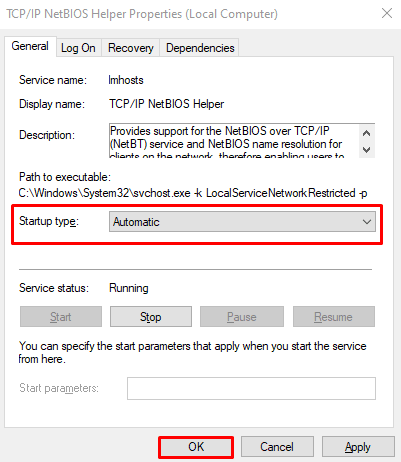
- Set the Startup type to Automatic using the drop-down menu.
- Click Apply > OK to apply the changes.
- Restart your computer and try initiating Network Sharing.
3] Turn off the third-party firewall
The Third-Party Firewall is not an essential part of security software but may come along with the new generation of Anti-Virus used nowadays. It is used to protect from data theft, hacking, and other personal information of the user.
In some cases, as a preventive measure, it may also prevent the user from utilizing the Network Sharing feature of Windows. Therefore, it is necessary to disable it temporarily while initializing Network Sharing and enable it once it is done.
4] Enabling SMB V1.0
A few users were able to fix this error code by enabling SMB V1.0 on their devices. Go and check if this feature is disabled on your computer or not. In case you do find this turned off, re-enable it by following the below steps –
- Press Win + S.
- Type Windows Feature and click on the first result.
- On the “Turn Windows features on or off” pop-up window, scroll down and locate SMB 1.0/CIFS File Sharing Support.
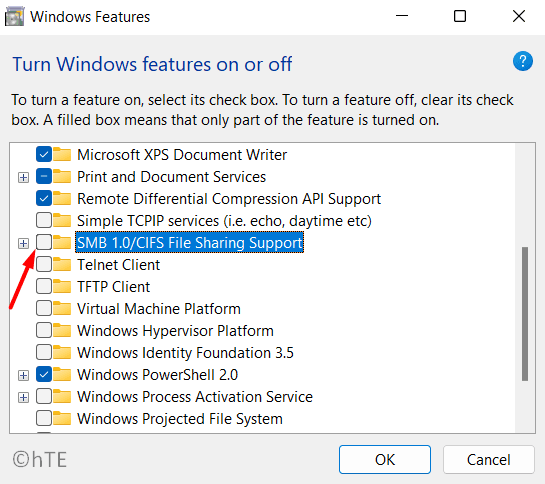
- Tick the checkbox available left of it and hit OK.
- Reboot your PC and check if this error resolves on your computer.
5] Modify the registry entry “AllowInsecureGuestAuth” Value
In case you are still getting an error code 0x80070035, you must enter the registry editor and modify the following key entries. Here’s how to do this –
- Press Win + R, type “
regedit” without quotes and hit OK. - When the UAC window appears, hit Yes to authorize opening the registry.
- Inside the registry window, navigate to the following path –
Computer\HKEY_LOCAL_MACHINE\SYSTEM\CurrentControlSet\Services\LanmanWorkstation\Parameters
- Move to the right pane and locate the DWORD entry titled – “AllowInsecureGuestAuth“.
- When found, double-click on this entry and change its Value data field to “1”.
- Click OK to confirm the recent changes and restart your PC.
I hope the problem resolves from the next PC reboot. If not, follow the next set of solutions –
6] Enable advanced sharing on the root drive
When the root drive is set not to share any folder, the error 0x80070035 may also occur. To overcome this issue, one must enter the Share folder settings and configure it correctly. Here’s how to do this –
- Press Win + E to launch File Explorer.
- Right-click on the C:\ drive, and select Properties.
- Head over to the Sharing tab and click Advanced Sharing.
- Check the box for Share this folder, and hit Apply > OK.
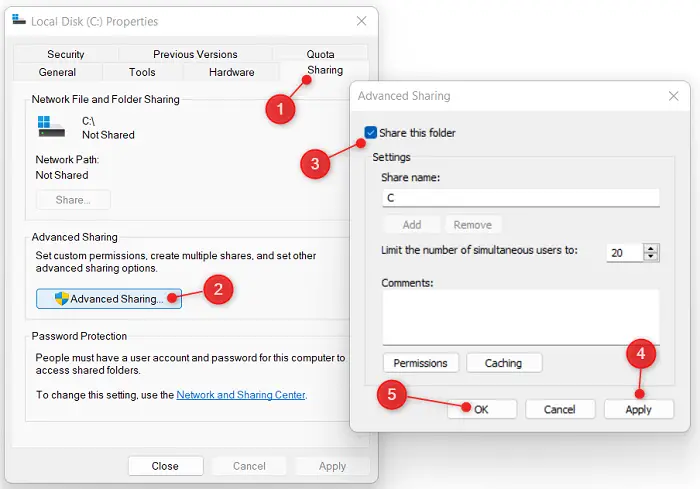
Now that you have enabled Sharing of the root drive folder, check if the problem 0x80070035 is resolved now.
7] Reset Windows Update Component
The process of installing and uninstalling is run by the Component Object Model also referred to as Windows 10 updating component. The model if reassembled, can eliminate the Error code 0x80070035 by resetting the Windows 10 update component.
8] Run System File Checker
The System File Checker command scans all the protected folders and restores the corrupt files with a cached copy. Here is the method to run the SFC scan:
- Open an elevated Command Prompt window.
- Type the following command and press Enter to execute it:
sfc /scannow
- Once it finishes, restart your computer and check if it resolves the error.
9] Run the Deployment Image Servicing and Management (DISM)
The Deployment Image Servicing and Management command is used to service and mount Windows Image before execution. One can also use this command as a troubleshooting tool to fix the Network Sharing error in Windows 10.
Here’s how to run the DISM tool –
- Right-click on the Start button and select Run.
- Type CMD in the text field, and press the Ctrl + Shift + Enter keys together.
- When the UAC window prompts, hit the Yes button to authorize the CMD opening.
- Copy/paste the below code on it and press Enter –
DISM /Online /Cleanup-Image /RestoreHealth
- Wait for a while until it completes the process. After that restart your PC and check if it solves the problem.
10] Use Windows Update Troubleshooter
Windows 10 comes with an option of troubleshooting which can solve multiple issues relating to Windows. If you are using this update, then this process might help to solve Error Code 0x80070035:
- Right-click on Start and select Settings.
- Choose Updates & Security.
- Go to the left pane and select Troubleshoot > Additional troubleshooters.
- Select Windows Update and click Run the troubleshooter.

- Wait for it to finish and then restart your computer.
Sign back into your device and check if you can update your PC without getting an error code 0x80070035.


