In this guide, we will discuss what causes Installation Error 0xC1900101 along with eight working ways that can resolve this issue in Windows 11/10. As its name suggests, this is a type of installation error that appears while installing a new operating system using the Media Creation Tool.

What does Installation Error 0xC1900101 mean?
The error 0xC1900101 implies that the core system files are somehow broken or corrupted. This even suggests that you should create a system restore point before trying to address this issue. When this occurs, the update process halts at a percentage of around 25-30% and displays the following message –
“The installation failed in the SAFE_OS phase with an error during INSTALL_RECOVERY_ENVIRONMENT operation”
What causes Error 0xC1900101 in Windows 11/10?
Not having enough disk space is the main reason behind getting this error code on Windows 10. This bug may also appear when there is any problem inside BIOS or SATA. Apart from these main reasons, this bug may also appear due to one or more of the following issues –
- Corrupted system files
- Outdated device drivers
- Buggy or problematic app installation
How do I fix Installation Error 0xC1900101
If you are getting an error code 0xC1900101 while installing the new OS in Windows 11/10, try out the below fixes, and see if any resolves this issue.
- 16 GB of free Disk Space must be available
- Unplug All Cables
- Run Windows Update Troubleshooter
- Update faulty Driver
- Uninstall recently installed application
- Disable Network Adapters
- Run SFC command
- Clear CMOS
Note: Make sure to create a restore point before applying any changes to your device. This will act as the system backup in case something bad occurs and corrupts the entire operating system.
1] 16 GB of free Disk Space must be available
Just like installing any operating system, Windows 11/10 requires free disk space of at least 16 GB or more. If there isn’t enough room on your hard disk, use the Disk Cleanup tool and clear the unnecessarily stored junk or old installation files. Here’s how you can check the exact storage spaces in your computer –
- Press the Win & E shortcut together to open the File Explorer.
- When the explorer launches, click This PC on the left column.
- Click Local Disk (C:), and see what’s the availability of free space here in the root drive. See the Snapshot below –

Most of the time, this is the sole reason that prevents the smooth installation of the new operating system. As stated above, free up the storage spaces and you will be able to upgrade Windows.
2] Unplug All Cables and Remove Secondary devices
If you are using too many devices while upgrading Windows, this may also result in errors like 0xC1900101. To fix this issue then, one should remove all the unnecessarily attached devices like printers, Soundbars, broadband, etc. In case you are on a desktop, unplug all the wires on the hard disk, and clean it for possible dirt. After you have cleaned the HDD ports, connect the wires back to the hard disk. Make sure to remove and reconnect both the wired keyboard and mouse.
Assuming you have already performed all these steps, try installing Windows Update using Bootable Media.
3] Run Windows Update Troubleshooter
Running Windows Update Troubleshooter is one of the best ways to know about the possible issues that are preventing new OS installation or up-gradation. Since you are here, you must be still getting error code 0xC1900101. Here’s how to run the update troubleshooter –
- Jointly press Win & I to launch the Settings app.
- From a list of categories, select Update & Security thereafter Troubleshoot from the left column.
- On the right pane, you will find a link to Additional Troubleshooters. Well, click on it.
- Moving further, click Windows Update and hit the option – Run the troubleshooter.

- When the troubleshooter window launches, hit Next and follow the on-screen instructions.
- If this tool provides you with a fix, hit Apply this fix. Else, see what extra information it provides when the troubleshooting ends.
- Don’t forget to restart your PC in the end.
4] Update faulty Driver
Having corrupted or outdated Windows may also prevent installing a new operating system on the computer. To fix this issue then, one must update the obsolete device drivers using the steps outlined below –
- First of all, press Win & X together to launch the Power menu.
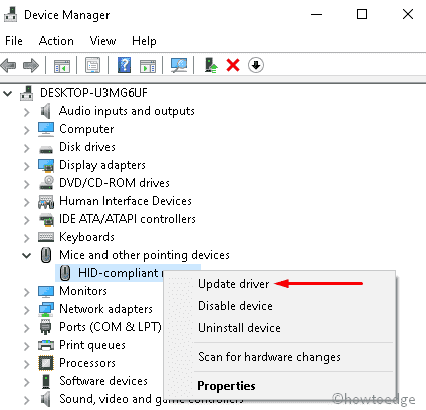
- Select Device Manager from the list and expands each section to find the faulty driver.
Note: The Yellow exclamation mark next to the driver signifies that the chosen driver is problematic or buggy.
- When found, right-click on it and select Update driver using the context menu.

- Moving further, click “Search automatically for drivers” and let the system search for any pending updates online.
- In case the above search reveals any pending updates, the same will be automatically downloaded and installed.
- Lastly, reboot your PC so as to save the changes made so far.
Doing this should fix the installation Error 0xC1900101 successfully. When Windows 10 reloads, try again to upgrade to Windows.
5] Uninstall recently installed applications
If you had lately installed any application and this bug starts appearing next, you must have installed a buggy program. As a workaround, try to uninstall that program and retry to update your Windows. Here’s how to uninstall the recently installed apps in Windows 11/10 –
- Launch Control Panel.
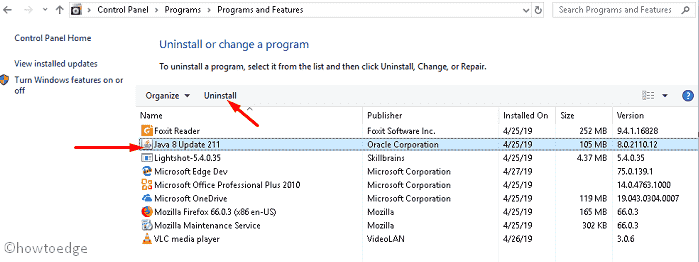
- Proceed as follows – Programs > Programs & Features.
- The system will land on the page where you can uninstall or change a program.
- Select the recently installed program, and hit the Uninstall button.
- When the confirmation window, appears, hit Uninstall again.

Note: Following this way, you can only remove those applications that you have installed using their executable files. In case you have downloaded a program from Microsoft Store, remove them by following these steps –
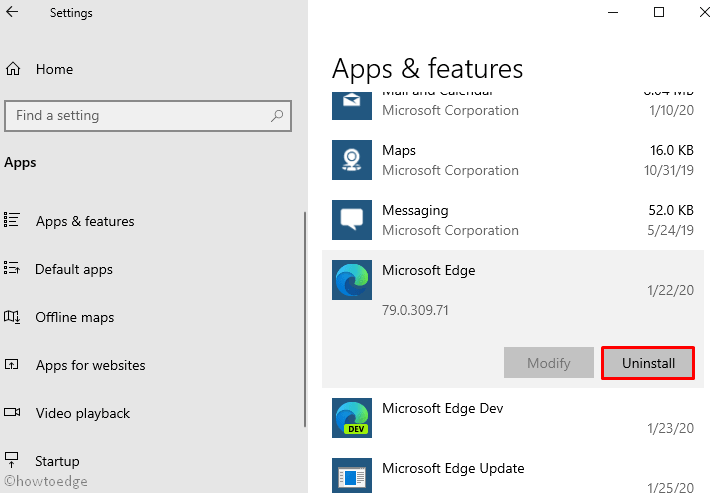
- Press Win + X, and select Apps & Features.
- On the succeeding page, scroll below and find the recently installed programs.
- Click to expand an application and hit the option – Uninstall.

6] Disable Network Adapters
In case the Installation error 0xc1900101 still persists, try disabling all wizards under the category – Network Adapter. Several users were able to resolve this issue by disabling all network adapters. See how it is done in Windows –
- Press the Window key & R to start the Run dialog.
- Type
devmgmt.mscin the text field, and hit OK to launch Device Manager. - On the subsequent screen, locate and expand the Network Adapters section.
- Right-click on each entry and select Disable device using the context menu. Repeat this process until you disable all the drivers under this category.

- Restart your PC so that the changes made become effective from the next login.
- You may now plugin bootable Media and retry the Windows installation.
7] Run the SFC
The presence of corrupted system files or a few files missing on the operating system may also prevent a smooth up-gradation. To solve this, you must use the System File Checker utility program and see if this addresses the problem that you are currently dealing with. Here’s how to perform this task –
- Press Win & X keys altogether to launch the Power menu.
- Select the Run option on the list henceforth types cmd in the text box.
- Now simultaneously press Ctrl+Shift+Enter to open Command Prompt as Admin.
- If the UAC dialog appears up, click Yes to authorize the access.
- On the elevated console, type the following, and press Enter –
sfc /scannow

- Wait till this process reached 100%.
When completed, reboot your PC and when it reloads, try again to upgrade your Windows.
8] Clear CMOS to fix Installation Error 0xc1900101
In case none of the above fixes work on your device, resetting BIOS will surely help. This procedure is far easy on the Desktop as compared to the laptop because one can easily access the hardware on it. Here’s how to clear CMOS –
Note: While ongoing with this method, you should be a bit careful. Take the help of the experts if you feel this is a bit hectic or complex. Making incorrect changes to the BIOS may cause serious problems on your computer.
- First of all, switch off the power supply and unplug all power cords connecting to your PC.
- Open the casing and you will see a flat battery attached to the Motherboard.

- Remove this battery and wait for approximately 5 minutes.
- Place back the battery at its original position and set the casing carefully.
- Don’t forget to attach all the cables back to their default locations.
- Start your PC and retry upgrading your Windows again.
I hope this article helps to solve the 0xC1900101 error which otherwise seems impossible. In case you have any queries or suggestions, let us know in the comment section.

