PIN doesn’t work in Windows is a unique problem and this happens mostly because of some malware infection, missing system files, or when the core files get corrupted somehow. In any case, Windows will start displaying the “Something happened and your PIN isn’t available” error on the lock screen.
This post explains what exactly goes wrong with your PIN to initiate such error codes and seven fixes that might help you to overcome this issue on Windows 11/10. Let’s have a look at the reasons causing PIN errors first.
Something happened and your PIN isn’t available, what causes this error?
Windows hello PIN may get corrupted because of either software or hardware-related issues. It is fairly easy to solve system-level issues and check if you get the PIN working again.
However, if the error remains as it is, you must boot into BIOS, and check if TPM is enabled on your computer. There’s a possibility that TPM was enabled before, but some third-party apps or their interactions with system files corrupt the hello PIN.
How to Fix PIN doesn’t work in Windows
If you are unable to set up a PIN on Windows 11/10 or the PIN is not working, we suggest attempting the below fixes one after another.
First, start by rebooting your computer. If the problem persists, reset your Microsoft account password. In case you are using a local account, you may boot into Safe mode and remove or delete the PIN. Command prompt lets you create a new administrator account by running the right code on it, so try this as well.
The PIN doesn’t work issue should resolve by now. However, if it still occurs, this must be because of hardware-related problems. Go and check if the TPM setting is available and enabled on your computer. Or, you may go for using the previously created restore point or simply resetting your Windows PC.
1] Restart your Computer
Oftentimes, a simple restart of a Windows PC resolves issues that otherwise look quite impossible to fix. This is because when you reboot Windows, all processes and components on it restart as well. Now, that every process is starting afresh, you might boot into your device using your 4-digit PIN.
If the error persists even after this, try logging into your device using your Microsoft password. Local account users may go for manually delete their PINs after entering into Safe Mode.
2] Reset your PIN using your Microsoft account
Microsoft lets its users use “I forgot my PIN” to reset their passwords as well as PINs. Go for this solution only if you are logged in as a Microsoft account user, else, skip to the next solution. For this method to work, you require an active WiFi or Ethernet connection.
Follow the below instructions on how to complete this task –
- While remaining on the login screen, click I forgot my PIN.
- When prompted, type your Microsoft account mail id and then verify it with your password. In case you have enabled two-factor authorization, you must provide the 6-digit code received on your Phone or Mail as well.
- Assuming you did verify your account successfully, click Continue to open the Reset confirmation page.
Use a new 4-digit PIN to set it up on your computer and hit OK. Restart your computer again and check if you can log in using the newly created PIN.
3] Reset your PIN after booting into Safe Mode
Sometimes, Windows hello PIN stops working just because of the constant interference from third-party apps. If you have recently installed an application and this problem started occurring afterward, you must get rid of that particular program.
Since the problem here is you can’t use your PIN normally, you should try booting into Safe mode. This mode prohibits third-party applications and services from running, and hence you may sign in to your device using your default PIN. Here’s how to perform this task –
- First of all, locate the Power button (bottom-right corner of the Lock Screen).
- Now, while holding the Shift key, click on this Power button, and select Restart.
- Your device will automatically boot into the Advanced Startup Menu.
- Go to Troubleshoot > Advanced options > Startup Repair, and hit Restart.
- Press a number to choose from the options appearing on the next screen. For this, you may either use the number keys or function keys from F1-F9.
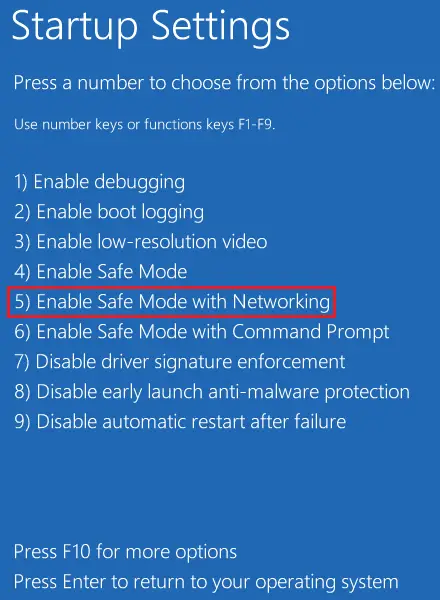
- Press 5 or F5 to boot your device into Safe mode with Networking.
- Provide your PIN and see if it works here. If it works here, the problem indeed is with some external applications which you must uninstall from your computer.
Open Control Panel while remaining in Safe mode, and remove the buggy software. If you are not sure of which app to remove, get rid of all applications.
Remove Windows Hello PIN while remaining inside Safe mode
The problem must have been resolved by now. Still, we recommend you remove the hello PIN from your device. You can always generate a new PIN if you are able to get past the lock screen. Here’s how to find and remove the hello PIN from Windows.
- Press Windows + I to launch Settings.
- Select Accounts from the left sidebar, and Sign-in options on the right pane.
- Click to expand PIN (Windows Hello), and hit the Remove button.
- A confirmation window will pop up next, hit Remove again to confirm this action of yours.
- You need to provide your account password so that the hello PIN is removed successfully from your account.
Note: When you remove the PIN (Windows hello) from your device, it automatically disables your fingerprint as well as any face recognition set on your Windows PC.
- Boot normally into your Windows and you will find it easy to get past the Lock Screen.
Restart your device 2-3 times and check if you can sign in to your device successfully. If yes, you may re-visit Settings > Accounts > Sign-in Options, and set up a new PIN.
Delete Your PIN and Set it up again
In case the above method fails to remove your PIN, you may take ownership of the NGC folder, and manually delete this folder. The NGC folder comprises all data essential to storing Keys, PINs, and others. So, when you delete this folder, this will automatically delete the associated PIN with your account as well.
4] Use Command Prompt to create a new Administrator account
Windows hello PIN is associated with your user profile. So, if your PIN is not working, there is a possibility that your user account has already been corrupted. If that’s the case, you better create a new user profile and check whether this problem resolves this way. Here’s what you need to do on your Windows PC –
- Press and hold the Shift key and restart your PC (using the power icon on your lock screen).
- Go to Troubleshoot > Advanced Options, and click Command Prompt.
- You might need to provide your account password or PIN to sign into your user account.
- Use your password and when the CMD launches, run this code on it –
net user administrator /active:yes
- Close the Command prompt and restart your PC using again the Power button.
- When your computer reboots, you’ll find a new Administrator account. Well, sign into this account.
- Open Control Panel next and select User Accounts.
- Click Change account type and now you are inside Manage Accounts.
- Now, click Add a new user in PC settings and the system redirects you to the following page –
Settings > Accounts > Other Users
- Click Add account next to “
Add other user” and use a different Microsoft account to create your new user profile. - Press Win + E to launch File Explorer, and navigate to this path – C:\Users\Old_username\. Press Ctrl + A and then Ctrl + C to select and copy all files and folders from here. Go to C:\Users\New_username\ next, and press Ctrl + V to save the copies items here.
- Now that you have successfully migrated all data from the previous user account to your new user account, you may even delete your old user profile from your computer.
- Close all running windows and restart your Windows PC.
From the next login, I hope you are now able to get past the login screen normally using your default PIN.
5] Enable Trusted Platform Module (TPM)
Trusted Platform Module (TPM) is a chip on your computer’s motherboard that is entrusted to easily manage all your PINs on Windows 11/10. Though it works erroneously, it may at times fails due to internal glitches. As a result of this, one can’t get past the login screen.
Boot your device into BIOS and check if TPM is disabled inside your computer’s UEFI settings. You may even reset the TPM to its default state and while doing so, you will remove the owner authorization value and stored keys.
Note: Windows Pro edition users must disable BitLocker before proceeding ahead and resetting TPM on their devices. It is nearly impossible to access your BitLocker-protected files after you lose the encryption keys for your drives. In case you have the encryption password saved somewhere else as well, proceed ahead with this task –
- Press Windows + I to launch Settings.
- Select System from the left navigation and then Recovery on the right pane.
- Scroll down to Recovery options, and hit the Restart now button available next to Advanced startup.
- The system will boot next into the Advanced Startup Screen.
- Select Troubleshoot > Advanced options and then UEFI Firmware Settings.
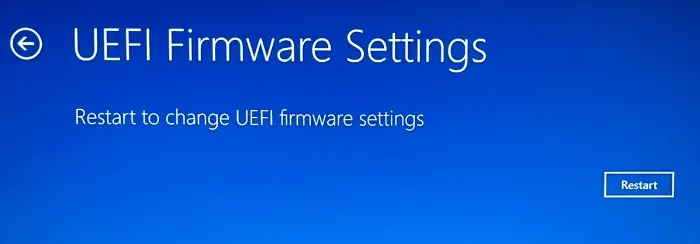
- Your device will now boot automatically into its BIOS Settings.
- Go to the Security tab, and check if the “Intel Platform Trust Technology” is set to Enabled. If otherwise, click once on it, and select the Enabled option using your keyboard arrow keys.
Note: Different Manufactures provide the TPM Settings differently, so this procedure might vary from one device to another. This could appear as TPM Device Selection, TPM 2.0 Security, TPM Switch, TPM Support, or others. Just keep in mind that you have to enable the TPM.
- If you are presented with an option to clear TPM, clear the same.
- Go to the Exit tab, and click Exit Saving Changes. When prompted, press Enter to confirm the recent changes.
Restart your PC and this time, your device will boot normally. Since you have already cleared TPM, you don’t require entering a PIN to get past the login screen. If you wish, you may even create a new PIN by reaching out to the below path –
Settings > Accounts > Sign-in options
6] Use Previously created Restore Points
If none of the above methods work to resolve the PIN issue on your computer, and you do have a restore point, attempt reverting your PC back to its previous stable state. Make sure that you use the system backup which has been created long before this PIN doesn’t work on your PC. Here’s how to perform this task –
- Since you can’t log into your device without entering the 4-digit PIN, boot into the Advanced Startup Menu. You may do so by powering On and Off your device 2-3 times using the Power button.
- Select troubleshoot > Advanced options, and select System Restore option.

- If you see a Recommended restore, look at its time of creation. Its creation time must be before the occurrence of the PIN issue. Else, select Choose a different restore point and hit Next.
- Tick the box left of “Show more restore points”, and choose a system backup. Next, click on the Scan for affected programs button.
- Click Next and then Finish to authorize reverting your device back to the chosen state.
The restoration process will take 20-25 minutes to take your System Build to its previous stable state. So, wait till this happens and when it does, restart your PC again.
7] Reset your Computer to Default Settings
In case you don’t have a restore point available on your computer, you must reset your PC to its default settings. To do so, use these easy steps –
- Boot your device into the Advanced Startup Menu first.
- Select Troubleshoot and then Reset this PC.
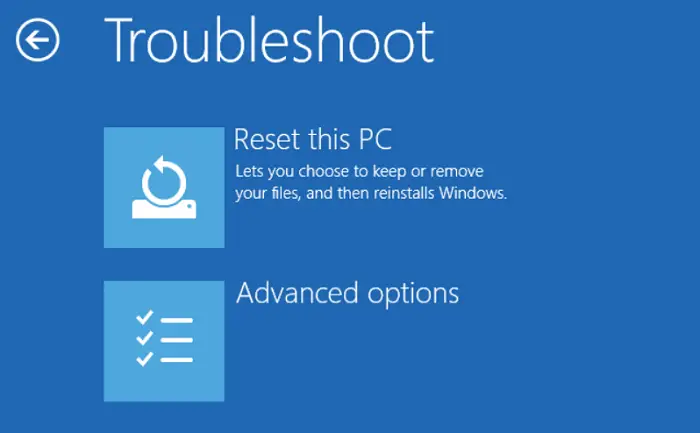
- When prompted, choose to Keep my files.
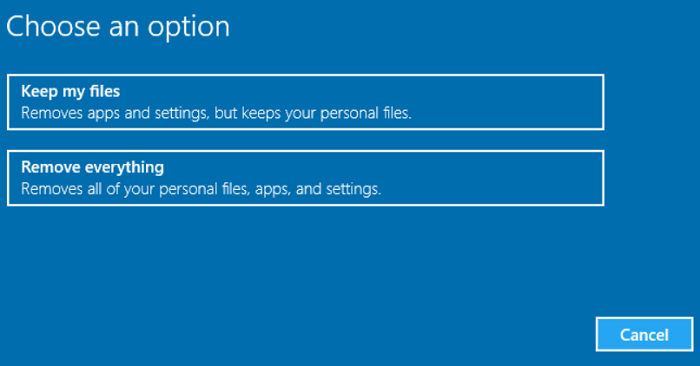
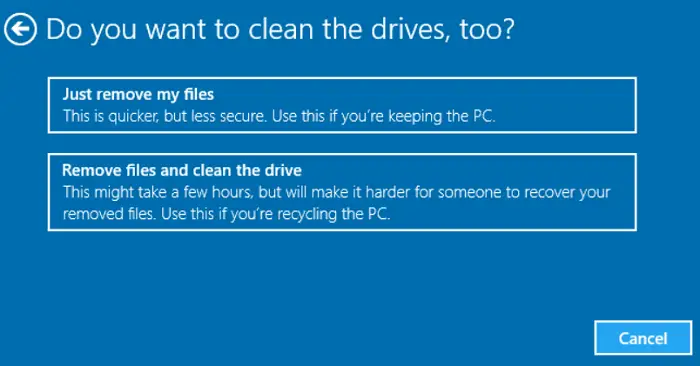
- In case you opt to Remove everything, Windows will ask if you want to remove files only or drives as well. Go for this option only if you are selling your device and don’t want a third party to recover all your removed files.
- Now, wait while the system is resetting to its default settings.
After this is over, restart your PC and check if you can boot into your device and use your previous four-digit PIN.
I sincerely hope this method works in your case. However, if this fails as well, you better perform a clean installation of Windows. Let’s know in the comment section, what exactly works in your case.


