100% Disk Usage on the Task Manager despite running any intensive program on Windows 11 or 10 PC always baffles users. They start closing applications one by one and to their surprise, the problem doesn’t resolve even when they terminate all running programs.
Sometimes, this may improve the problem and the disk usage starts coming down. However, the question is do we succeed in solving the problem? The answer is of course No, so what should we do now?
What causes 100% Disk Usage on Windows 11/10?
The 100% disk usage on Windows 11 or 10 PC may appear because of different reasons. Some of them are quite easy to fix, and there are some that requires registry changes or running a few codes on CMD.
Well, in this guide, we tried accumulating all those processes that use system resources to a larger extent. Besides this, we have also presented the troubleshooting techniques to get rid of this issue on Windows PC. If your device is running slow or getting stuck in between basic operations, check whether the Task Manager displays 100% disk usage or not.
How can you confirm it?
To confirm this, press Ctrl + Alt + Delete keys and click Task Manager. If the Disk usage percentage reads anywhere between (90-100)%, apply the solutions discussed below –

Fix: Task Manager 100 Percent Disk Usage in Windows 10
To solve the 100% Disk usage issue on Task Manager, try the following suggestions –
1] Stop Apps running in the background
Too many applications running on Windows 10 will definitely use huge system resources. To avoid disk usage reaching 100%, restrict those programs that you are not using or going to use in the next 1-2 hours. Windows 10 provides an easy way to stop apps from running in the background. Here’s how to perform this task –
- Launch Settings by pressing Win + I.
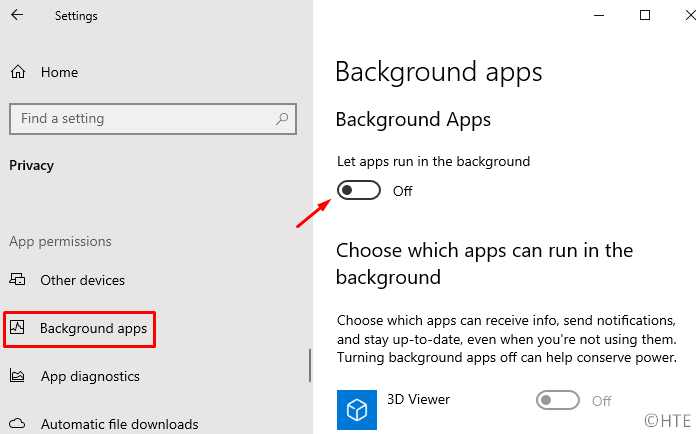
- Click Privacy thereafter Background apps on the left column.
- Jump to the right side and turn off the “Let apps run in the background” toggle switch.
- Restart Windows to implement the recent changes.
Sign back into your PC and check whether the disk usage on Task Manager decreases or not.
2] Disable StorAHCI.sys driver
As per Microsoft, using StorAHCI.sys driver may cause the 100% disk usage issue on Windows 10. If you keep ignoring this bug, this may corrupt the entire operating system. The company has already provided a set of steps following which one can address this issue. Here are the essential steps to work upon –
Before proceeding to the solution, you need to first confirm whether this in fact is the case or not.
- Make a right-click on the Windows icon and select Device Manager.
- Click “>” left of IDE ATA/ATAPI Controllers to expand this section.
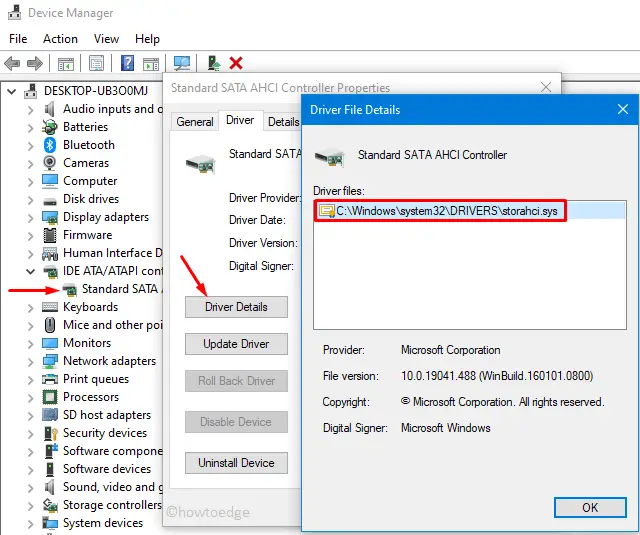
- Right-click on “Standard SATA AHCI controller” and hit Properties.
- Go to the Driver tab and click “Driver Details”.
- On the next wizard, check whether it displays “storahci.sys” at the path end or not. See the Snapshot below –
After confirming the presence of storahci.sys driver, use the following steps to correct 100% Disk Usage issue –
- Close the Driver File details window, and switch to the Details tab on the Properties window.
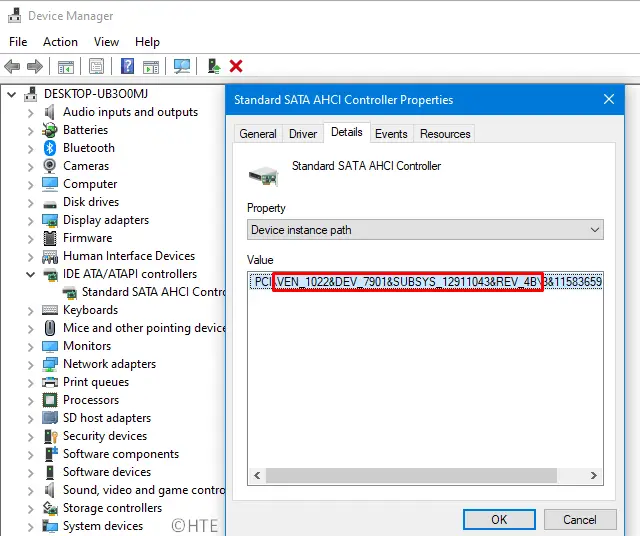
- Use the Property drop-down menu to select the “device instance path“.
- Note down the key values that come in between PCI and the immediate slash icon. Do also note down the folder name that comes after the slash icon.
- Moving forward, use Win + S to start the Search bar.
- Type “regedit”, make a right-click on the top result and select Run as Administrator.
- When the UAC window appears, hit Yes to authorize the access.
- When the Registry Editor starts, browse to the below path –
HKEY_LOCAL_MACHINE\System\CurrentControlSet\Enum\PCI\<first path you noted down>\<folder name after the slash>\Device Parameters\Interrupt Management\ MessageSignaledInterruptProperties
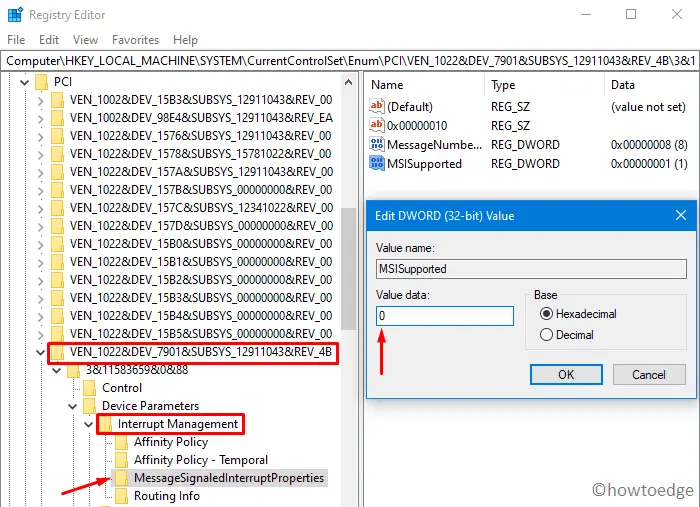
- On the right pane, double-click the “
MSISupported” key entry and put “0” instead of “1” in the Value data field. - Close the registry window, and Restart the PC so as to make the recent changes effective from the next logon.
Performing the above steps successfully should fix the 100 percent disk usage in Windows 10. If not, you must start working on improving disk usage by different apps and services.
3] Change Power Plan to high performance
According to some users, they corrected 100% disk usage on Task Manager simply by resetting the Power Plan to high performance. To do so, use these steps –
- Launch Control Panel on Windows 10.
- Click Power Options and enable the “High Performance” radio button.
- Close Control Panel windows and Restart the device.
4] Stop Windows Search
Stopping the Search service in Windows 10 may also resolve this bug, Here’s how to stop Windows Search –
- Launch Command Prompt as Administrator and execute the below code –
net.exe stop "Windows search"
- Running the above command will disable the search service temporarily.
- Start Task Manager and check whether the disk usage comes down a little bit or not.
If yes, follow the remaining steps to disable Windows search service permanently –
- Start the Run dialog using Win + R.
- Type
services.mscin the text field and tap OK. - Scroll down to Windows Search on the services window.
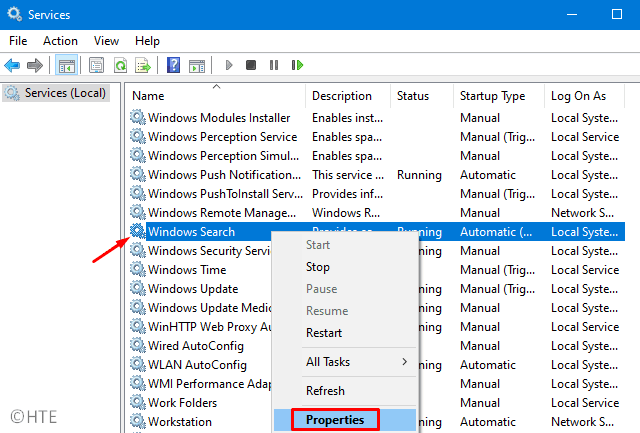
- Next, do the right-click on Windows Search and hit Properties.
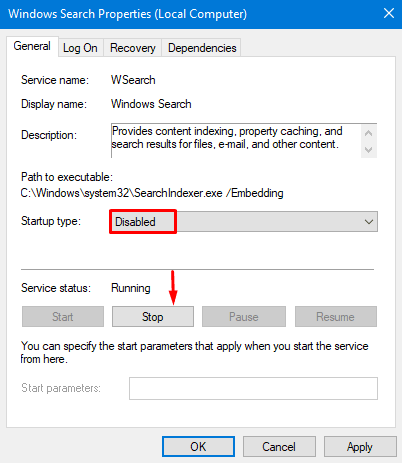
- Select “Disabled” using the drop-down menu next to Startup type and hit Stop.
- Lastly, click Apply then OK to confirm the recent changes.
5] Turn Off Superfetch Service
Windows 10 uses the Superfetch feature to load a few programs via RAM. Doing so will load the application faster. Since Superfetch keeps on running in the background, it consumes excessive Memory and may result in high disk usage. In order to fix this, you must disable Superfetch functionality on Windows 10 device. To do so, follow these easy steps –

- Use Win + R to launch Run, type “CMD”, and press Ctrl + Shift + Enter keys together.
- When Command Prompt comes into view, execute the below code –
net.exe stop superfetch
Tip: To restart the Superfetch on Windows 10 anytime in the future, use the code – net.exe start superfetch.
6] Disable Tips, Tricks, and Suggestions
By default, Windows 10 suggests Tips and Tricks improving the overall user-experience. This feature too consumes excessive system resources leading to 100% disk usage in the Task Manager. Try disabling this function and check if it helps to solve the issue at hand.
- Jointly press Win + I to invoke the Settings app.
- Go to
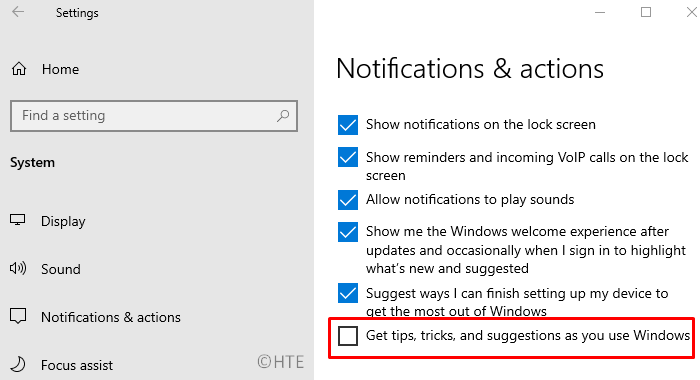
System > Notifications & Actions. - Jump to the right side and scroll down to the “Notifications” section.
- Here, toggle off the “
Get tips, tricks, and suggestions as you use Windows” option.
7] Disable Diagnostic Tracking by Windows 10
Microsoft keeps an eye at the users’ activities via the Diagnostic Tracking tool. This too is one of the prominent reasons increasing the overall disk usage on Windows 10. In order to reduce disk usage and safeguard privacy, it is important to turn off diagnostic tracking. Here’s how to perform this task –
- Hit the Windows Key and start typing “CMD” on the search bar.
- Right-click on the top result and select Run as Administrator.
- On the elevated console, run these two codes one after another.
sc config "DiagTrack" start= disabled
sc stop "DiagTrack"
Note: Make sure to press Enter at the end of each command-lines.
8] Disable Windows Update services
Microsoft constantly releases new updates, patches, and .NET Frameworks to improve overall security in Windows 10. If your device is not running into some trouble, you may skip a few updates. Here’s how to disable Windows update via the service manager –
- Launch the Search window using Win + S, type “services” and click the matching result.
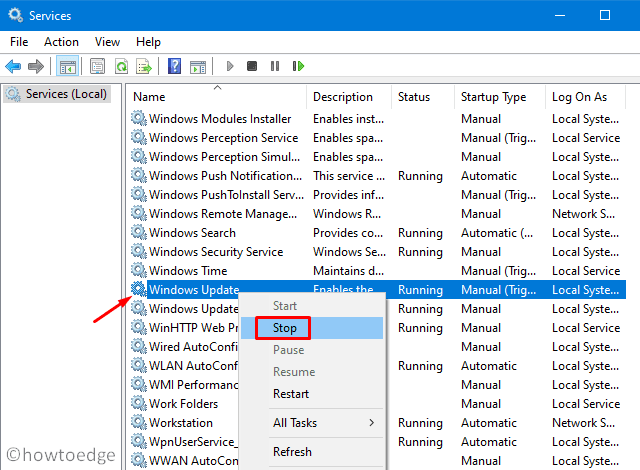
- On the succeeding window, scroll down to Windows Update and do the right-click.
- Hit “Stop” on the context menu. Windows update hasn’t been disabled completely.
- You must search and stop the “background intelligent transfer” service as well.
I hope, the 100% disk usage on Task Manager must have resolved by now. To decrease the disk usage even further, follow the next method –
9] Change File Explorer Options
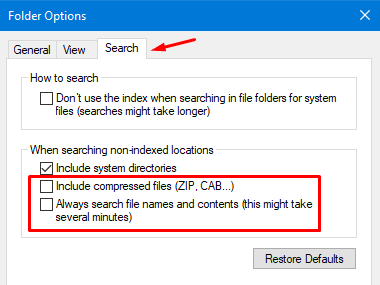
Usually, when you type something on the search bar, Windows 10 also looks for any ZIP/CAB files having similar names. Searching for such content took several extra minutes increasing the usage of system resources. Here’s how to disable their appearances in a typical search –
- Launch File Explorer using Win + E.
- Head over to the View tab and click “Options”.
- Switch to the “Search” tab and uncheck these two boxes –
-
- “Include compressed files (ZIP, CAB…)”
- “Always search file names and contents (this might take several minutes)”
- Click “Apply” and then OK.
- Restart Windows to incorporate the above changes.
10] Enter Safe Mode
I hope the above methods must have resolved the 100% disk usage issue on Windows 10. If not, attempt booting Windows into the safe mode.
A safe reboot usually fixes different bugs and issues that occur due to conflicting programs, third-party antivirus, etc. If the Disk usage appears to be less than 100% on the Task Manager, log back into Windows 10 normally, and uninstall the recently installed apps.
Note: In case the issue appears inside the Safe boot as well, come out of this mode, and follow the next set of solutions.
11] Perform a Disk check up
In case the disk usage still displays 100% on the Task Manager, there is a possibility of corruption on the hardware. To confirm this, you should run the CHKDSK command. Here’s how to proceed –
- Open Command Prompt having Admin rights (discussed above).
- Copy/paste the below command and press Enter to start the execution.
chkdsk C: /f /r /x
- A message may appear asking to confirm this action after a Windows reboot, type Y, and press Enter.
- Now, Restart the device so that CHKDSK starts looking for any bugs and errors.
Command Prompt will fix any errors (if possible) that it finds during the check-up.
If the above scan signals no error on the hardware, however, the disk usage is still over 100%, you should perform a clean installation of Windows 10.


