Windows Search is an essential component that lets us find different files, apps, videos, etc. effectively on Windows 10 PC. Since it is integrated with BING, one can find tutorials on how-to or commonly occurring issues solutions simply using the search button. However, it may sometimes stop responding thus preventing our day-to-day activities. For example – Think of typing “Word” in the search bar and it returns nothing. Here, in this tutorial, we discuss some easy workarounds that can fix the search bar issue in Windows 10.
Getting a blank result on Windows Search may worry users as they won’t be able to perform even a simple task. This error occurs owing to some problems inside SearchUI, indexing issues, high CPU usage, or buggy Windows update. Restart SearchUI process, Reset Windows Seach, Delete and Rebuild Index Settings are some of the fine methods that you can try to overcome this bug. Disable Bing Integration and Run Search & Indexing Troubleshooter may also to get rid of the Search trouble. If these workarounds don’t help, simply uninstall the recently installed cumulative updates. Let’s explore each one of the solutions in detail –
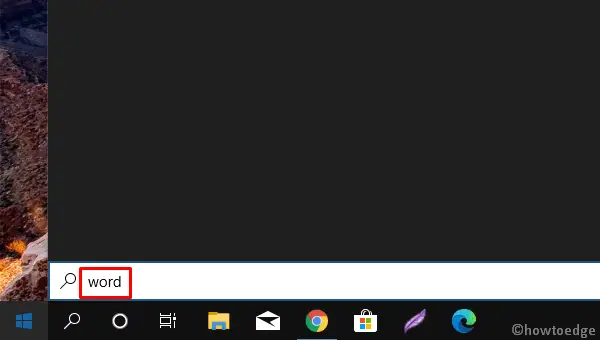
Ways to fix the Search Bar Issue in Windows 10
To Fix the Search Bar issue in Windows 10 PC, use the following workarounds –
1. Restart SearchUI process on your PC
Windows users are able to search for any items inside their computers due to the presence of the SearchUI process. It is possible that the above program starts malfunctioning and thus results in blank results. To mitigate this error, one must restart this process using the following steps –
- At first, press Ctrl+Alt+Del keys together to invoke the Task Manager.
- Go to the Details tab and locate SearchUI.exe under the Name column.
- Once found, do the right-click and hit End Task.
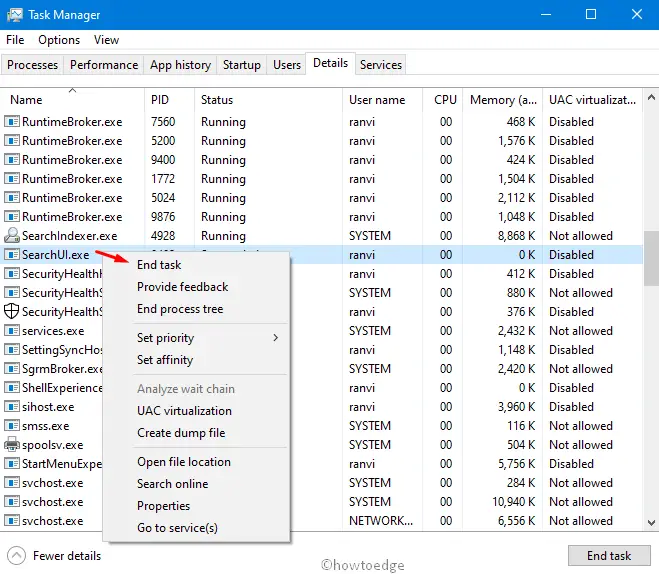
- A confirmation window may prompt, just click the end process.
Note: The Windows Search process will immediately end and will restart automatically after the next login.
- Perform a System Reboot to confirm the changes made so far.
This method should work. If not, try resetting Windows Search itself.
2. Reset Windows Search
If restarting the SearchUI process doesn’t fix the Search bar error in Windows 10, reset the Windows Search. However, before moving ahead, do check the running OS version thereafter proceed accordingly. To know which version of Windows is running on your device, use the steps –
- Navigate to Start > Settings > System > About .
- Select Open About settings.
- Next, find the exact OS version under Windows specifications.
Doing this won’t affect any of your system files. However, this may temporarily affect the results appearing after typing a keyword.
Windows 10 version 1809 and earlier
If you are on Windows 10 1809 or earlier versions, reset Cortana (as both Cortana and Search were exactly the same). Here’s how to do –
- Make a right-click on Cortana and select More.
- Next, choose App settings and click Reset under Cortana Settings.
Windows 10 version 19H1 or newer
With the onset of 1903, Cortana and Search were two different things. If you are using one such operating system, you need to use PowerShell to execute a few commands. Here are the essential steps –
- Login as an Admin on your PC as you need to run PowerShell with administrative privileges.
- Go and download the Reset Windows Search PowerShell script visiting Microsoft’s official website.
- After you have saved this script, do the right-click on it and choose “Run with PowerShell“.
- A prompt may appear asking “Do you want to allow this app to make changes to your device?”, tap Yes.
- The above file resets Windows Search functionality. When you see the “Done” message, exit from the PowerShell console.
- In case, there appears an error message citing “Cannot be loaded because running scripts is disabled on this system”, you have to execute a few command lines here. Make sure to press the Enter key after each code –
Get-ExecutionPolicy
Note: Look out for the current policy inside and note down this value as you are required to use this later. For example – Restricted.
The current policy appears in the window. For example, you might see Restricted. We recommend that you note this value because you’ll have to use it later.
Set-ExecutionPolicy -Scope CurrentUser -ExecutionPolicy Unrestricted
Note: There may pop up a warning message explaining the security concerns, tap Yes to proceed ahead.
- When you receive the “Done” message, you need to revert your previous PowerShell execution policy setting. Otherwise, keep running the above command lines (2-3 times) unless you get the above message.
To revert back to the prior settings, run the command Set-ExecutionPolicy -Scope CurrentUser -ExecutionPolicy along with the execution policy name. See the example below –
Set-ExecutionPolicy -Scope CurrentUser -ExecutionPolicy Restricted
You will receive the warning message again, just hit Yes to move ahead.
- Lastly, close the PowerShell window and perform a System reboot.
3. Delete and Rebuild Index Settings
One possible reason that can affect the normal functioning of the Search bar is the Index setting. It is therefore, we suggest resetting this feature to fix the Windows 10 search error. Here’s how to reset –
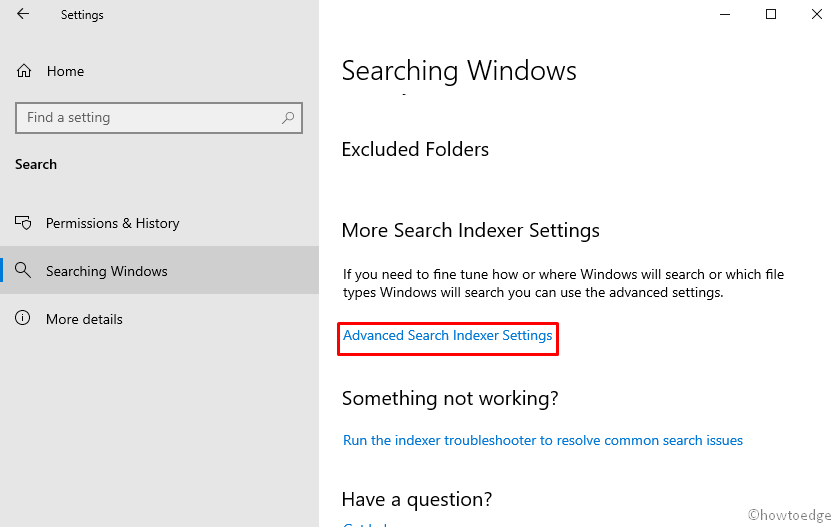
- Press Win+I together to start Settings and select a Search category.
- Next, click Searching Windows thereafter “Advanced Search Indexer Settings“.
For Windows 10 1809 or earlier version users
- Start Control Panel.
- Tap View by on the top-right corner and select the Large icons view.
- Hit Indexing Options.
Note: Here, do check the Excluded Folders, as well as the item you were searching for, may lie inside this. If that’s the case, select the folders (You want to include), and tap Remove.
- Go to the Advanced button thereafter Index Settings tab on the succeeding screen.
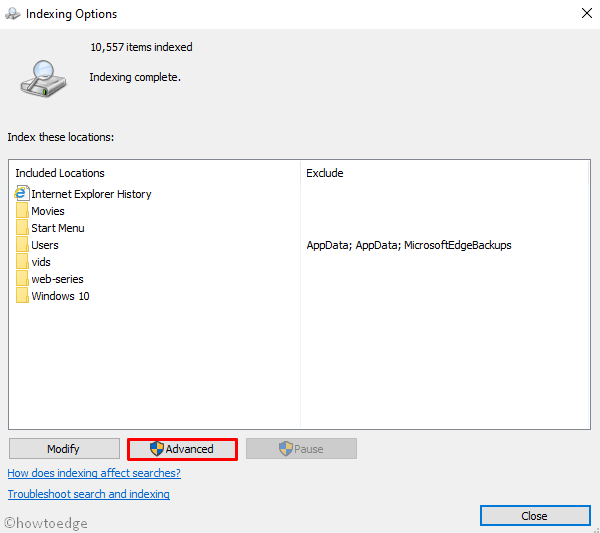
- Click Rebuild under Troubleshooting.
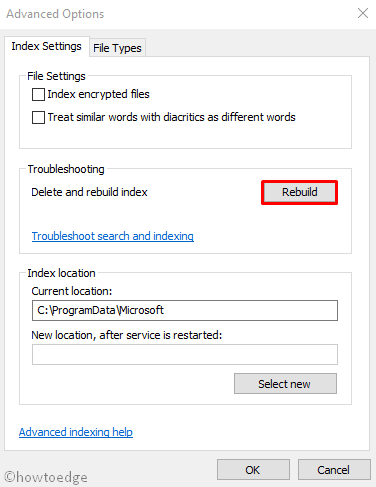
- Lastly, hit OK and come out of the current window, close them all, and Restart your PC.
Windows 10 will automatically clear and rebuild the Index database.
4. Use Search and Indexing Troubleshooter
Windows 10 provides an in-built tool that can find and repair any bugs causing Search not to function properly. Let’s see how to use this utility –
- Right-click on the Win icon and select Settings.
- Select Update & Security thereupon Troubleshoot.
- Here, scroll down and click search and Indexing under “Find and fix other problems“.
- Tap “Run the troubleshooter” and wait until the system finds a resolution to this.
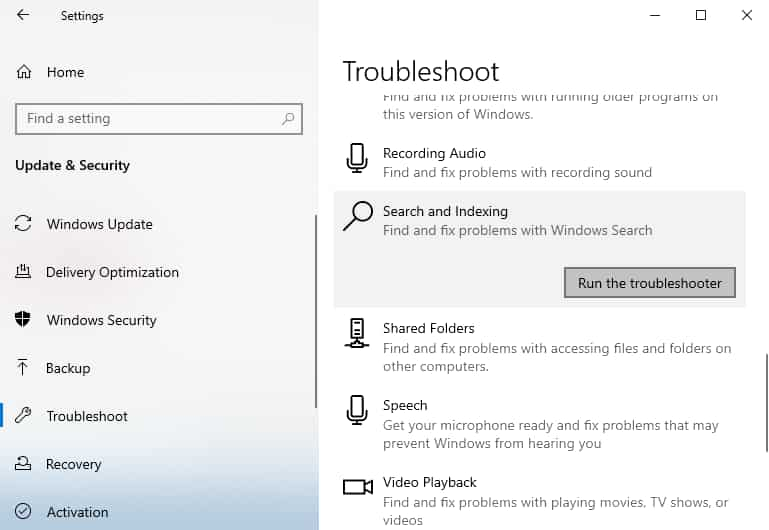
- Hit Next then follow the on-screen instructions (if applicable) to solve this bug.

The search should function properly afterward. If not, run a few codes using the command prompt.
5. Run a few codes on Command Prompt
One can run a few codes on command prompt as well to activate the above troubleshooter. Here’s how to proceed –
- Jointly press Win+R to start the Run dialog.
- Type cmd (admin) at the void and press Enter to launch Command Prompt as an Administrator.
- Next, type “
msdt -ep WindowsHelp id SearchDiagnostic” near the blinking cursor and hit Enter.
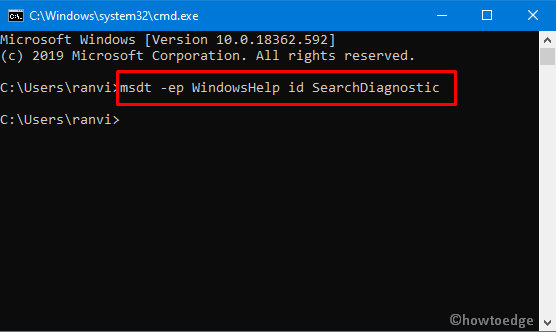
- On the succeeding window, click Advanced then Apply repairs automatically followed by Next.
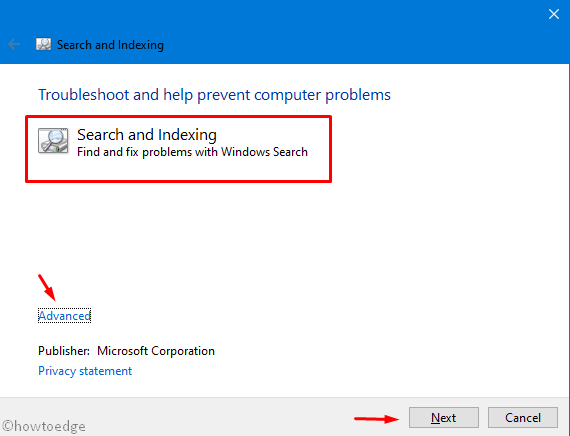
- Here, check the issues that best depict your current situation and press Next again.
- Lastly, follow the on-screen instructions (if any)to fix the Search issue.
The Search and Indexing troubleshooter will auto-scan and resolve the Search bar error in Windows 10.
6. Disable Bing Integration
If none of the fixes above solve the Search bar issue on Windows 10, you should try disabling the Bing integration as well. However, you can perform this task using the Registry Editor only. We recommend creating a backup of your important files then only proceed with the below steps –
- Press Win+R to start the Run dialog.
- Type regedit at the void and press Enter to start Registry Window.
- Now, navigate to the following path –
HKEY_CURRENT_USER/SOFTWARE/Microsoft/Windows/CurrentVersion/Search.
- Make a right-click anywhere on the right-pane inside Registry and select New.
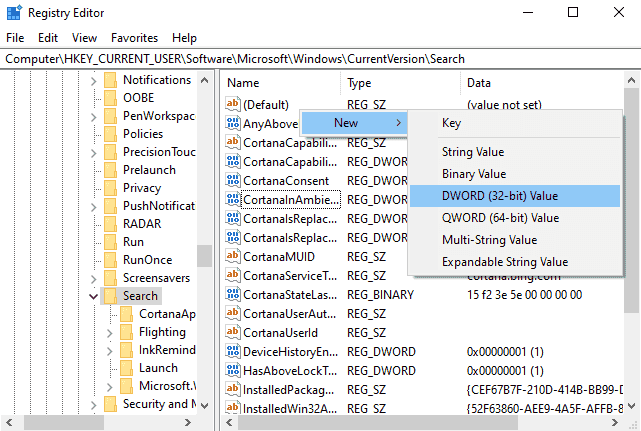
- Select DWORD 32-bit value, type BingSearchEnabled, and press Enter.
- Double click the file you just created and put “0” inside the Value data field.
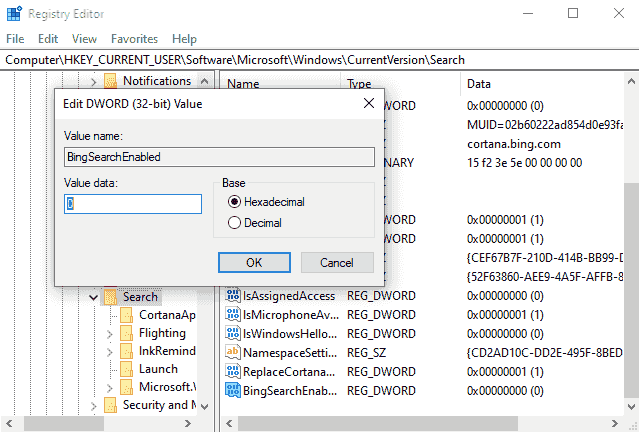
- Next, do the same for CortanaConsent and tap OK.
- At last, make sure to Restart your PC so as to confirm the changes made so far.
Hopefully, this will bring back the search functionality. As per the company, this bug is temporary and they have already started working on this matter.
Note: Once, the company rolls new updates, make sure to re-enable the above entries inside Registry. To do so, replace “0” with “1” in the above DWORD entries.
7. Via Windows Update Section
Microsoft releases new cumulative updates on a monthly basis, however, it may backfire sometimes. Not able to find any file, app, etc. while typing inside the Search bar is one such bug that occurs after updating to the latest security patch.
All of us are left with two different options i.e. either remove the recently installed Windows 10 version completely or wait for the new Build version. To see whether there is any pending update for your system, navigate to the following path and tap Check for updates button.
Settings (Win+I) > Update & Security > Windows Update
If there is no new Build version available for your computer, it is better to uninstall the lately applied cumulative update following the below steps –
- Jointly press “Win+I” keys to invoke Settings.
- From the category list, select Update & Security.
- Go to the right pane of Windows Update section and tap View installed update history.
- Click Uninstall Updates available at the top.
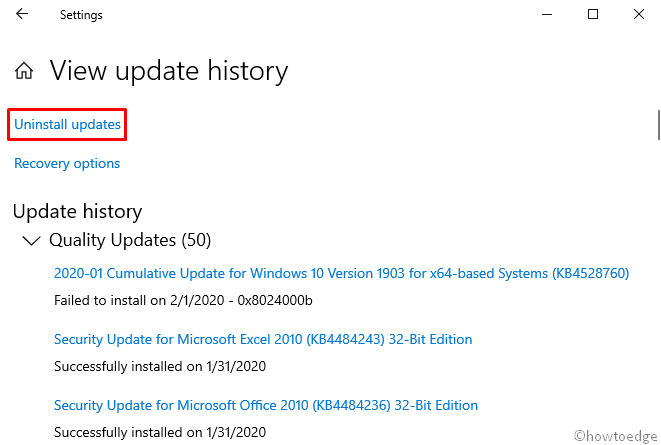
- Next, all of the recently installed patches will appear on your Display Screen.
- Select the latest update and hit the Uninstall button. See the Screenshot below –
- Once over, Restart your system and check whether Bluetooth is working fine or not.
Apart from that, you could wait for the update to be provided to your system and then install it.
We hope this article helps to resolve the Search issue on Windows 10. If you have any queries or suggestions regarding this post, ask us in the comment box.


