The Error Code 0x8000FFFF mostly occurs when you launch Microsoft Store or try installing/updating an application on it.
A few users reported encountering this error code when they were trying to install the latest Windows Updates on their PCs. Depending upon where exactly you are getting this error code, follow the respective solutions.
What is Error 0x8000ffff and when it occurs?
Error 0x8000ffff is a combined error of Windows Updates and Microsoft Store. This implies that it could appear when something has gone wrong with the updating process or the Store app has corrupted somehow. We will look into both these cases separately, however, we suggest applying all the workarounds mentioned in this post.
What causes Error Code 0x8000ffff?
This error may appear when your device meets one or a combination of the following issues –
- Missing system files/folders or when they have been corrupted.
- The presence of infected files like trojan files, malware, etc.
- The device drivers are either outdated or have been corrupted.
The Store error 0x8000ffff could also have been the work of Microsoft servers going down or under maintenance.
Fixing Microsoft Store Error 0x8000ffff
If you are getting this error code during Microsoft Store startup, you should purge the stored cache on it. The Store app keeps some data about your recent app updates, purchases, and others in its database. Over a period of time, when it exceeds the permissible limit, this may cause similar error codes. So, it is required of you to purge the stored cache from time to time. Here’s how you may perform this task –
- Launch Command Prompt with administrative privileges.
- Type
wsreset.exeon the elevated console and press Enter.

- This will effectively reset the Windows Store to its default settings and your Store app will launch automatically.
If the issue still persists, do the following –
- Jointly press Win+R to start Run.
- Copy/paste the below path and hit OK.
%localappdata%\\Packages\\Microsoft.WindowsStore_8wekyb3d8bbwe\\LocalState
- Locate the Cache folder, make a right-click and rename this to
Cache.old. - If there is no such folder present at the browsed location, create a new folder and name it Cache.
- Now, navigate to the below location and Scan Windows Store for any bugs and errors.
Windows 11: Settings > System > Troubleshoot > Otehr troubleshooters > Windows Store Apps > Run

Windows 10: Settings > Updates & Security > Troubleshoot > Additional troubleshooters > Windows Store Apps > Run the troubleshooter

- The troubleshooter checks for possible issues within your system and provides a fix. Click on the button – “Apply this fix” and when the fix is applied, restart your PC.
The Store app should start running normally.
Six Ways to Fix Windows 11/10 Update Error
The easiest way to resolve update error 0x8000FFFF on Windows 11/10 is by manually downloading and installing the pending updates.
- Manually download and install updates on Windows 11
- Manually download and install updates on Windows 10
This workaround alone should resolve this issue on your Windows 11/10 PC. However, if it hasn’t, go ahead and follow the advanced tweaks discussed below.

1. Use Windows Update Troubleshooter
Windows Update Troubleshooter is the best tool to resolve update-related troubles including the 0x8000ffff error. This bug often occurs while attempting to upgrade Windows 10 existing Build version.
Running this utility program automatically starts looking for any issues and fixing them (if found any). Here’s how to troubleshoot the update process on Windows 11/10 –
Windows 11:
- Press Win + I, and browse to the below path –
Settings > System > Troubleshoot > Other troubleshooters
- Locate Windows Update under Most frequent, and hit the Run button.

- Click Next on the troubleshooting window and follow the on-screen instructions.
I hope, the error 0x8000FFFF resolves after you have successfully troubleshot Windows Update.
Windows 10:
- Jointly press Win+I to start the Settings app.
- Click Update & Security thereafter Troubleshoot on the subsequent screen.
- Jump to the right pane and hit the “additional troubleshooter” option.
- Click to expand Windows Update and hit “Run the troubleshooter”.

- This tool will automatically scan for any available issues on the PC and repair the same.
2. Reset Update Components
Windows update errors mostly occur when the internal files or components have corrupted somehow. Reset update components on your device and check if the error code 0x8000ffff resolves this way.
Snapshot 1: Disabling all Windows Update Services.

Snapshot 2: Purging Windows Cache Folders and re-enabling the stopped services.

3. Repair System Files/Images using SFC/DISM
The System File Checker is another great utility that can locate and fix missing as well as damaged system files. Here’s how to use this tool –
- Open Command Prompt having Admin rights.
- On the elevated console, type “
sfc /scannow” without quotes and press Enter.

- The tool will immediately start looking for and fixing any corrupt entries that exist on your computer.
- Since this takes 15-20 minutes to complete the whole process, so wait accordingly.
This bug may also appear if there is corruption inside the Windows image. In order to get rid of this error then you must restore disk health using DISM. Here’s how to proceed –
- Launch Command Prompt as an Administrator: To do this, type “CMD” in the search bar, right-click on the top result and select “Run as Administrator“.
- On the elevated console, run this code –
DISM.exe /Online /Cleanup-image /Restorehealth

- Wait for a while as this takes a few minutes to repair the damaged Windows Image.
- Once the code executes successfully, Restart Windows to implement the above changes.
I hope this fixes the 0x8000FFFF error on Windows 10. If not, try the next set of solutions –
4. Disable the Proxy Server
If you are using an incorrect Proxy server, this may also result in similar update errors. Disable the current Proxy on your system by following these easy steps –
Note: The steps to disable the proxy server on Windows 11 is similar to that on Windows 10. So, you may apply this fix to both versions of Windows.
- Right-click on the Windows icon and select Settings.
- When the Settings app comes into view, click Network & Internet.
- Locate and click Proxy available on the left column.
- Head over to the right pane and disable the toggle switch under “Manual Proxy Setup“.

Restart your Windows PC next, so that recent changes come into effect from the next login.
5. Boot into Windows Safe Mode with Networking
The presence of third-party apps, drivers, and other external processes do also interfere with system files. As a result of this interaction, system files or sometimes even update files get corrupted and prevent installing a new update on your computer.
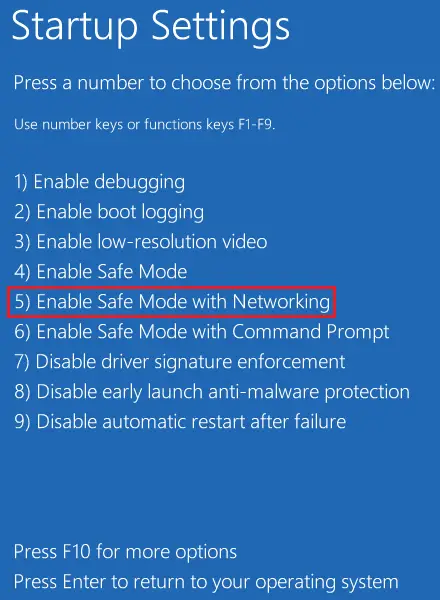
Safe Mode with Networking is a great tool on Windows PCs to counter third-party apps and their related services. When you boot your device into this mode, all ties with the external apps are cut off. Check if you can update Windows while remaining in this mode.
System Configuration provides an easy way to boot into the Safe Mode. For this, you may follow these easy steps –
- Press Win + R, type
msconfigand hit OK. - When the System Configuration window launches, go to the Boot tab.
- Under Boot options, tick the checkbox next to Safe boot. The minimal checkbox will auto-select.
- Click Apply > OK and your system will boot into Safe Mode.

When Windows 11/10 reloads, make sure to follow this path –
Choose an option > Troubleshoot > Advanced Options > Startup Settings > Safe Mode with Networking
Now that you are inside the Safe boot, try to update your device again. Hopefully, your system will upgrade to the next available version without getting into error 0x8000ffff.
6. Create a New User Account and sign in with that
Many a time, update errors don’t resolve on Windows PC because you are using a corrupted user account. Create a new user account and sign in with that, and check if the problem resolves this way. Here’s how to create a new user account and then log in using its credentials –
- Press Windows Key + X together to open the Power Menu and select Run.
- Type “CMD” and press Ctrl + Shift + Enter keys altogether. Following this, Command Prompt will launch having admin rights.
- On the elevated console, run these two codes. Make sure to hit Enter at the end of each command.
net user /add [username] [password]
net localgroup administrators [username] /add
- In the commands above, replace the username and password with your preferred choice.
- Restart Windows and when it reloads, sign in using the newly created account credentials.
- Go to the
C:\users\previous_username. Use Ctrl + A to select all items inside this folder, navigate to your current username folder, and press Ctrl + V. The copied items will be pasted here inside your new user account.
The system must prompt entering into your Microsoft Account. Well, do the same.
|
Tip: If none of the above solutions work to resolve the 0x8000FFFF error, you are left with only two options i.e. “Reset this PC” or “Clean Installation of Windows“. Choose whichever method suits you the most. |
How to boot into Safe Boot with networking on Windows 10?
You may boot into the Safe boot with Networking using the Settings window as well. For this, you need to follow these steps –
- Open Settings and reach out to the Recovery section.
Settings (Win+I) > Update & Security > Recovery
- On the right pane, click “Restart Now” under Advanced Startup.

- Windows 10 will immediately boot into the Advanced Startup Settings. Navigate to this path next –
Choose an option > Troubleshoot > Advanced Options > Startup Settings > Safe Mode with Networking

- That’s it, you have entered the right mode on your Windows 10 PC.
I hope this guide indeed helps to address the 0x8000ffff error on the computer. In case you have any queries or suggestions related to this topic, feel free to comment below.


