WiFi Connectivity Issues are pretty common after installing a new feature update on Windows 10 device. This problem continues to occur on Windows 11 operating system as well, as several users have reported receiving no signal after they connect their devices to a Wi-Fi source. The problem can be anything from slow network speeds to a malfunctioning adapter/router.
Incorrectly configured TCP/IP settings and Incompatible drivers are some of the prime reasons that lead to such issues on the computer. A faulty or obsolete network adapter may also cause similar problems. In order to fix this issue in Windows 10, we will discuss five different workarounds. They are – Run Network troubleshooter, Reset or Update Network Adapters, configure TCP/IP, or modify DNS settings.

If none of these methods resolve the Wi-Fi connectivity issues on Windows 11/10, simply roll back your device to an earlier state i.e. Windows 10, Nov 2021 update. Let’s explore the solutions in detail –
Fix WiFi Connectivity Issues on Windows 11/10
To solve the Wi-Fi connectivity issues in Windows 11 or 10 PC, try the following suggestions –
1] Run Network Adapter troubleshooter
There’s an in-built troubleshooter on Windows that can easily solve different network-related issues on your computer. Here’s how to use this troubleshooter –
Windows 11:
- Press Win + I, and select System.
- On the right pane, scroll down to Troubleshoot and click on it.
- When this expands, hit Other troubleshooters.

- Under Most frequent, click the Run button available beside Internet Connections.
- Wait for this troubleshooter to find and resolve network issues.
- Restart your PC and check if the problem resolves.
- If not, re-visit Other troubleshooters and hit locate Network Adapter.
- Hit the Run button available on its right end and wait patiently.
I hope the WiFi connectivity issue resolves now on your Windows 11 PC.
Windows 10:
- First of all, browse the below path –
Win + I > Update & Security > Troubleshoot
- Jump to the right pane and click “additional troubleshooters”.
- Scroll down and click Network Adapter to expand its pane.
- Hit “Run the troubleshooter” on the extended pane.

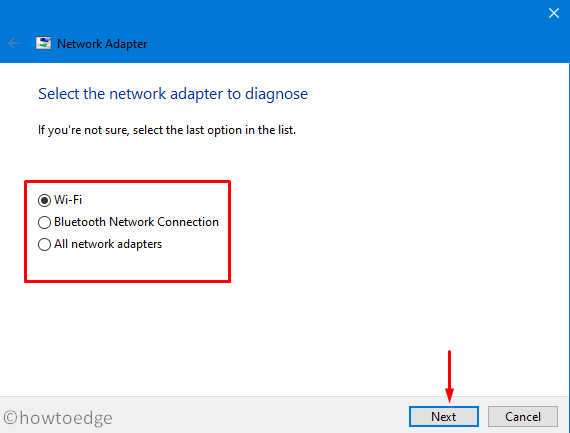
- The network Adapter scans the PC and prompts it to choose an internet option.
- Select the adapter from which you are currently accessing the Internet and hit Next.

- That’s it, the troubleshooter starts detecting the possible causes and fixes them (if found any).
- When this completes its testing, Restart Windows to incorporate the recent changes.
From the next logon, you may check whether this resolves the Wi-Fi connectivity issues or not. If the wireless connection is still not working, try the next workaround –
2] Reset Network Adapter
Sometimes, simply resetting the network adapter fixes Wi-Fi connectivity issues in Windows 11/10. Performing this will reset all of the networking components and restore them to their factory settings. To do so, follow these easy steps –
On Windows 11:
- First of all, press Win + I and select “Network & internet”.

- Head over to the right pane, scroll down and click Advanced network settings.

- Under More settings, click to expand Network reset, and hit the button – Reset now.

Restart your PC and check if the nework works all good.
On Windows 10:
- Navigate to the below location –
Settings > Network & Internet > Status
- Head over to the right pane, scroll down, and click Network reset.

- On the succeeding window, click the “Reset now” button.

- When a pop-up appears asking to confirm this action of yours, click Yes.
- Close all running windows and Reboot the computer.
Note: Following the above guideline will reset the Network to its default settings. So, if you were using any Proxy or VPN clients, you need to re-fill the data wherever required.
In case of a wireless connection, manually enter the password again to access the Internet.
3] Configure TCP/IP settings and DNS
After performing an in-place upgrade, Windows automatically resets its components to their default settings. So, if you have previously configured TCP/IP or DNS settings, you need to re-configure them properly. Besides, restart the router as well so as to avoid any conflict from the router side.
4] Update Network Adapter
The presence of an old network adapter may also lead to WiFi connectivity issues on Windows 11/10 devices. To fix this, you must download the latest driver visiting the manufacturer’s site, and manually install that on your computer.
Often network issues occur when you upgrade to a new operating system, however, the updated drivers are yet not released. As a workaround, you may go to Settings > Windows Update, and hit Check for updates. If this query results in some optional updates, do download and install them on your computer.
If the above search doesn’t display any optional updates, try updating network adapter via Device Manager itself. This method will work only on earlier versions of Windows 10 as the new feature updates stop using the Device Manager.
- Make a right-click on the Windows icon and select Device Manager.
- Click “>” left of Network Adapters to expand this section.
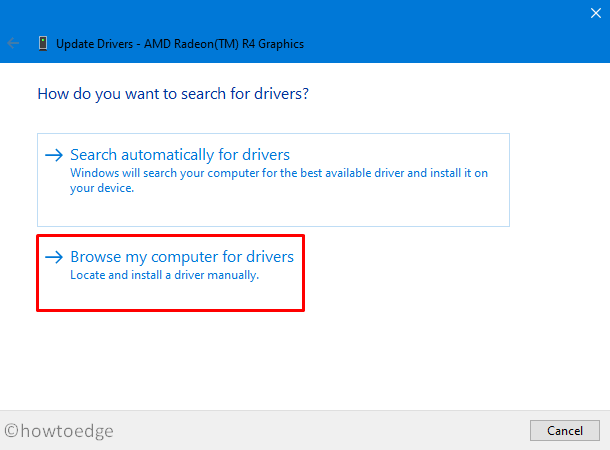
- Right-click on the available Wi-Fi adapter and choose “Update driver” on the context menu.

- Subsequently, hit the “Browse my computer for driver software” option.

- Now, open the folder that contains the downloaded driver and hit Next –
- The system will take care of the remaining steps. Just make sure to remain connected to an active internet.
- Once over, Restart the PC so that changes made come into effect from the next logon.
5] Uninstall Windows 11
Following the above guideline should fix the Wi-Fi connectivity issues on Windows 11 or 10 OS (whichever is running on your computer). In case the issue persists, provide your feedback to Microsoft. The experts are already working to find a resolution to this bug. They may release a cumulative update fixing Wi-Fi connectivity issues in forthcoming releases.
For the time being, you may roll back your device to previos Build updates of Windows 11 or 10.


