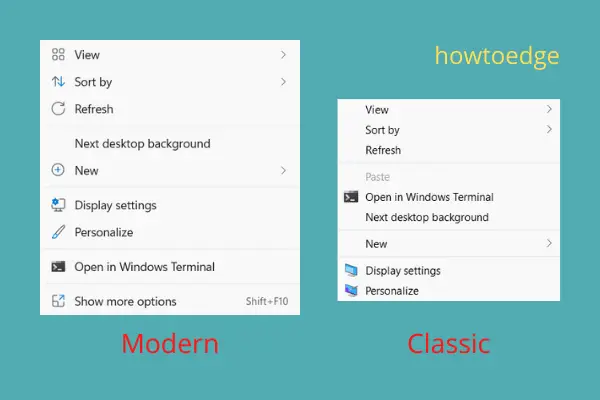
Windows 11 comes powered with lots of changes like a centered taskbar, a modern classic menu, Snap Layout, separate notifications & calendar windows, and several other features. The new Context menu in Windows 11 is an enhancement to its previous classic menu bearing shortcuts to Cut, Copy, Rename, Share, and Delete.
Though the new context menu is quite advanced, some users love the things they were. If you are one such user and want to get back the Classic Context menu in Windows, this post is intended for users like you.
In this guide, we will learn how to configure a registry entry to bring back the old shortcut menu. Since this process involves modifying the registry, make sure to create a full backup of the entire registry.
How to use both Modern and Old Context Menu in Windows 11
There’s a way to keep both Modern as well as Classic Context menus on Windows 11 PC as well. To keep both, do the following –
- Right-click anywhere on the Desktop Screen and this will launch the Modern Context Menu.
- To view the Classic Context menu, hit the last option i.e. Show more options. Alternatively, you may also press the “Shift + F10” hotkey to launch the old shortcut menu.
How to Enable the Classic Context Menu in Windows 11
To permanently switch back to the old or classic Context menu in your Windows 11 PC, use these steps –
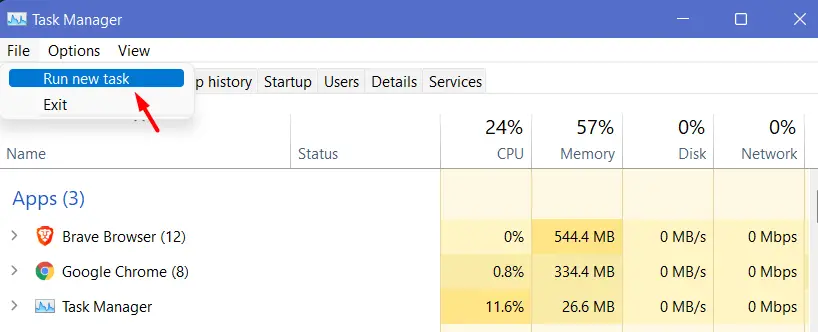
- Press Ctrl + Shift + Enter to open the Task Manager.
- Go to File, and click Run new task.
- When the Run dialog opens up, type “
regedit“, and press Enter – - The UAC window will prompt next, hit Yes to authorize opening Registry Editor.
- On the subsequent window, navigate to the below path –
HKEY_CURRENT_USER\SOFTWARE\CLASSES\CLSID
- Right-click on the CLSID and select New > Key.
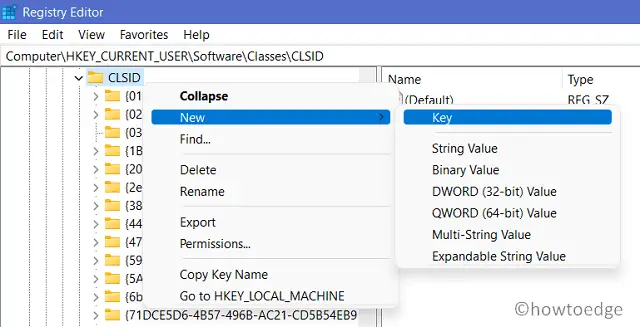
Note: How to create a new registry entry on Windows 11 PC
- A new key will be generated under this folder. Rename this to the following –
86ca1aa0-34aa-4e8b-a509-50c905bae2a2
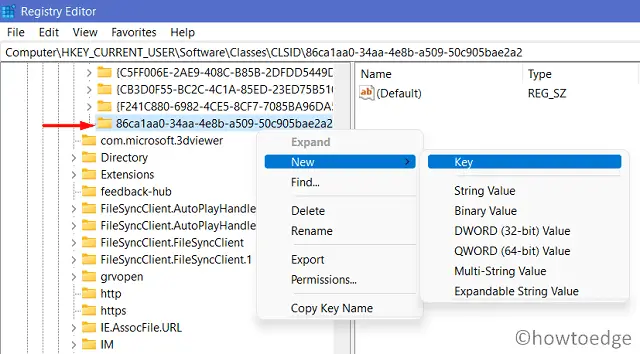
- Right-click on the newly created key and proceed as follows – New > Key.
- Name this subkey as “InprocServer32”.
- Double-click on the default key present inside the “InprocServer32” key.
- When the default entry pops up, remove any number from its Value data field. In short, keep this blank as shown below –
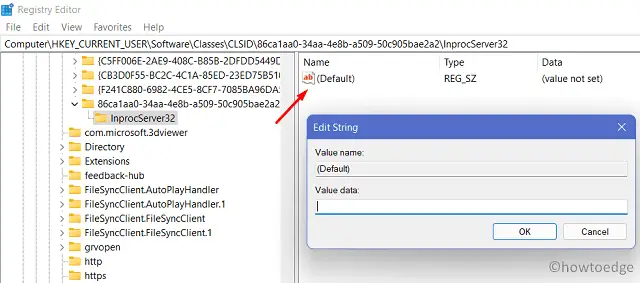
- Click Apply then OK to confirm the changes made so far.
Restart your PC next and see if it brings back the Classic Context Menu on your Windows 11 PC. I hope the right-click should behave like before in your current operating system i.e. Windows 11. To confirm this, right-click anywhere on the desktop or inside the File Explorer and see the changes yourself.
How to bring back the Modern Shortcut Menu
If for any reason, you don’t like the classic context menu and want to revert back to the new style, do the following –
- Open the registry as an administrator.
- Reach out to the below path when the registry editor launches.
HKEY_CURRENT_USER\SOFTWARE\CLASSES\CLSID
- Locate the newly created key here i.e. 86ca1aa0-34aa-4e8b-a509-50c905bae2a2.
- Right-click on this key and select the option – delete.
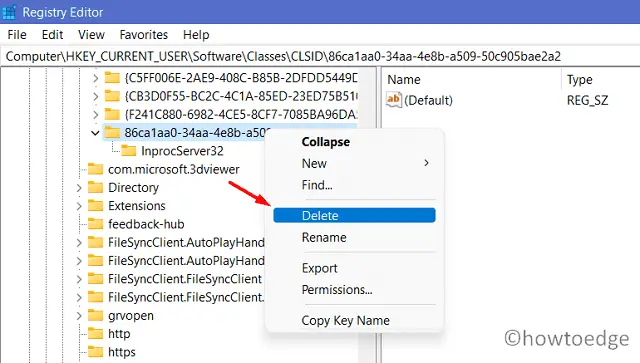
- The context menu will revert back to its modern look.
I hope this article helps you to bring back the Classic Context Menu on your computer. If you have any queries or suggestions, let us know in the comment section.


