Windows 10 and NT support Enable or Disable disk quotas which, in turn, helps to maximize the utilization of disk space by users. Using this feature, the Admin may allow separate storage space for different users. This also adjusts the usage of the NTFS volume in a more controlled way. If the PC exceeds the determined limit, a warning message will appear quoting the same thing.
You can adjust the disk quota of an individual disk or all drives according to your willing. Here, in this blog, we guide different solutions to configure disk quotas like File Explorer, Command Prompt, and Policy Editor. Let’s explore these methods in detail-
Ways to Enable or Disable disk quotas in Windows 10
Here, we have explained different methods to Enable or Disable disk quota on Windows 10 PC-
Before proceeding to the below workarounds, log in the PC with administrative privilege.
1. Enable Disk Quota using File Explorer
To adjust the quota limit on a specified disk drive using File Explorer, you must follow these steps-
Step-1: Press Win Logo and E together to open the File Explorer.
Step-2: When this desktop app begins, select the NTFS drive in which you want to set the disk quota. Again, choose the Properties option using the context menu.
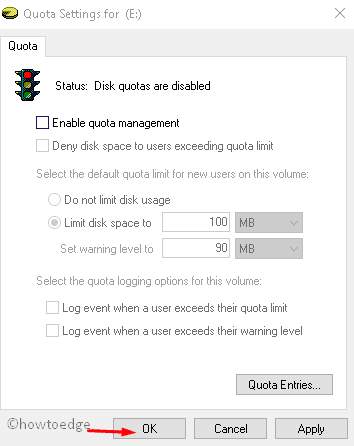
Step-3: Henceforth, jump to the Quota tab and hit Show Quota Settings option. See the Snapshot below-

Step-4: On succeeding page, mark the check-boxes Enable quota management and Deny disk space to users exceeding quota limit.
Step-5: In case, this is your first time, set the space limit that you want to occupy on HDD. To do this, click Limit disk space radio button.
Note: You may get a warning message when space reaches near to the off-limit. This is applicable only if you have put any value inside Set warning level to option.

Step-6: Once the setup is changed, click Apply and OK to confirm the changes.
Step-7: At last, Restart your computer and enjoy the quota limit on your Windows 10 PC.
Disable Disk Quota using File Explorer
You can also disable the disk quota or mention space on the same page. To perform this, just un-check the following check-boxes that you have turned ON previously.
Enable disk quota management
Limit disk space
Set warning level

Once you run the above codes, click OK and Reboot your PC to save the recent changes.
2. Enable Disk Quota using Command Prompt
Alternatively, you can also set the disk quota using the Command Prompt just following these simple steps-
- Click on the Search icon and type cmd in the text box.
- Right-click on appeared Command Prompt option thereupon select Run as Administrator.
- Further, you will receive the UAC prompt, press Yes to permit the access.
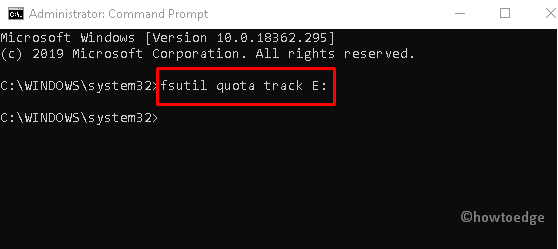
- Now type the following command line to turn on the disk quotas. Make sure to press the Enter key at the end.
fsutil quota track <drive letter>:

Note: Here, put the NTFS drive name under <drive letter> section where you want to set the disk quotas. For eg: fsutil quota track E:
- When the code executes, close the elevated prompt and Reboot your computer.
Disable Disk Quota using the Command Prompt
To dislocate the disk quota to a specified NTFS volume, follow these steps-
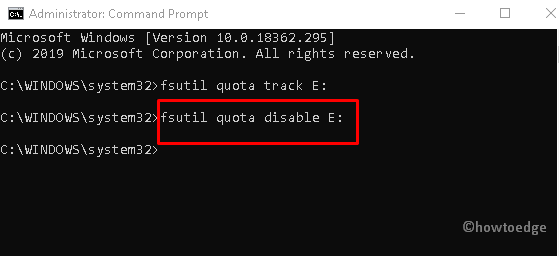
- At first, open the Command Prompt (Admin) and execute the below code-
fsutil quota disable E:

- Once this runs successfully, Reboot your computer and see the changes.
3. Enable and Disable Disk Quota using Local Group Policy Editor
Group Policy Editor is an enhanced feature on Windows 10 Pro, Enterprise, and Education editions. This tool also provides the option to set the Disk Quota on your PC. Let’s see how to do-
- Press Win & E jointly to launch the Search menu.
- In the text area, type Group Policy Editor and click the same result.
- If the User Account Control comes into view, click Yes.
- Next, navigate to the following address-
Computer Configuration\Administrative Templates\System\Disk Quotas
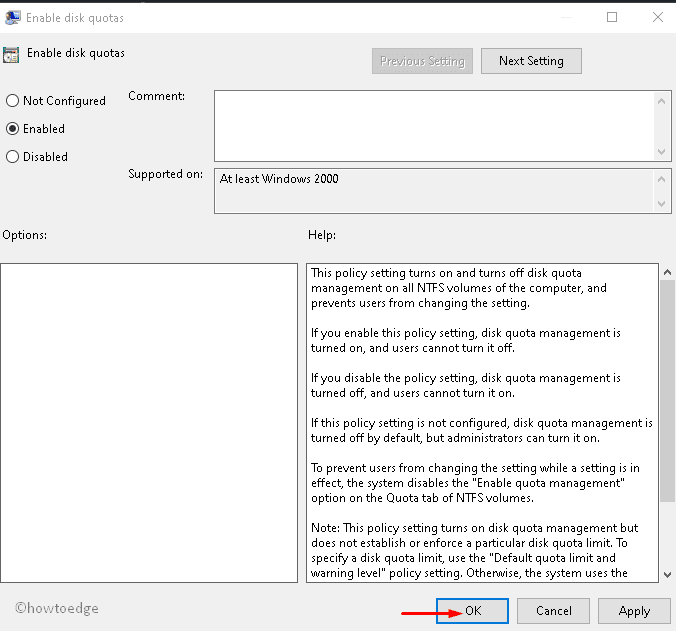
- Henceforth, open the Enable disk quotas policy option.

- There are three sequential radio buttons available here, select any as per your requirement.

The options are as follow-
- Enable – This will set the disk quotas for all NTFS volumes and users can’t disable this.
- Disable – This is by-default turned on, so just avoid this tool.
- Not configured – When this option is active, the disk quote remains disabled. However, Admin does have the authority to change it.
Once you change the setup, tap OK. At last, close the Policy Editor and Reboot your computer to refresh the changes.


