As we all know, the Settings app plays a crucial role in day-to-day activities on Windows 11, one doesn’t like this app opening or running very slowly. When this happens, it not only slows down your system performance but also prevents Windows updates from happening pretty smoothly. As a result of this, your system continues degrading and a time comes, when your device is no more useful.
To prevent such things from happening, Microsoft allows its users to reset or re-configure the Settings app from time to time on Windows 11. If you are interested in resetting or reinstalling your Settings app, follow our two easy methods. The first one suggests ways to reset this built-in application right from its interface while the other performs reinstalling of this application.

How do I Reset the Settings app on Windows 11?
If the Settings app is not working effectively on your Windows 11 PC, resetting it might resolve the underlying causes. When you reset this system app, all the recent changes on it will be lost and you need to re-configure the installed apps.
Follow the below instructions on resetting this built-in app on Windows 11 –
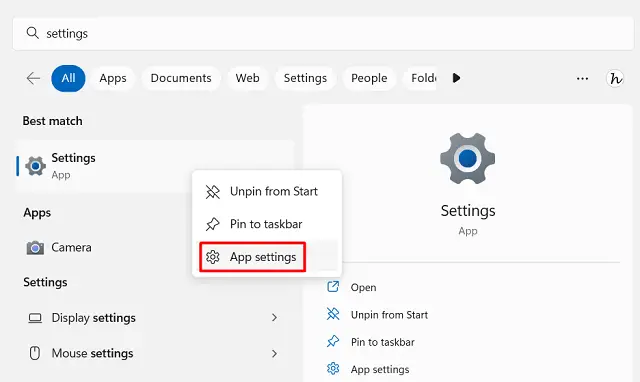
- Press Win + S to launch Windows Search.
- Type “Settings” on it and right-click on the top result i.e. Settings.
- Choose the “App settings” option from the context menu.
- The System will redirect you to the below path –
Apps > Installed apps > Settings

- Click once on Terminate and check if the Settings app starts working now.
- If the problem remains as it is, re-visit the above section, and this time hit the Repair button.

- When you choose to repair the Settings app, all its data remain intact.
- In case the Settings app is still not working, you may go for resetting it. Do remember that when you click on this button, all system app settings will be lost forever.
If the Settings app continues to load slowly, you should try uninstalling and reinstalling this app via the Terminal.
Note: PowerShell lets you reinstall the Settings app from its interface. Since there isn’t a button available to uninstall the Settings app on Windows 11, you should go for the PowerShell method.
How to Reinstall the Settings App via PowerShell
If the above method fails to reset your Settings app on Windows 11, you should definitely uninstall and reinstall this application using PowerShell. Here’s how to perform this task –
- Press Win + X, and select Terminal (Admin).
- When the UAC window prompts, hit Yes.
- The terminal will default land into Windows PowerShell having admin rights.
- Copy/paste the below cmdlet on it and press Enter –
Get-AppxPackage *Windows.ImmersiveControlPanel* | Reset-AppxPackage
- Wait for this command to run successfully and once it completes, you will find the Settings app reset to its default values.
In case you would like to reset all system app settings to their default states, you should run this command as well. This code will reset all applications including the Settings app to their original settings. Make sure to close all built-in apps before you execute this command –
Get-AppXPackage | Foreach {Add-AppxPackage -DisableDevelopmentMode -Register “$($_.InstallLocation)\AppXManifest.xml”}
- After you execute this command successfully, restart your PC. Doing so will delete any leftover or residual files and the Settings app come back to its original state.
During this resetting process, Windows PowerShell will fix any issue existing within the Settings app or other apps running on your computer.
Is the Settings app different from Control Panel on Windows 11?
Whatever purposes the Control panel handles on earlier versions of the Windows operating system, the new Settings app does that better. In short, both works in similar ways, with Control Panel being the traditional option and the modern approach is by using the Settings app.
I hope you do enjoy knowing how to reset the Settings application on Windows 11. The PowerShell method works for earlier versions as well, like Windows 10 and version 8.1.


