HomeGroup is the unique characteristic on an earlier version of Windows like- 10, 8.1 and 7. This aids users to share files or printers under the network area. With the onset of Windows 10 version 1803, Microsoft discontinues this attribute and hence you can no longer avail of this facility to share files and printers on Windows 10. Today, we have brought some alternate ways to carry out the sharing operation under the Local Area Network.
Share option, OneDrive, and File Explorer render enhanced features to transfer documents or printer under local area without HomeGroup. Here, in this blog post, we have focused on how to connect printers to the older versions of OS (Windows 10, 8.1 or 7) to client PCs. In addition to this, we will approach four different ways to troubleshoot shared folder access issues. In the end, we will see how to connect more than one device to the same Printer. Let’s explore these functionalities in detail-
- Share files using Share
- Share files using OneDrive
- Sharing folders using File Explorer
- How to access the shared folder
Methods to share files and printers on Windows 10 lacking HomeGroup
Here, are some useful ways to share files and printers on Windows 10 PC that lack a HomeGroup feature.
1. Share files using Share
Share is an inbuilt characteristic on Windows 10 that helps to send any files/folders over LAN. Here is the complete procedure-
- Press Win & E hotkey together to launch File Explorer.
- Navigate to the specific location and select the files that you want to share.
- Henceforth, tap the Share tab on the menu bar and hit the Share button.
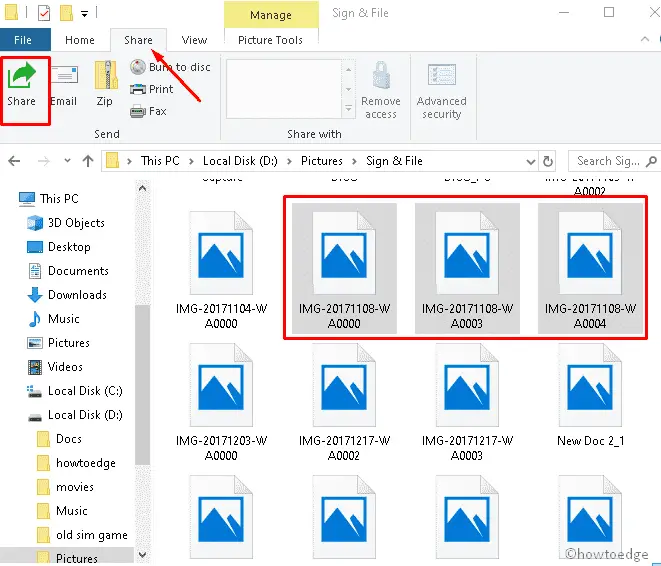
Note: Alternatively, you can also do the right-click after selecting files and choose the Share option on the context menu.
- Thereupon, choose any app using which you want to share these files.
- You can even select a specific app using your Microsoft Account, scroll down and hit Get apps in Store option.
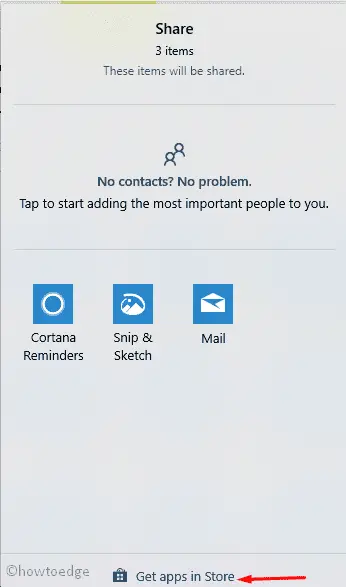
- Succeeding after, follow the on-screen instructions to complete sharing files or folders.
Note: Make sure that the location on your PC is enabled to let complete the sharing process.
2. Share files using OneDrive
Similar to the above method, OneDrive provides the option to share your documents. Here are the steps to follow-
Step-1: Go to the right pane on the system tray and click on the OneDrive icon.
Step-2: When the app opens up, sign in using the login id and password.
Step-3: Subsequently, launch File Explorer and select the files which you want to share.
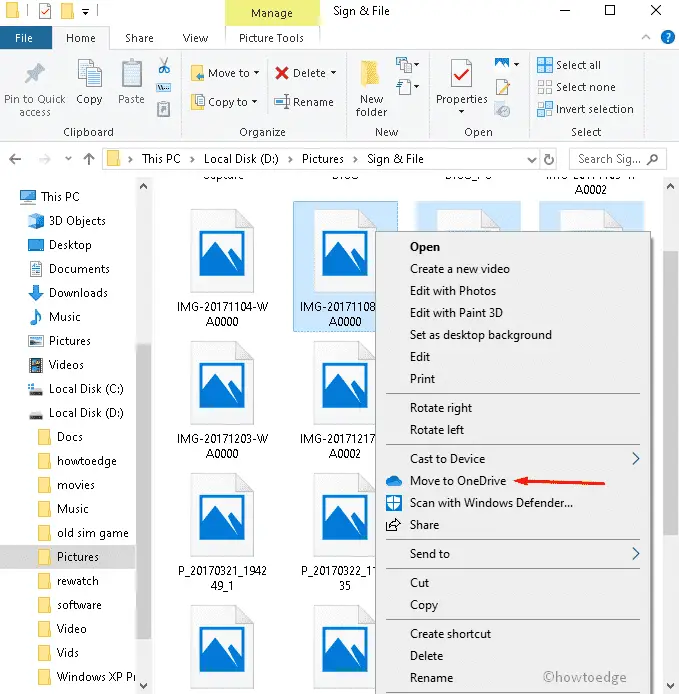
Step-4: Make a right-click and choose Move to OneDrive option using the context menu.
Step-5: Once again you are required to right-click on highlighted files and choose to Share a OneDrive link. See the Snapshot below-
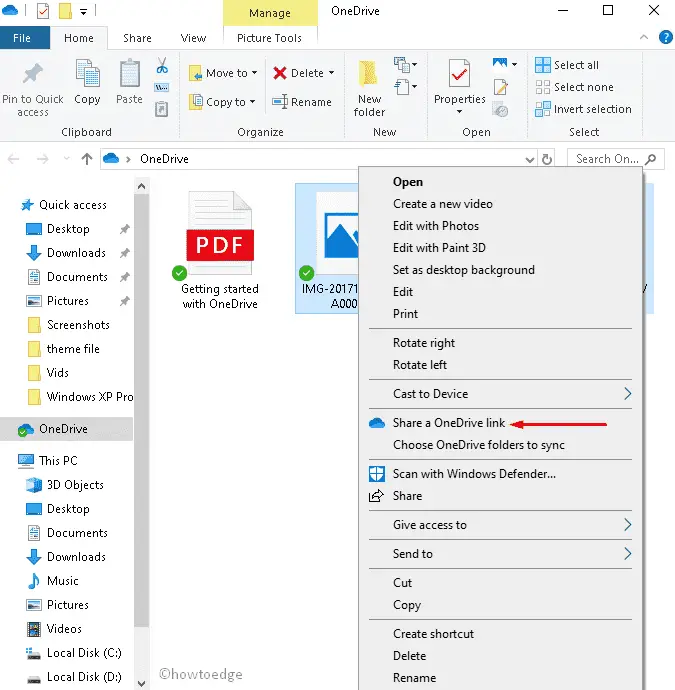
Note: You will see the Confirmation message “the link of the shareable file is created on clipboard”.
Step-6: Henceforth, open OneDrive and click the ellipse icon next to the file and choose the Share option.
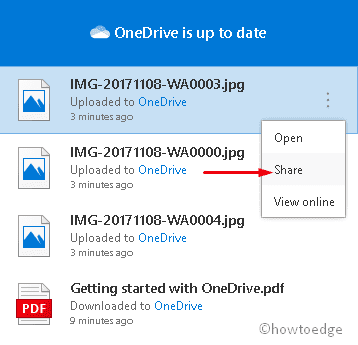
Step-7: From the succeeding window, tap the Share button and send the selected files to your desired location like email, social media or any other specific app.
Once the beneficiary receives the link, you will too get the notification even if you are offline.
Customize sharing options with OneDrive
The customize sharing feature allows users to access the contents of items. You can also edit, set the entry code or expiry date of selected items to receive the items. Here is how to proceed-
- Go to Cortana and type OneDrive in the search box, click on the well-matched result.
- Thereafter, right-click on the files/folders and choose More OneDrive sharing options.
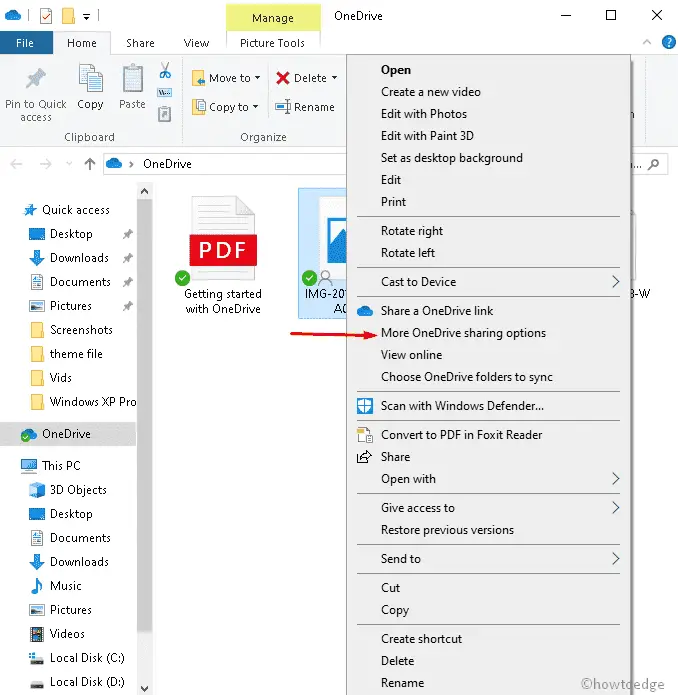
- Now, change the preference such as allow editing, set expiry date, password and tap Get a link option.
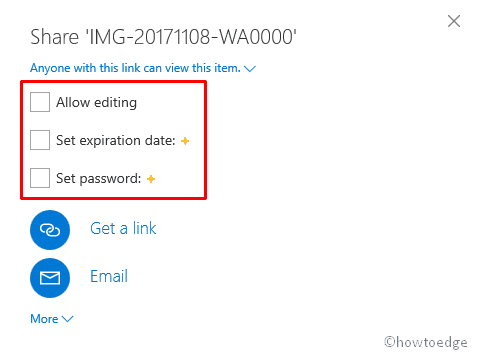
- Here, tap the Copy button to upload the link on the clipboard.
- Do the right-click and paste the saved link to share the resources through email, social media, etc.
After you finish the above steps, the receiver can access these files even if the PC is offline.
3. Sharing folders using File Explorer
Users can transfer files using File Explorer as well. This is no doubt an easy approach to share items to the client PCs. Below are the steps to follow-
- At first, open File Explorer and reach out to the files or folders that you want to share.
- Now, select the specific items and right-click on the combination.
- Henceforth, select Give access to option followed by Specific people on the Sub-menu. See the Screenshot below-
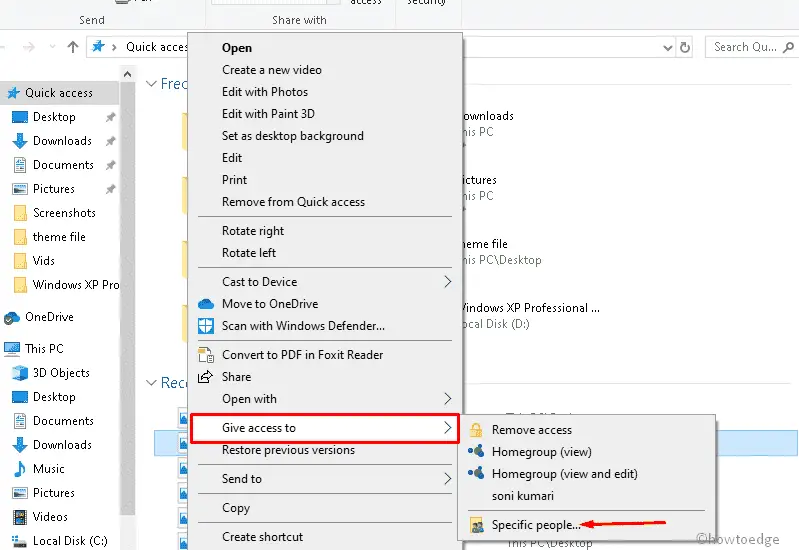
Under Network access window, tap the drop-down menu and select any one of the choices available there-
| 1. |
Local users | This one is a more private option to access the file. Sender and Receiver both must use the same credentials to get the shared contents. |
| 2. |
Everyone |
Using this option, you can share items over the network area without any passcode so that anyone can access these files. |
Note: There is yet another interesting feature “To create a new account” under the drop-down menu, however, this won’t work. This is because Windows 10 doesn’t permit you to make a new account using the Control Panel.
- Afterwards, do the click on the Add button and switch permission level section.
Now select the drop-down menu under Access privileges category and select any of the following options-
| 1. | Read | After selecting this option, you can only open the file in reading mode. You can’t modify, upload or create a new folder or a file. |
| 2. | Read/Write | This option allows you to change the sharable contents such as open, modify, delete, upload, and create new files and folders. |
| 3. | Remove | This will prevent users from accessing any shared items. |
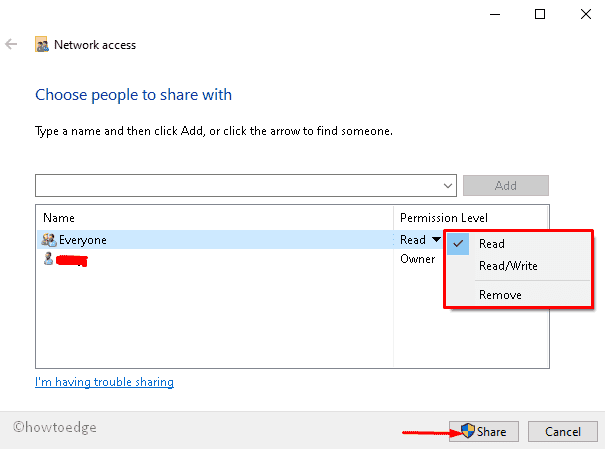
- Now, tap the Share button to go ahead.
- Further, right-click on shared folder address and choose Copy Link.
Once you finish the task successfully, you will be able to share files and printers to any network users on Windows 10.
How to access the shared folder
To access contents of the shared folder, you need to follow below steps on your Windows 10 PC-
- Go to the File Explorer app and copy the path of the shared folder.
- Under the address bar, paste the destination location and hit Enter key to find out the shared items.
- Alternatively, select the Network icon from the left pane on File Explorer and navigate to the shared files or folder’s contents.
- When the sharable item is under networking, you can access these contents only if your PC is turned On and remains connected to that network.
Note: To access the sent items, Sender and Receiver must sign in using the same credentials (User name and Password).
Troubleshoot shared folder access
When you try to send the resources under the home area, sometimes it may fail to do so and deny access. This might be due to different reasons like – receiver computer could not identify the system’s IP address, Network Profile is set as public and Firewall doesn’t allow to share files or printer. Let’s follow the troubleshooting guide below to fix such issues-
1. Identify TCP/IP address
When the receiver system doesn’t recognize your IP address, the data failure may occur on your system. So you need to identify the computer Internet Protocol address and replace it on the network settings. Here is how to do-
- Click on the start and select Settings using the Power menu.
- On the new window, select the Network & Internet category.
- Again on succeeding window, tap the Ethernet or Wi-Fi from the left column.
- Switch to the right pane and select your network connection.
- Now scroll the cursor down to reach out to the Properties section.
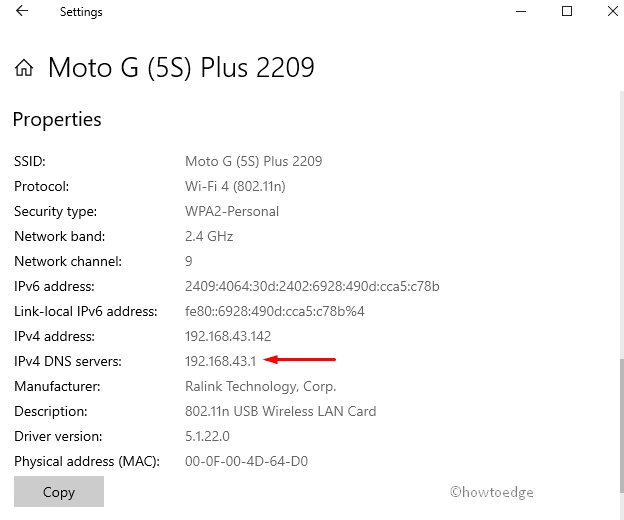
- Here, note down the IPv4 address and replace the computer name with IP address in the network path.
Once you change the location, the destination path resembles //192.168.43.142/ShareOne.
2. Set network profile to private
Sometimes, the network profile set to the public may also arise similar issues while allowing data access on connected PC. In this case, it asks for certain credentials while accessing the documents. Setting a network profile to the public (discussed below) will help you to encounter this bug.
- Press Win logo and I hotkey together to open Settings.
- Here, select Network & Internet followed by Ethernet or Wi-Fi on the left column.
- Switch to the right-hand side and click on the network connection.
- Now, activate the Private radio button under the Network profile section.
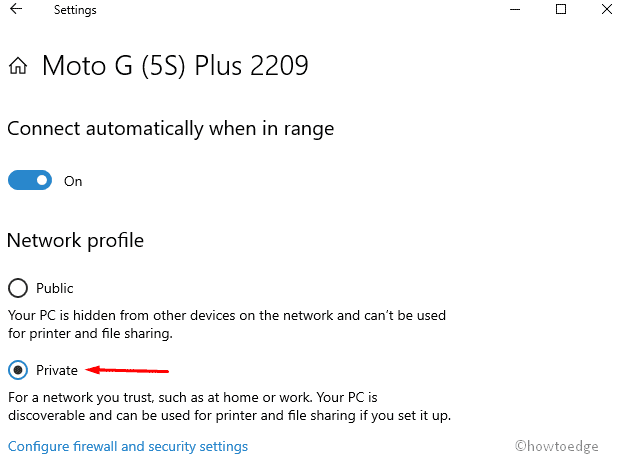
After finishing these steps, you can easily share files and printers to any other Windows 10 System under home area.
3. Allow files and printer through a firewall
Usually, the Windows firewall is set as enabled. This can also block certain characteristics of your PC like- receipts won’t access files/folders under the network area. To fix this trouble, you should disable this Firewall momentarily by going through these simple steps-
- Go to the right pane of System tray and select Windows Security.
- Henceforth, select Firewall & network protection followed by a Private network on the next screen.
- Here, disable Windows Defender Firewall toggle switch.
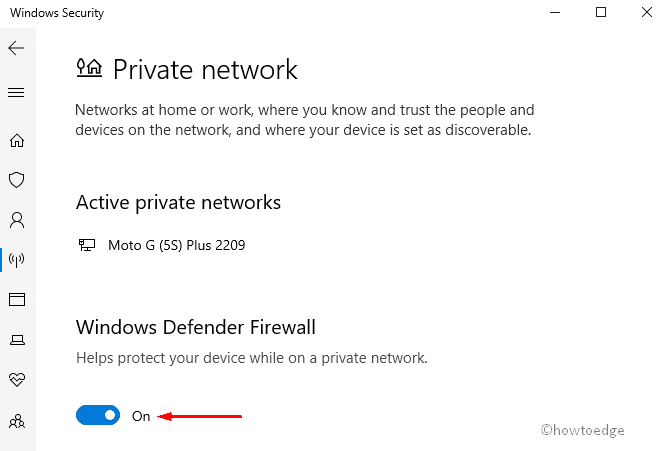
- If the confirmation dialog appears up, click Yes to authorize.
Now you can try to open a shared file/folder under the network area, hope you can do this easily.
Note: To enable the Firewall once the issue gets solved.
4. Open firewall ports to share file and printer
Follow these easy steps to authorize file and printer sending data to other System-
- Go to Start and type Windows Security, click on the well-matched result.
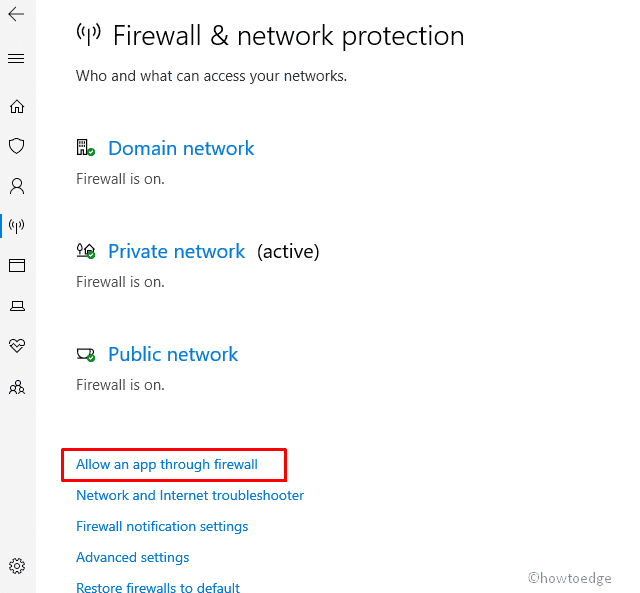
- Here, select Firewall & network protection followed by Allow app through firewall feature.
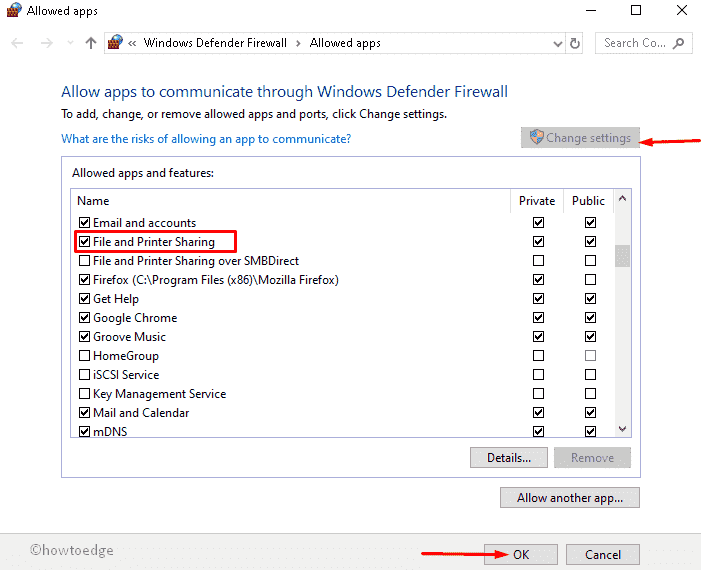
- This will launch the Allowed apps window, tap Change settings button here.
- Thereupon, mark File and Printer Sharing checkbox and hit OK option to save the changes.
Once the above procedure is over, you will be able to share data under the network area without any hassle.
Note: If you are using a third-party firewall, you should disable them to get rid of this issue.
Share printers without HomeGroup on Windows 10
As Windows 10 doesn’t support HomeGroup, this becomes really difficult task to share printer under network area. Here, we have explained an easy way of the print server to allow such a process. Here are the steps to follow-
- Right-click on Windows and select the gear icon (Settings) on the left pane.
- When Settings window appears, select Devices thereafter Printers & scanners from the left column.
- On its corresponding right pane, select the printer that you want to share and hit the Manage button.
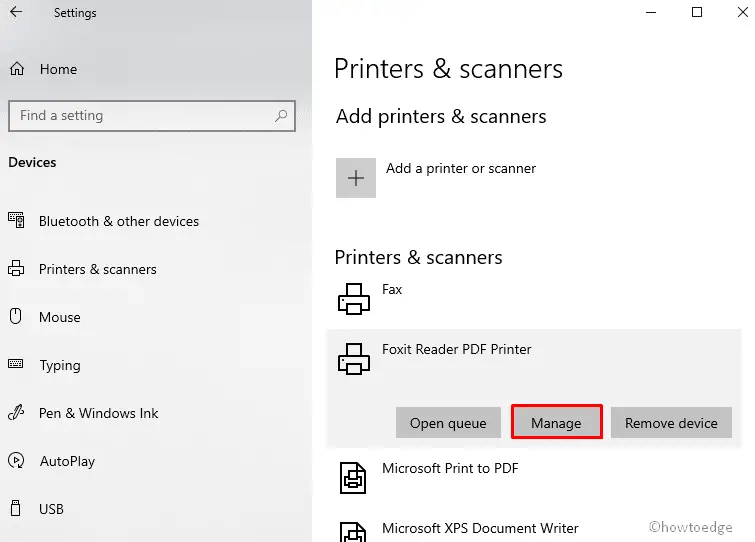
- Next, do the click on the Printer properties link to go ahead.
- Here, under the Sharing tab, activate Share this printer checkbox.
- Type the name of the printer at the void against Share name.
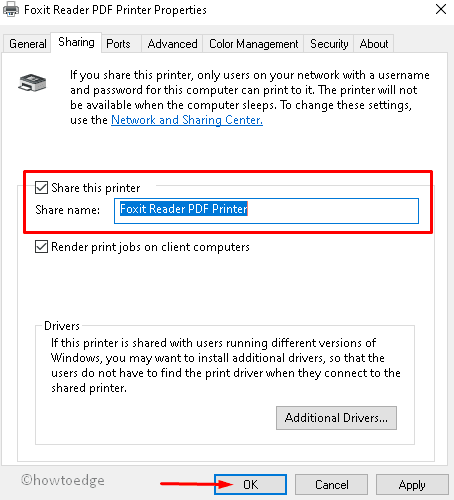
- At last, click Apply and OK button to confirm the changes.
After completing the above task, you can share the printer when the PC is turned ON.
Important: If your printer is connected to a print server, we recommend you to use this method to connect devices.
How to connect devices to the shared printer
Building client relations with the printer on Windows 10 PC is very easy. This helps you to share data easily to the connected devices. Here’s how to proceed-
- Open the Settings app and choose the Devices category.
- On the left column, choose Printer & scanners and switch to the corresponding right side.
- Now click on the plus symbol (Add a printer or scanner) there forth choose the printer from listed devices to add the same.
- In case, printer discovery is malfunctioning, click The printer that I want isn’t listed option.
- Subsequently, check the Select a shared printer by name radio button and type the full path of the printer.
For eg: \\xxx.xxx.xxx.xxx\PRINTER-SHARE-NAME
Here xxx.xxx.xxx.xxx is the IP address or computer name and PRINTER-SHARE-NAME implies the device which you want to connect.
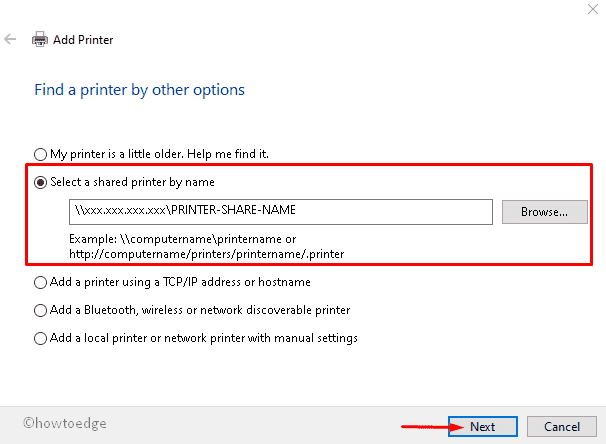
Note: If you want to see the location of the share printer, click the Browse button to find the same.
- Now, select Next to proceed followed by Install driver button to install the respective driver.
- Hit the Next option again to Finish the above task.
That’s it, you can now try to share the data without getting printer sharing issue.
How to connect the printer on older PCs
Normally connect printer to older version of Windows 10, 8.1 or 7 is quite different. Here, we have explained the connecting process on initial Windows version-
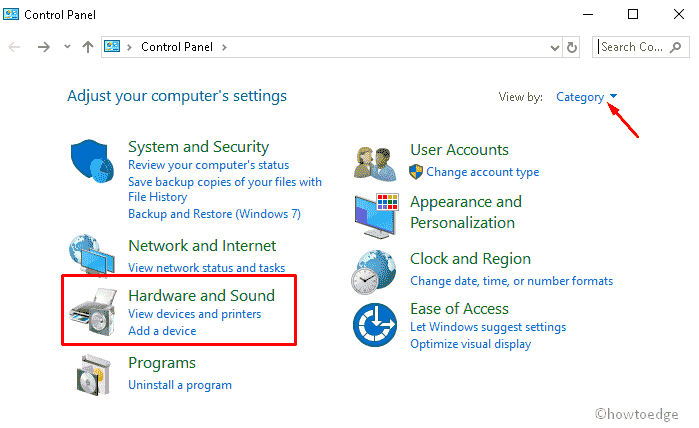
- Go to Control Panel and select category in View by option. See Snapshot below-
- Now, go to Hardware and Sound section thereafter hit first option View Devices and Printers.
- On the next window, tap Add a printer option as shown below and wait till the system identifies the printer.
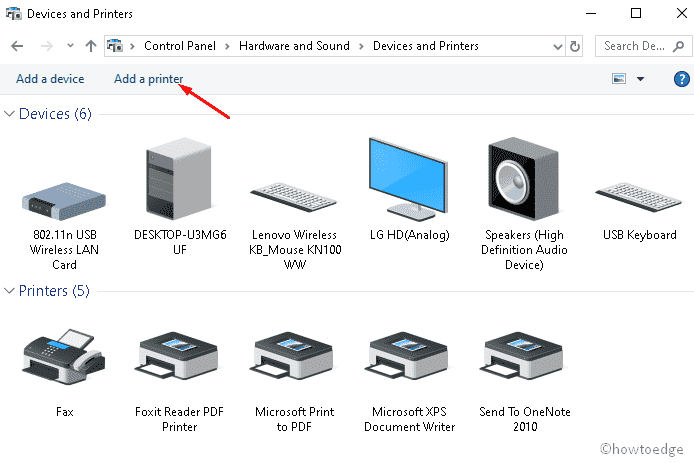
- In case, the PC doesn’t discover any printer, click The printer that I want isn’t listed link.
- On the succeeding window, check to Select a shared printer by a name radio button.
- Here in the void, type the computer name/IP address and printer name that you want to share.
- Scroll down and hit the Next button to proceed.
- Henceforth, tap Install driver option followed by Next.
- At last, tap the Finish button to confirm these changes.
When the task is over, you can share your printer with any connected device.
Note: Keep in mind, you can only share your data when your system is currently operating. If the PC is in sleeping, hibernating or power off mode, you can not avail of the facility of the shared printer.


