You must have come across the word “DNS” while browsing different sites online. This even is more applicable when you are on a device that opens websites quite slowly. The first thing that comes to our mind is that there must be some issue with the computer itself. So, we start looking into the reasons that might have bogged down your PC.
Well, a slowed-down computer might also be an indicator of “Your ISP-provided DNS servers are down or are not working effectively“. In this guide, we will discuss what exactly is DNS (for beginners), how it works, and how you may Change DNS Settings on your Windows 11 PC. We will also talk about some of the fast. reliable, and secure DNS servers you may opt for to boost up your network speed.
What is a Domain Name System (DNS)?
DNS is basically a mapping of all IP addresses available worldwide to their respective domain names. Whenever you type a domain name and press Enter, you are guided to an IP address containing all the related information. This way, you don’t need to remember the complex numbers to access any site(s). To put it simply, you may think of DNS as the phonebook of the internet.
When queried upon, DNS will take you to the IP address that is coded inherently to a domain name. It functions through a wide array of DNS servers that are there to answer your online queries.
How to enable DNS over HTTPS (DoH) in Google Chrome
Why should one change the DNS Settings on Windows?
Before we learn how exactly one can assign a new DNS on his/her PC, let’s know the reason why it is required. The default DNS server provided by the ISP is sufficient to handle our queries. However, at times, you may experience issues accessing a particular site or get an error message – “DNS Server could not be found“.
If you do get such messages while connecting to the internet, you may opt to switch to a better DNS provider. There are dozens of free DNS servers that you may go for. We have included a list of four DNS servers that are free, secure, and reliable. Now that we know why changing DNS servers is required, let’s learn how to go for this in the below section.
How to Change the DNS settings on Windows 11
If you are willing to change the default DNS settings on your Windows 11 PC owing to the reasons listed above, do the following –
- Press Win + I first to launch Settings and select Network & Internet.
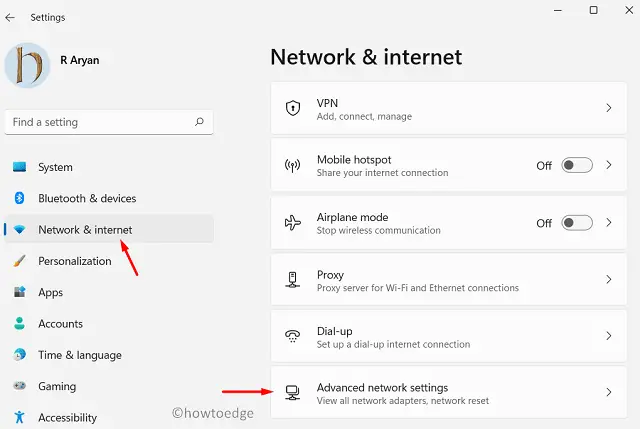
- Head over to the right pane and click Advanced network settings.
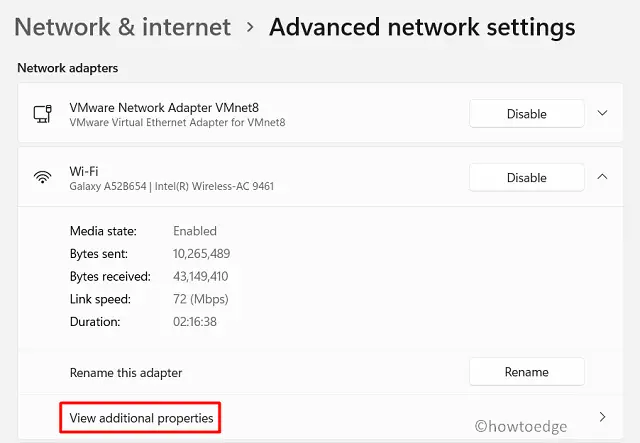
- Select the Network from which you are accessing Intenet. For example, if you are using a WiFi connection, hit over the option – “Wi-Fi“. In case you are using an ethernet connection, select that instead.
- Click on the Edit button next to the DNS server assignment.
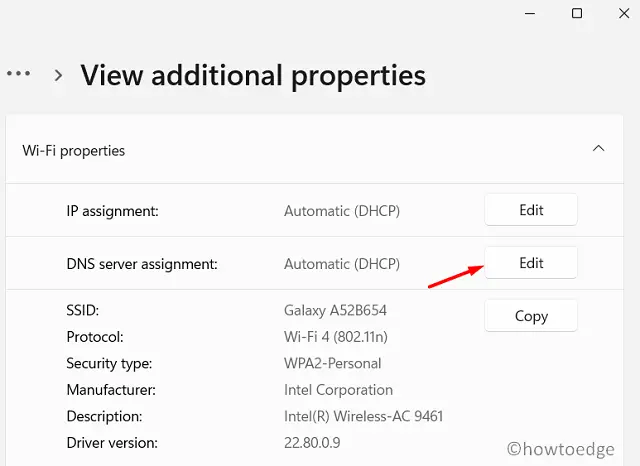
- Use the drop-down menu and select Manual.
- Enable the IPv4 radio button, and fill in the following –
Preferred DNS
Alternate DNS
- You may choose in between the following DNS numbers from Cloudflare, Google, or OpenDNS.
Cloudflare: 1.1.1.1 and 1.0.0.1
Google: 8.8.8.8 and 8.8.4.4
OpenDNS: 208.67.222.222 and 208.67.220.220
Quad9: 9.9.9.9 / 149.112.112.112
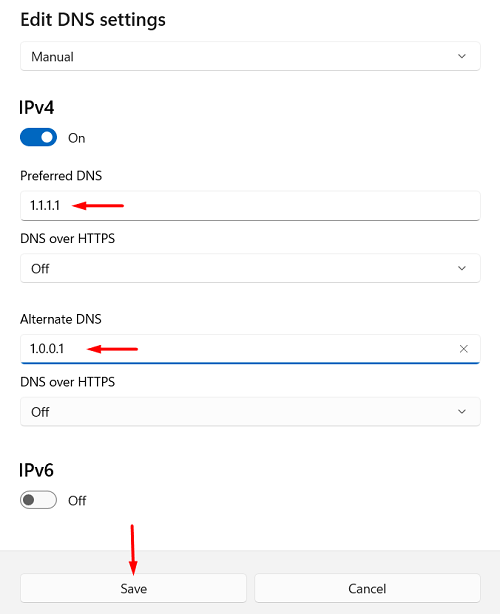
- In each category, you will find two DNS numbers that you may use as Preferred DNS and Alternate DNS.
- Click Save to confirm this configuration and restart your PC.
Sign back into your device again and connect to your Ethernet/WiFi. The new DNS address will now start working on your computer.


