Thumbnails are small image previews that appear in File Explorer, and allow you to quickly identify the contents of files and folders. Despite thumbnails usually functioning properly, there are instances where File Explorer may fail to display them correctly or not show them at all.
This issue often arises due to corruption in the thumbnail cache database. This database is located in the ‘Explorer’ folder within the ‘AppData’ path. Thankfully, you can quickly resolve this issue on Windows 11 by simply clearing the “thumbnail cache”. In this post, we have come up with four working methods which are well-elaborated in the below section.
How do I Fix Thumbnail Corruption Issues in Windows 11?
If you are facing problems viewing thumbnails inside File Explorer, this must have occurred due to corruption in the thumbnail cache database. To solve this issue, you have four different options using which you may clear the “thumbnail cache” and they are –
By following these easy fixes, you may purge and recreate the thumbnail cache, ensuring accurate and hassle-free thumbnail displays. Let’s learn all these methods in detail –
1] Purge Thumbnail Cache in Windows using Settings
In Windows 11, Settings provide an easy way to clear the stored thumbnail cache. Here’s how to perform this task –
- Open the Settings app by pressing Windows + I.
- Inside the Settings app, locate and click on the “System” category.
- Go to Storage > Temporary Files next, and you will find the Thumbnail section here.
- Deselect any current item selections to ensure only the thumbnail cache is selected.
- Check the box next to “Thumbnails” to indicate that you want to clear the thumbnail cache.
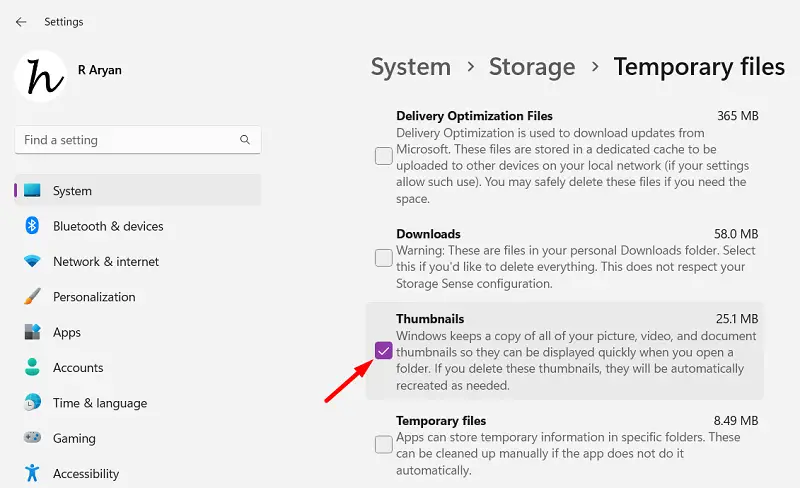
- Finally, click on the “Remove files” button to initiate the clearing process.
Once you have completed these steps, Windows 11 will automatically recreate the thumbnail cache database, which should resolve any thumbnail display issues you were experiencing before.
2] Clear Thumbnail Cache using Disk Cleanup
Disk Cleanup is an in-built tool on Windows 11 that you can utilize to find and clear all thumbnail cache at once. Here’s how to use this tool –
- Press Windows + S, and type “Disk Cleanup” in the text field.
- By default, this will autoselect “C:\“. If the root drive differs on your PC, select the same using the drop-down menu, and click OK.

- Deselect any current item selections, and check the “Thumbnails” option.
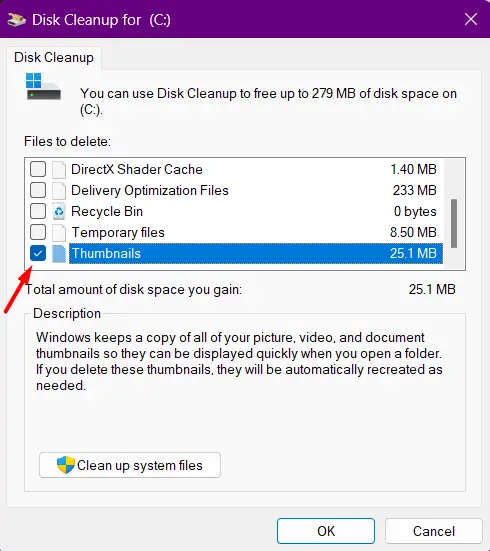
- Click OK and wait for a few seconds.
After you complete these steps, the thumbnail cache will auto-delete from your system. Restart your system and you will find a new database of thumbnails appearing on your Windows PC.
3] Purge Thumbnail Cache from File Explorer
File Explorer is the place where all your thumbnail caches are actually stored. So, you may also use this system app to view or even delete these cache files.
Note: This method is applicable only when you have the thumbnail feature enabled in File Explorer. If this feature has been disabled, make sure to re-enable it first by navigating to Options > View, and deselecting the “Always show icons, never thumbnails” checkbox.
![]()
Follow these instructions to purge the Thumbnail cache using File Explorer –
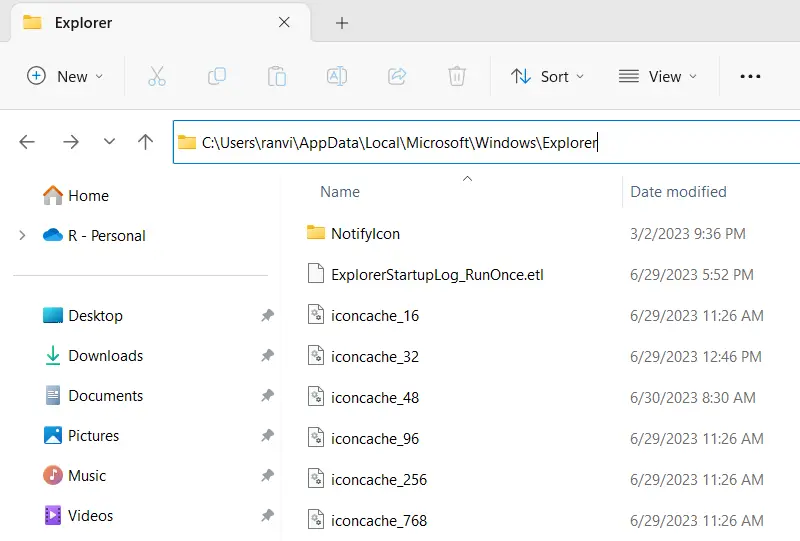
- Press Windows + E to launch File Explorer.
- Inside File Explorer, copy/paste the below path on its address bar, and press Enter –
%HOMEPATH%\AppData\Local\Microsoft\Windows\Explorer
- Go to the View menu next and select Show > Hidden items.
- Type the search term “thumbcache_*” in the search box and press Enter.
- You will see a list of files appearing with some unknown file extensions.
- Use Ctrl + A to select all items, and then press the Delete key on your keyboard.
That’s it, you have successfully cleared all thumbnail caches from your system. Restart your PC so that a new set of thumbnails appear on your computer from the subsequent login.
4] Purge Thumbnail Cache using CMD
Command Prompt offers an easy way of clearing all the caches inside Windows 11 with a few commands. On top of this, running these codes is quite easy, especially when you know what exactly are you doing. Let’s learn how to clear the thumbnail cache in Windows 11 using CMD –
- Launch Command Prompt as administrator first.
- Copy/paste the following command, and press Enter. This will stop all File Explorer processes from running.
taskkill /f /im explorer.exe
- To delete the current thumbnail database inside File Explorer, run this code next –
del /f /s /q /a %LocalAppData%\Microsoft\Windows\Explorer\thumbcache_*.db
- Wait for a few seconds and then restart File Explorer by running this command –
start explorer.exe
After you complete the above steps, all stored cache in the form of thumbnails will be removed from your Windows 11 PC.
Conclusion
In this guide, we learn how to clear the thumbnail cache in Windows 11. Whether you prefer using the Settings app, Disk Cleanup, File Explorer, or CMD, we’ve got you covered.
I hope you are now able to resolve the thumbnail issues by following either of the four solutions discussed in this post. Do note that the thumbnail database will create automatically when you restart your computer.