Several users complained of fast battery drainage on their Windows 11 PCs. We all know the importance of a battery on computers, especially on laptops. So, if you are facing low battery levels too frequently on your device, we suggest you enable Battery saver on Windows 11.
When enabled, this feature enhances the battery life by reducing the overall power consumption. This does so by disabling certain apps that are rarely or never used. Enabling Battery saver even stops background processes like sending emails, accessing OneDrive, etc. If you are still interested in turning On this feature, read and apply the steps outlined below. how

Read Also: How to make your Windows 10 fast and Efficient
How to Enable Automatic Battery Saver on Windows 11
Windows 11 users may configure the Battery Saver setting in such a way that it turns On automatically. If you do want to enable this feature on your computer, do the following –
1] Turn ON Battery Saver on Windows 11
If you want to just enable the battery saver on your Windows 11 PC, follow and apply these steps –
- Press Win & X and select Settings.
- Go to the System tab, and hit Power & battery on its adjacent right window.
- Scroll down to the Battery section and click to expand Battery Saver.
- Click “Turn on now” next to Battery saver.

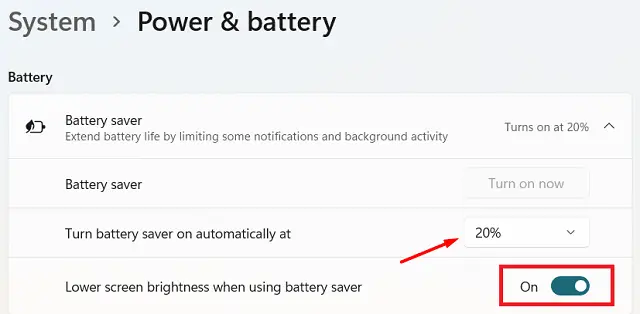
- Ensure enabling the toggle switch “Lower screen brightness when using the battery saver” so that your display screen dims whenever your device enters this mode.
Note: Enabling Battery saver serves two purposes and they are –
- Improves Battery longevity
- You get extra time to finish your important work which otherwise might go unsaved.
2] Tweak battery saver settings to start it automatically
By following the above guideline, one may easily turn On or Off the Battery Saver settings on his/her computer. If you go back to the Battery section, you may see there’s a drop-down menu just below it. This is by default set to 20%. As soon as your device battery percentage drops below 20%, the battery saver enables.
What if you want to launch this feature at some higher percentage, keep it enabled always, or never use this feature. Well, you may do so by clicking the drop-down menu and choosing in-between the available options. Let’s see how you may enable this setting on your Windows 11 PC –
- Open Settings using Win & I shortcut.
- Select System > Power & battery.
- Under the Battery section, click Battery saver.
- Now, use the drop-down menu just below it and choose in between the available options.

- Make sure to keep the “Lower Screen brightness when using battery saver” toggle switch as it is.
That’s it, the battery saver will turn On automatically whenever the battery percentage drops the selected value.
How to disable Power Saving Mode in Windows 11?
If you no longer want your device activating the power saving mode, do the following –
- Right-click on the battery icon available on the taskbar and select “Power and sleep settings“.
- On its settings page, click to expand Battery saver and hit “Turn off now“.
Note: “Turn On now” and “Turn Off now” buttons are greyed out when your device is connected to a power source. So, don’t make any changes while the power cable is drawing electricity and is plugged into your computer.
Battery usage on Windows 11, how to view it?
Battery usage is a nice feature on Windows 11 that explains applications-wise battery consumption on your computer. This even displays a bar graph stating the time for which the screen was On, Off, or under Sleep. One may view battery usage by reaching out to the following location –
Settings (Win + I) > System > Power & battery > Battery usage
- Once you are there, click on it to view all available data under it.

I hope by now you do know how to enable or disable Battery Saver on Windows 11 PC. Let’s know if you face any issues or difficulty following this tutorial.


